Fold along perforations of two layers of
uniquely-folded hexagonal shapes which
form base to arrange 6
folded points
radiating from center. This creates a hanging ornament
for interior decor or
as window-hanging sun catcher.
Cut from opaque vellum so that the layers create
gradations of color values.
Top point includes hang hole for narrow ribbon or
twine.
Snowflake measures approx. 5.5” wide x 6.3” tall
when fully assembled. (Enlarge as desired).
Since liquid adhesive is likely to cause warping
of vellum as it
dries, use ONLY dry “dot” style
sticky tape in carefully placed locations.
ASSEMBLY 1. Identify and cut the shapes:
A bottom layer that creates outer points
B hexagon layer that creates middle "pie" layer
C points: regular (5) and top with punch hole (1)
This snowflake was sized to make use of 8.5x11" vellum
sheets, the most readily available. All required shapes
for one snowflake of this size can be cut from 2 sheets.
On one of the sheets, this is now the A shape and 4 points
are laid out.
gently lift the shapes from a "used" cutting mat,
taking time at angle cuts and narrow points so that
tearing is avoided. Below, a spatula tool is slid under
the inward angle to support it as it is separated
from the cutting mat.
2. Prepare the middle shape by carefully
bending and creasing the side flanges of each point
inward, first one side . . .
. . . then the second side, until the edges meet at
the center of the point. Fold all points in this manner.
3. Once side flanges are folded inward, carefully
bend the point inward so that the tip aligns at
the center guide hole.
4. Unfold triangle tip. Using a "dry" adhesive tape
such as this Scotch Double-Sided Tape runner,
apply a small amount at tip only, then re-fold to attach
the tip in place around center.
Repeat for all six points to create the "pie" shape.
5. Prepare the bottom layer shape by bending and
creasing the slim flanges inward, first on one side . . .
. . . then the other.
Take care that the creases extend straight and
neatly all the way to the cut point tip.
Repeat for all 6 points of the shape.
6. Open up the slim flanges and apply a tiny bit of
adhesive dot tape at the bottom widest point of flange,
then re-fold. Repeat for both side flanges of each point.
7. Prepare each of the 6 points:
A) bend the top "collar" portions inward and crease . . .
. . . first one, side then the other. Unfold collar shapes
to add adhesive dot tape under the bottom "tips" of
each end of collar shapes, then re-fold and attach
in place.
B) Fold the first complete side portion on the long
diagonal edge and crease.
C) Bend and crease the inward-most slim flange
outward, folding back on the connected portion of
the side portion - only a short attached fold here.
Then . . .
. . . fold the narrow "wing" extension on
the angled, short perforation line.
D) Repeat steps B and C for the second side portion.
E) Unfold each side section to add a small bit of
adhesive dot tape at top of narrow flange, then
re-fold and attach in original creased-to position.
F) Apply small amount of adhesive dot tape to
the underside of the outer slim flange top portion
as defined by the "wing" perforation lines,
then re-fold into position. Repeat for all point shapes.
SNOWFLAKE ASSEMBLY
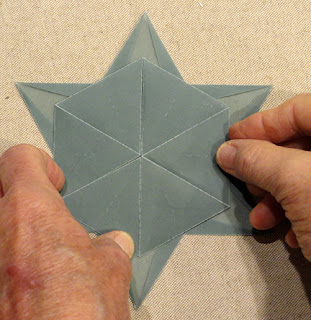
8. Turn the "pie" shape face down, then apply
a small bit of adhesive at each of the points,
and also across the center where guide hole is.
9. Place the bottom points layer face up on work surface,
then identify the point guide mark cuts just down from
each point.
With the pie layer returned to face up, position each
point above the guide marks all around. When ready
and aligned, push down into place and apply pressure
to secure all adhesive bits between base and middle layers.
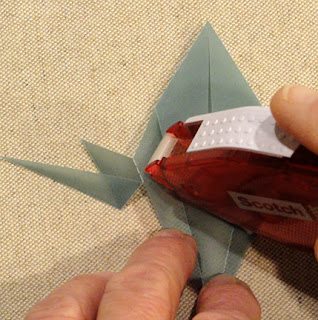
10. Apply bits of adhesive dot tape at narrow end of
first point, also along the very narrow tips all
the way to the ends. NOTE it may be helpful to use
a "catch pad or sheet" when applying adhesive tape;
remove/rub off any excess adhesive that hangs over edges.
Also add adhesive on pie layer at center of
each hexagon side edge.
11. Place inward tip of point AT center guide hole
(not beyond), with point centered between
bottom and middle layer points, and . . .
. . . with "wing" tips laying over corresponding
folded flanges of base points. Adjust as necessary,
then press to attach in place.
Re-crease as needed to ensure that all edges
are crisp and align with under layers.
12. Repeat for remaining points, to apply adhesive,
position and attach, including the hang hole point.
As desired, thread a length of coordinated twine
or narrow ribbon through hang hole, thread ends
through a decorative bead, then knot and trim
ends to form a hanging loop.


No comments:
Post a Comment