Sunday, August 18, 2024

Sunflower Checker Round Card


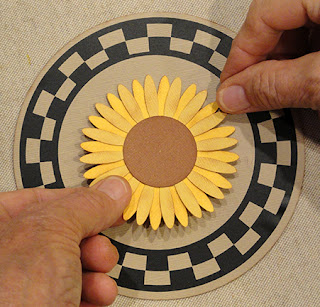
Layered sunflower is framed by circle checker
accent which can be cut from regular card stock
paper or vinyl, with centering guide marks for
flower and checker circle. 
Card back has perforated cross line near top
to bend to create a hinged easel style card
that can stand. 
Card measures approx. 5.25" in diameter.
A companion square envelope is also
available to enclose for giving or sending.

ASSEMBLY: 1. Identify and cut the shapes:
A card front base
B card back base with near-top perforation line
and short flat cut along bottom edge for standing.
C-F sunflower petals and center circles
G checker sections (model uses black vinyl)
2. If using adhesive vinyl, cut, weed, then use clear
transfer adhesive sheet to prepare the checker unit
for placement. Then position over the front card panel
with center positioning guide over card panel center punch.

If using cardstock cut out shapes, position the outer ring
of the checker unit over the card front panel,
centered with even edge offset margin all around, 
and attach. Then position and attach the inner ring 
with alternating checker unit in correct positioning.
3. Layer the sunflower petal shapes with centers
aligned, then rotated so that top petals fall exactly
between bottom layer petals.
Use a pin to help center the shapes then glue together
where they overlap.
4. Position and attach center circle over front of
petals assembly, with centers aligned.
5. Position and attach within checker accent frame,
with center of flower and card aligned (use pin if needed).
6. Prepare card back panel by bending forward
on cross-perforation line. 
7. Apply glue to the backside above the perf line,
then position at backside top of card front assembly,
align cut edge, then glue in place to create
a self-standing, hinged closure card.
NOTE that the center bottom of card back panel
has been shaped with a flat edge to assist standing.

Sunflower Patchwork Block A6 Card


Cheery card features a four-patch quilt block
replica with curvy stem and a pair of leaves
and flanking script phrase "scatter sunshine".
Build the layered "patches" on foundation
(either quarter portion or guide-marked whole),
mount on narrow-offset base mat, then arrange
the elements on sawtooth and plain edge accent
panels. Arrange these on front of side fold card.
Card measures approx. 4.64" wide x 6.5" tall
when fully assembled and closed.

ASSEMBLY: 1. Identify and cut the shapes:
A card base with fold perforation
B accent front panel plain edge
C accent top front panel sawtooth edge
D sunflower patch block offset accent
E four-block patch assembly base (shows thru
as sunflower patchwork "background")
F sunflower "petal" patchwork groups (4 sets
with 8 different petal prints or solids)
G optional blossom center circle accent
H curvy stem   I petals pair
J words cut out (don't loose the 'i' jot!)
2. Prepare to assemble the card base by identifying
the helpful positioning marking for the patchwork block 
accent base that are cut into the top of the sawtooth panel.
3. Fold the card base in half along perforation.
Position the plain edge base, centered on the
card base front and attach. Repeat to position
the sawtooth front panel onto the front of
the assembly. Set aside until blossom is complete
in the following steps.
4. NOTE that a separate petals base quadrant
base is included in the cut design to allow 4 different
background prints to be used.
For the sample card, the "consolidated" base
panel that shows thru as the block's single background
color will be used. It includes "crosshairs" center
positioning markings in the form of short dash lines.
(For the purposes of photography, the lines have
be highlighted with pencil lines here.)
A)  Working with the first petals group unit,
position the center triangle into one corner of
the crosshairs markings with the right angle edges
positioned exactly at the lines. Glue in place.
B) Position first petal shape abutted at the triangle's
long edge, so that the bottom edge is an extension
of the triangle's bottom edge, and the outer edge aligns
at the patch background edge, as shown.
C) Repeat for the mirror image second triangle which
is placed in the opposite position.
NOTE that a separate petals base quadrant
base (shown here as plain white) is included in 
the cut design, with the background "square" with cut off
center corner where the triangle patch is placed,
to allow 4 different background prints to be used.
D) Repeat steps A-C to position and attach
the three other petal groups in the same manner.
E) position and attach the contrast center circle
accent, if desired.
5. Position the blossom assembly, centered, on
the offset accent base, and attach in place.
6. Position the blossom patch onto the card front
assembly, with the top corners positioned at
the guide marks, then attach in place, except
leave the bottom left corner area unattached
until the stem is positioned, in the next step.
7. Position the curvy stem with the bottom end
edge flush with the plain edge accent panel,
and the left curve edge a scant 1/4" in from
sawtooth inward cut edges. Attach the long
portion of stem in place, then LIFT the lower
left corner of sunflower block to overlap stem,
then reposition and attach block and stem.
8. Arrange and attach the whole and vein-cut
leaves near the lower curve of stem.
9. Arrange and attach the word cut outs in
the panel margin along right side of card.
Here is the complete card.


Friday, August 16, 2024

Sunflower Lid Gift Box

 
Ten-sided box has closely fitted lid that presents
a layered sunflower in curved patchwork style.
Add angular opening frame up sunflower,
with side wall eyelet "extensions".  
Box measures approx. 5.5” wide x 5.8” long x 2” tall 
when fully assembled and closed. 
Substitute opt. round base interior accent “liner” 
with the Doily Round Eyelet Hearts 
(separate design) small version. 

ASSEMBLY: 1. Identify and cut the shapes:
A LID main shape    B LID frame accent  
C LID side wall lace overlay (10)
D-H Sunflower layers
I BASE main shape  
J BASE outer wall accent overlays (10)
K opt. interior floor accent (from separate design)
2. Prepare the LID main shape by bending back
on all perforation lines for side wall panels
and tabs.
3. Position and attach the LID accent frame
with outer straight edges aligning with perforation
lines/bends of LID.
4. Bend adjacent wall segments back to overlap
straight edge across tab to perforation line and
glue the 10 seams.
5. Position and attach each lace overlay on
each wall LID segment with straight edges
aligned as near to wall perforations or cut
edges as possible.
6. Layer the sunflower shapes in order from
largest on bottom to largest circle on top,
(retain top-most circle for step 7)
aligning centers, centering inner petal shapes
within larger base shape petals, aligning
star-shape points between petals, etc.,
and glue together one by one.
7. Position the top circle accent inside the larger
circle, then attach in place.
If possible, press the sunflower assembly under
a flat heavy object such as a thick book or plank,
and leave in place until completely dried,
for hours if necessary.
8. Position and attach sunflower onto LID assembly
within frame circle opening, rotating so that
petal points align with frame outer edge points.
Invert the lid on a flat surface and use a flat weight
that fits inside to press in place as adhesive cures.
9. Prepare the BASE shape as the LID was
prepared in step 2, including bending the "rim"
tabs back.
10. Position and attach each outer wall accent
centered within the perforation lines or cut edge
of each of the 10 wall segments.
NOTE: if desired, and using dry adhesive such
as double-stick tape, the accents can be
added after BASE seams are joined, as shown
in step 12.
11. Bend the walls up into position and glue seams
in similar manner to LID in step 4. Then . . .
. . . bend each rim tab down to interior of BASE
and glue each in place. NOTE this may be most
easily accomplished by placing the target edge on
flat surface and using fingertip pressure along tab
until fully joined.
12. If not completed previously, apply double-stick
tape or similar dry adhesive to accent backside
edges, then position and attach each of 10.
13. Use the ten-sided interior "floor" cover accent
included in the cut file, or substitute this dressier
lacy edge doily (separate design file).
14. Close the box by fitting the LID over the BASE.
Here is the completed box.