(This project requires 12x12 paper stock and min. cutting
capacity.)
Large-scale tote container has gable-shaped and
slotted side panel
extensions, with upper front and back panels
that bend together to form handle
at top and latch hooks
that fit into slots for closure.
At bottom, latch flaps are
attached to hull panels
to fold and interlock.

Front and back panel size
accommodates special
Graphic45 print panel sizes with contrast .125" offset
margin accent panels.
margin accent panels.

Upper panel offset accent shapes also included.
Add
embellishments for a fun gift container or decor accent.
Measures approx. 8.5"
tall x 6.5" wide x 4.5" deep
when completed and closed.
The model project is decorated using Graphic 45
October Cut Apart #4501047 card stock print
from the "Time to Flourish Collection".
All of the months in this collection are set up
with the same size panels, so a different tote
could be created using any of the months.

The sample project is embellished using other cut designs:
October Word Art Tracing and Base,
Bow 3D Lattice 2 Layer,
and Web Semi Circle Overlay with
Punch Hole.
ASSEMBLY: 1. Identify and cut the shapes:
A main hull shape (2)
B Front bottom panel
C Back bottom panel
D & E side bottom panels
F front & back accent panels
G front offset inner accent panel (back not shown)
H upper front and back accent panel (2)
I center handle tab
J side accent panel (2)
K upper side accent panel (2)
A main hull shape (2)
B Front bottom panel
C Back bottom panel
D & E side bottom panels
F front & back accent panels
G front offset inner accent panel (back not shown)
H upper front and back accent panel (2)
I center handle tab
J side accent panel (2)
K upper side accent panel (2)

Here are the panels that are fussy-cut from
the Graphic 45 print paper:
A October word cut (uses die cut template
to trace, hand cut; offset colored accent;
duplicate shapes stacked and glued together)
B front panel accent with trimmed print panel
(file includes a template shape to assist)
C composed back panel with accent panel underneath
D & E composed side panels on side panel accents

2. Prepare the main hull shapes by bending
back on wall panel and flange perforation lines.
Also fold forward at slot extension and handle
panel perforation lines.
3. Overlap the plain side edge of one hull panel
over the side flange to perforation line of
second hull panel, adjust so that hull panel
lower edges line up, and glue in place.

4. Position the B-E bottom latch panels along
hull unit lower edge EXACTLY as shown,
then attach to the bottoms of corresponding
front, sides and back panels by overlapping
hull onto flange and gluing in place.
5. Position and attach the accent panels
while the hull section is flat.
(Substitute the Graphic 45 print panels
if you are using those panels as accents.)

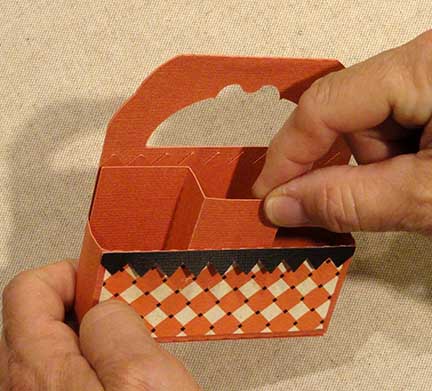
6. Form the hull into a tube to align and join
the second side seam.
the second side seam.

NOTE: the symmetrical shape of the tote
allows for the box to be flattened to apply
finger pressure all along the edge as shown.

7. To close the bottom latch flaps,
first fold in the FRONT panel . . .
first fold in the FRONT panel . . .

. . . then fold both side panels inward . . .

. . . then fold the back tab into position, and push
all panels slightly beyond the horizontal to allow
the tab to slip under the front slot edge.

Then push bottom latch panels back to
perpendicular.
To unlatch tote box bottom, reverse the process
to press inward until Back panel un-slots itself,
and the panels can be unfolded into flat positions,
allowing the box to be flattened for storage, for instance.

8. To close gable top, bend front and back panels
toward center until the handle openings line up,
then push side extension slots over tabs to lock.

9. To prepare the October word cut embellishment,
prepare the shapes:
A traced and fussy-cut October word cut
B contrast offset margin base shape
C duplicate base shapes to thicken the base (5-7)
NOT SHOWN: template shape for word cut tracing
prepare the shapes:
A traced and fussy-cut October word cut
B contrast offset margin base shape
C duplicate base shapes to thicken the base (5-7)
NOT SHOWN: template shape for word cut tracing

10. Position the template over the October
panel of the Graphic 45 paper, adjust for
centering and even offset "space" margin
all around, then hold in place and trace
with very fine pencil.

11. Use scissors to carefully hand cut on
the marked pencil line.

12. Position the word cut shape onto the offset
contrast base shape, center with even offset
margin all around, and glue in place.

13. To prepare build up, position each of
the duplicate shapes into a stack, gluing
each layer, and taking care to align
cut edges of each shape as precisely as possible.

Use a flat weight placed on top of the stack
to press until glue is completely dried.

14. Position the word cut unit on top of the stack
and adjust so edges are all aligned,
then glue in place, and press with weight.

Here is the completed October word cut shape.

Here is the decorated box, front view.

And back view.