
Dimensional box card for the season of thanksgiving.
Folds flat for giving, unfolds into a box.
Flat size is approx. 7.125" x 8" tall.
Display size is 2.5" deep x 2.5" wide.
Bridges within the box cavity hold the
diminishing size horn rings.
Front ring has offset base, silhouette base,
and twenty tiny teardrop accent shapes.
Pair with companion four-flap, fold-over envelope
("box card
envelope ribbon slot flaps").

ASSEMBLY:
1. Identify and cut the shapes:
A main box body with tall back panel
B back panel accent shape
C & D side "fold-down" accent panels
E front panel, base banner, "Thanksgiving" cut
F bridge 5 with tail, contrast underlay
G bridge 4, mid ring 4
H bridge 3, mid ring 3
I bridge 2, mid ring 2
J rim offset, rim base, 20 teardrop accents
K second cluster base (corn, pear, peach)
L second base build up strips (4)
M first cluster base with accents
(pumpkin, grapes, apple acorn & leaf)
O side leaf accents, half leaves for left & right
P two-part tag with "Blessing"

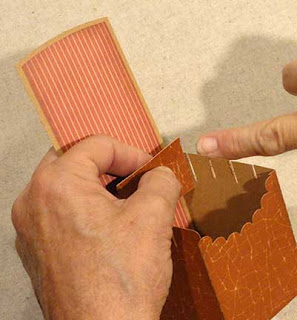
2. Prepare the main card box base by bending back on all vertical perforation lines.

3. Form box base shape into a tube to bring the straight side edge of tall back panel to overlap the side flange. Apply glue, overlap straight edge to perforation line, adjust to line up the lower edges, and glue in place.

NOTE that the symmetry of the box shape allows the body to be laid flat to apply pressure along the seam edge, as shown.

4. Position the back panel accent shape over the inside face of the box shape, align bottom edges even, center side to side for slight interior offset, then glue in place.

5. Prepare Bridge 5 by folding the end tabs back.
6. Position the left tab against the inside face of the left interior side at the pair of vertical cut mark guides, top of edges of bridge and box side even, and glue in place.
7. Position and attach the right bridge tab to the right inside wall face, lining up the top of the tab with the top of the box side, also even with the back slot edge.

8. While the glue for two side tabs for Bridge 5 have grabbed but are still somewhat adjustable, fold the box into its flattened shape, pressing at the tab connection locations, allowing them to slightly shift as necessary.
(Perform this same folding and pressing step after each bridge is attached, when the glue is still curing.)

Here is Bridge 5 in place, box in open position.

9. Layer the horn "tail" and the contrast underlay shapes.
10. Position and attach in place on the front of Bridge 5, using the curved dash guide lines on the bridge for placement . . .

. . . and allowing the right edge of the layered shape to extend through the slot of the right wall as indicated here.

11. Prepare Bridge 4 (and also Brfidges 3 & 2) by folding tabs back.
12. Position Bridge 4 left tab against left interior box face using dash lines for positioning, lining up top of bridge with top of box side.

13. Position and attach left tab of Bridge 4 even with back edge of next available slot, top edges even.

Fold flat and press at attachment positions.

14. Position and attach ring 4 with upper/inside curved edges matched up, right edge extending through side slot as shown.
15. Position and attach Bridge 3 with ring 3, Bridge 2 with ring 2 (attach this one behind slots on both left and right sides).
 (Apologies for the strange yellow color of this image; it is the same paper as seen in the next image.)
16. Prepare the front rim ring by attaching the scalloped-edge ring over the offset base, then attaching each of the teardrop accents in position around the ring.
NOTE: it may be helpful to cut the accent shapes, then leave them "unified" on the cutting mat, to remove one by one for positioning while they are organized in a way to easily identify which goes into what position on base ring. (They are not identical, though many are very similar.)

17. Position the ring over the front of the box so that the interior lower ring scallop edge matches the shape of the front panel top edge. Attach the edges that overlap.
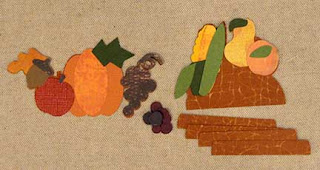
18. Prepare the front cluster and second cluster accent shapes on their base silhouette shapes as shown here (also place individual grape circles over base).

19. Position each of the four build up strips, one by one, onto the bottom front of the second cluster base shape. This will provide some visual depth between the two clusters, and also the rim shape (similar to attaching foam dimension squares).

20. Insert the second cluster behind the front rim/box front panel, adjusting up/down as you wish, so that top of corn/ear can still be seen. Attach build up strip to back of box front panel.

21. Layer and assemble the front "Blessing" tag and letters. NOTE that it may be helpful to use the "weeded" portion of cardstock from which it was cut when cut as a "grouped" word.
22. Prepare the front cluster by (optional) attaching foam dimension squares to the backside of the assembly . . .

. . then "audition" positions of tag and front cluster together, with tab slightly above the bottom front edge of box, then . . .

. . . center and attach tag and cluster (see next image) to box front.

5. Prepare Bridge 5 by folding the end tabs back.
6. Position the left tab against the inside face of the left interior side at the pair of vertical cut mark guides, top of edges of bridge and box side even, and glue in place.

7. Position and attach the right bridge tab to the right inside wall face, lining up the top of the tab with the top of the box side, also even with the back slot edge.

8. While the glue for two side tabs for Bridge 5 have grabbed but are still somewhat adjustable, fold the box into its flattened shape, pressing at the tab connection locations, allowing them to slightly shift as necessary.
(Perform this same folding and pressing step after each bridge is attached, when the glue is still curing.)

Here is Bridge 5 in place, box in open position.

9. Layer the horn "tail" and the contrast underlay shapes.
10. Position and attach in place on the front of Bridge 5, using the curved dash guide lines on the bridge for placement . . .

. . . and allowing the right edge of the layered shape to extend through the slot of the right wall as indicated here.

11. Prepare Bridge 4 (and also Brfidges 3 & 2) by folding tabs back.
12. Position Bridge 4 left tab against left interior box face using dash lines for positioning, lining up top of bridge with top of box side.

13. Position and attach left tab of Bridge 4 even with back edge of next available slot, top edges even.

Fold flat and press at attachment positions.

14. Position and attach ring 4 with upper/inside curved edges matched up, right edge extending through side slot as shown.
15. Position and attach Bridge 3 with ring 3, Bridge 2 with ring 2 (attach this one behind slots on both left and right sides).

16. Prepare the front rim ring by attaching the scalloped-edge ring over the offset base, then attaching each of the teardrop accents in position around the ring.
NOTE: it may be helpful to cut the accent shapes, then leave them "unified" on the cutting mat, to remove one by one for positioning while they are organized in a way to easily identify which goes into what position on base ring. (They are not identical, though many are very similar.)

17. Position the ring over the front of the box so that the interior lower ring scallop edge matches the shape of the front panel top edge. Attach the edges that overlap.

18. Prepare the front cluster and second cluster accent shapes on their base silhouette shapes as shown here (also place individual grape circles over base).

19. Position each of the four build up strips, one by one, onto the bottom front of the second cluster base shape. This will provide some visual depth between the two clusters, and also the rim shape (similar to attaching foam dimension squares).

20. Insert the second cluster behind the front rim/box front panel, adjusting up/down as you wish, so that top of corn/ear can still be seen. Attach build up strip to back of box front panel.

21. Layer and assemble the front "Blessing" tag and letters. NOTE that it may be helpful to use the "weeded" portion of cardstock from which it was cut when cut as a "grouped" word.
22. Prepare the front cluster by (optional) attaching foam dimension squares to the backside of the assembly . . .

. . then "audition" positions of tag and front cluster together, with tab slightly above the bottom front edge of box, then . . .

. . . center and attach tag and cluster (see next image) to box front.

23. Layer banner tag front and base, with "Thanksgiving" over the top.
Position and attach to the back panel approx. .125" below top edge.

24. Assemble the two pairs of leaf base and half leaf forms, then bend the upper portion of side accent/flaps downward, glue upper then lower leaf in place on both left and right side flaps.
NOTE: the side accent "flap" shapes have been modified from what is shown here, though they may look very similar.

Here is the finished card open in display form.

Here is the card folded flat for sending.
An envelope design, "box card envelope ribbon card flaps", is available that fits this flat form card.


