Showing posts with label gift card box. Show all posts

Thursday, August 13, 2020

Crab 3D Oval Box

Multiple shapes are layered to assemble 
the playful, be-spectacled crustacean that decorates top 
of unique oval-shaped gift box. 
Lid fits over base to enclose a platform gift card holder 
(to hold standard plastic 2.125” x 3.375” gift card). 
Measures approx. 5.35” wide x 4.1” long x 1.25” deep.

ASSEMBLY: 1. Identify and cut the shapes for the oval box:
A LID main panel   B Lid contrast offset overlay
C Lid boxing (side wall) strips (2)
D gift card platform with stand tabs
E gift card platform opening underlay
F BASE main panel
G Base boxing strips (2)
H upper platform interlocking strips
I lower platform interlock strips
Also identify and cut the shapes for the crab decoration:
J main crab silhouette (shows thru as legs)
K & Ls contrast show-thru for body speckles
M leg tips     N offset crab silhouette
O eye insert 'whites'    P body    Q cheek circles
R eye pupils   S claw overlays   T spectacles
U hat base   V hat rim band    W front brim with anchor
X hat crown base with top button
Y hat crown center
3. Assemble the crab lid decoration:
A) attach tips to leg ends
B) layer brim front over 'band' contrast, and
center, attach anchor
C) layer crown center onto main crown shape,
then add tiny button at top
D) layer brim assembly onto lower edges of main hat shape,
then add crown assembly above.
E) position and attach crab body assembly onto offset silhouette
F) add contrast inlays at lower body edge, claws
G) add eye 'white' circles, mouth
H) position and attach . . .
. . . main crab body over silhouette assembly,
with claws where they match up
I) position and attach cheek circles, eye pupils
J) add hat assembly and spectacles
4. Once the crab shapes have been glued together,
it is a good practice to press flat under a heavy flat weight
until thoroughly dry, to prevent warping or curling.
This may require a couple of hours to ensure thorough drying.
5. Prepare the BASE boxing strips by bending back
at each vertical segment perforation and also bending
bottom tabs back.
6. Position the first long segment at the corresponding
long edge of the main BASE panel, then overlap the panel's
straight edge over boxing tab to perforation line,
adjust for side to side alignment, then glue in place.
7. Bend the boxing to align the next segment tab
along the panel straight edge and glue in place.
8. Continue in the same manner to bend, align and
glue each segment's tab along the corresponding straight
edge of the panel.
As the assembly progresses, invert the base on a flat surface
and apply fingertip pressure along the tabs from the inside
to help them attach completely.
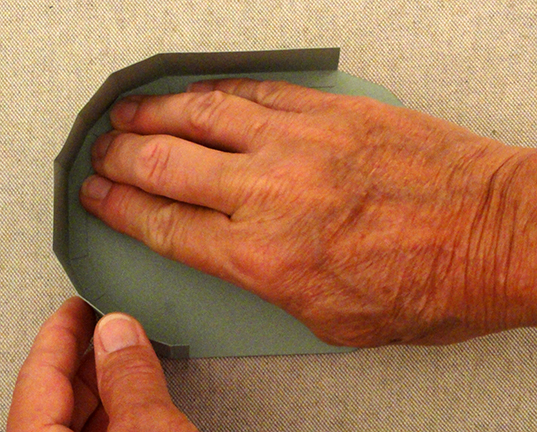
9. Position and attach the straight end of the second
boxing strip over the end tab of the first strip, then
continue to position and attach the second strip's
segment tabs all around.
When the final tab is being glued, at the same time
position and attach the first straight side edge
over the corresponding side tab in one operation.
10. Prepare the LID boxing strips by bending back
on vertical perforations and top tabs as was done
for BASE, also bend the rim tabs back.
11. Skip the long segment rim tab, then bend back and
glue in place the remaining rim tabs for both strips.
12. Position and attach the LID boxing strips just like
the BASE strips were positioned and attached in Steps 6-9.
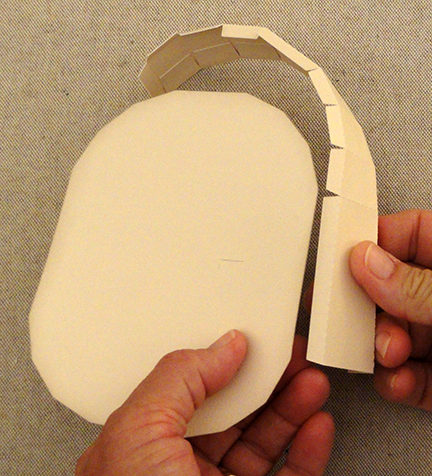
13. When both boxing strips are in place, bend the long
segment tabs down and glue in place . . .
. . . positioning the lid so that the area is flat and
fingertip pressure can be applied along the tab
until thoroughly attached.
14. Position and attach the contrast lid panel
(dry adhesive recommended if possible, to avoid
warping and curling since no flat weight can be applied).
15. Position and attach the crab decoration,
centered on the lid top panel.
16. To assist the base box to maintain its oval shape,
support 'struts' and reinforcement for the gift card panel
can be assembled and added.
Identify the upper strip set, which have a circle 'bite'
out of the end tab edge, as indicated here by pointing finger.
Here you can also differentiate upper and lower short
strips (as well as long strips) by the slots: the upper strips
will have slots that extend UP, and the lower strips
will have slots that hang DOWN.
17. Bend back on all vertical perforations and end tabs, 
and forward on bottom tabs.
Work with the long and short strips that correspond . . .
. . . then position the short strip straight end over
the tab at end of long strip and join first side seam.
Next, form the strips into a trapezoid
to bring the opposite two ends together and join
the second side seam.
Repeat for both the upper and the lower strips sets.
18. Position the upper strip trapezoid over the lower
trapezoid, with narrow ends on the outsides as shown,
and line up the slots so that . . .
. . . the shapes can interlock, then work the two strips
together until top and bottom edges are flush across.
19. Apply adhesive to the end tabs that extend from
points, and to the bottom tabs along the strips, and . . .
. . . to the short side end walls, then . . .
. . . insert it into the BASE and . . .
. . . quickly work it down flat against base floor.
Apply pressure to attach end walls together,
as well as attach point tabs and bottom tabs along strips
to the walls or base where they touch.
20. Prepare the card platform by bending back the stand
tabs.
Also position and attach the gift card recess opening
'liner' shape behind the window cutout.
Be sure to leave the tabs extending into the opening
unattached.
21. Apply adhesive to the stand tabs, then . . .
. . . slide the platform into the base, allowing stand tabs
to fit around platform strips. Push platform down fully
so that the panel rests on top of the supports.
22. Gift card can be inserted under the tabs to fit
in the recess.
Then position and fit the lid over the base
(this should be a snug fit).
Here is the completed gift box.


Friday, August 5, 2016

Sub Surfacing 3d Box

Only the "above the surface" portion of the 
submarine makes an appearance to deliver
a hidden gift card or other treat. 
Sturdy construction provides an underside compartment 
hiding a thin "message" or gift card tray. 
Con tower holds multi-layer cross fin and tubular periscope 
(use a 5/16" wooden dowel to assist construction). 
Tail assembly is composed of two lower side platforms 
with center propeller stand. 
Accent panels decorate tail platforms and prop stand, 
with rivet trim strips along lower edge. 
Measures approx. 7" long x 2.75" wide x 4.125" tall.

ASSEMBLY: 1. Identify and cut the shapes:
A main hull body with long strip accents
 B nose arch support
C nose assembly   D  con tower
E top con tower fin 
(front edge notched) with tip accents
F con tower fin build up shapes (7)
G periscope tube
H aft arch support with base
I aft side platforms (l & r)
J platform star accents with liner (l & r)
K prop support with side accents
L hull short accent strips (5 med, 2 short)
M propeller with accent
N propeller stem circles (7)
O propeller front large, small circles
P base tray    Q gift card insert
2. Prepare the hull main shape by bending back
on upper (shown left here) vertical perforation lines,
tabs, undercarriage side flange tabs.
At interior cross perforation lines . . .
. . . follow this diagram to fold both fore and aft lines
(at upper and lower portions of the window)
forward or back. NOTE these structures will create
tube "box" forms that help define the interior space
to hold base tray in position.

3. Apply adhesive to the narrowest division, then . . .
. . . re-position into the box form with the extending
lip as shown.
The back "wall" of the tube remains unattached at the
back (right in this picture) at this point in assembly.
Complete this gluing and forming step for
both front and back areas of hull.
4. Fold the inner long tab back behind the main
hull "roof" panel and glue in place.
5. Fold the other long flange next to opening
back (upward) at each of the single hash perf marks.
NOTE: this flange becomes the backing or support
for the hull's lowest, narrowest vertical wall
on the outside of hull assembly on this side.
Wrap the hull roof into an arch to bring the
opposite flange tab into position to wrap
to the inside of the hull cavity,
while also lining up the first narrow wall panel
(with end tabs) into position on top 
of the bent-upward flange.
Attach flange behind wall section.
Also attach edge flange to the inside of the
hull.
Here is how the hull cavity should appear
at this point in assembly, with fold edges
on long sides of openings,
interior lip-tube box assemblies
on short ends.
6. Prepare the nose arch support (left)
and the aft arch support with base as shown
with flange tab or trapezoid base bent forward,
edge tabs bent back.
(Photo shows these shapes from their backsides.)
7. Prepare left and right side platforms by bending
three side walls back, connected side wall and tab
back, edge flanges (eventually) inward.
Glue appropriate wall tabs in place . . .
. . .to achieve the form shown.
8. Orient left and right to match up to left and right
sides of aft arch support base, then insert inner side
and back tabs into corresponding slots.
On underside . . .
. . . bend the tabs inward and glue in place.
Also bend the edge tabs around base edges
and glue in place.
Attach both left and right platforms.
9. Prepare to attach aft arch with base assembly
by applying glue to interior back wall of tube support
and to arch tabs, then . . .
. . . side arch edges under hull edges until
hull aligns at tab perforation edges.
Secure tabs and tube back wall in place,
inserting fingers into hull bottom opening
to apply appropriate pressure.
10. Apply glue to the underside of platform base
. . . 
. . .and to back short wall of platform boxes,
then apply pressure to secure all surfaces together.
11. In similar fashion, position and attach nose arch
into forward hull opening . . .
. . . positioning the bottom arch flange tab's perf line
exactly at the angle of hull wall base
(at wall tab perf line).
12. Before positioning arch tabs, apply glue to
the back wall of interior tube box, then . . .
. . . slide arch support into opening and secure
tabs and interior tube box.
13. Prepare the nose assembly shape by bending
back at ALL tabs, vertical (short) wall perfs,
cross perforation lines as shown.
14. Bend the center and first side wall into position
to bring the straight edge to overlap the corresponding
tab to perforation lines, and attach in place.
Re-position to attach next segment tab and edge, etc.


15. Bend the nose top panel back to align the
straight edge at the top tab perforation of side section
as shown, and attach in place.
Repeat the steps to complete the front side and top
seams for the other side of nose.
16. Bend the back tabs inward, bend the back wall
over the tabs, align edges and glue all in place.
17. Bend the bottom tabs (2 side and 1 back) inward, 
bend the bottom panel over the tabs, 
align and glue in place.
NOTE it may be helpful to insert a blade tool 
through bottom opening and under back tab
(and sides) to provide a "press against"
surface to assist in attaching walls and tabs.
18. Apply glue to the nose assembly back wall,
and base, and underside of hull top tab,
then slide nose assembly into position
to snugly fit and attach to hull.
19. Bend the bottom front and back hull tabs
over the nose and aft platforms and glue in place.
20. Prepare the aft platform accents by
attaching the contrast liner shapes behind
the star windows.
21. Position the accents over the aft platforms
and attach in place.
22. Prepare the propeller stand by bending
back all tabs and wall perforation lines as shown,
except, bend the "arch" wall (upper left here)
cross perf lines forward slightly, with end tab back.
23. Bend the bottom and side walls up to
overlap straight edge and tab and glue in place.
24. Bend arch tabs inward (on the side being worked
in step 23 above), then position arch wall strip,
with end tab tucked under corresponding end wall,
and attach each tab in place.
(Remaining wall of assembly will be positioned
and attached further along int the assembly.)
25. Assemble the propeller with overlay,
front large and small accent circles.
Also position and attach the 7 stem circles
to each other to form stem stack.
26. Position and attach the stack to the backside
of the propeller.
27. Position the propeller assembly over the
back vertical wall of stand with holes aligned,
then . . .  
insert mini brad and bend tongs back on the
inside of the stand.
28. Bend arch tabs of remaining stand wall
inward, then bend wall into place to tuck
and attach all remaining tabs and edges
to form closed stand box.
29. Position and attach stand wide wall accents.
30. Apply glue to the bottom and short back wall
of stand, then slide into position between the
side platforms.
(This will be a snug fit.)
31. Prepare conning tower shape by bending
back on all wall and tab perforations as shown.
32. Form shape into a tube to bring the
side straight edge to overlap the opposite tab
perforation line, and glue in place.
33. Bend the top tabs inward, "lid" down into
place, adjust edges to match wall top perf edges,
and attach in place.
34. Position con tower on hull roof and insert
tabs into corresponding slots.
On the inside, bend tabs outward and attach
to hull underside.
35. Position and attach the hull lower edge
long and short strips (extra short strips at
back) along appropriate edges.
36. Identify the top fin shape by locating the
notch in the front edge.
(Making sure fin faces forward 
will allow hex holes to line up for
periscope insertion later.)
Position and attach fin shapes, one at a time, together
with edges aligned as precisely as possible,
to form a thick fin.
37. With front of fin oriented to sub front,
slide the fin into and through the con tower slot
until into centered position
(hash marks on fin should align with con tower
side walls).
Apply a little glue to the underside
of fin where con tower walls touch,
to attach fin in place.
38. Attach fin tip accents.
39. Prepare the periscope tube shape by
bending back on all wall perf lines and tabs. 
Carefully bend back the very small and
uniquely-shaped tabs along the edges
of the "hook" segments.
40. Form the shape into a tube, wrapping it
around a "press against" form such as
the 5/16" wooden dowel shown here.
Overlap the straight edge over the tabs
and attach along those seams.
NOTE: take care to form the tube as accurately
as possible to ensure that it can fit through the
con tower, fin and hull hex openings.
41. Begin to form the hook shape by applying
glue at the center underside tab 
of long tube section . . .
. . . then bending assembly at the back perf line
between long and first short segment
as far as it will comfortably go
to overlap the straight underside of small segment
over the long segment tab.
Insert a rod tool such as this wooden meat skewer,
into position under the tab and edge to
apply pressure to secure the seam.
42. Repeat the tab seam process for the
remaining two short segments,
applying glue to tab . . .
. . . and bending, using a tool to press and
secure each of the remaining two segment seams.
43. Bend the "cap" tabs inward, apply glue
to tabs, then tuck into the hook end of tube
and secure in place.
44. Prepare the insert the periscope tube
by "gathering" bottom end tabs together
into a form narrower than the tube
(to help them not get caught as it is
inserted).
45. Orient the periscope so that the hook faces forward,
then insert periscope bottom through the
con tower top hex hole, through fin opening,
and through hull roof, until . . .
. . . the tabs are fully exposed on the hull inside.
Bend outward and attach in place.
46. Prepare the base tray by bending back at
all side wall, rim and corner tab perf lines.
47. Form the shape into a tray by bending sides
up and overlapping wall straight edge at corner
tab perf line. Complete all four corner seams.
49. Bend the rim flange tabs to the inside
and glue each in place. Take the time needed
to apply uniform pressure along each to
minimize warping.
50. If desired, position gift card onto the insert
as shown, then place the insert into tray.
51. Position the tray into the opening
in hull bottom as shown.
Interior tube box lip will assist the tray
to stay in position, along with the snug fit.
Here is the completed surfacing sub box.