
Just right for your Thanksgiving season festivities
is another in the series of canister wrap figures.
Smiling pilgrim man features classic pilgrim buckle hat,
dimensional nose, collar suit with bow tie, slice form Indian corn.
Built in flanges on the hat’s underside
fit into
the top of the canister to help hold it in place.
This design is available from SnapDragon Snippets
through the Silhouette America online store,
or (soon) through SnapDragonSnippets.com.

ASSEMBLY:
1. Identify and cut the shapes:
A canister tube
B rim ring
C base ring
D base cap
E suit front
F collar
G belt and buckle
H head
I hair
J eyes, dimensional nose, smile
K hat crown segments
L upper brim
M middle brim (reinforcement)
N lower brim with flange slots
O flange
P hat band and buckle shapes (2)
Q corn slices (5) and back
R husk shapes (5)
S kernel colored circles

2. View the canister tube construction here (Scarecrow canister wrap project) in steps 2-6, then return to continue the assembly of the Pilgrim.

3. Prepare the dimensional bow tie. Curl the long bow ends. Bring the perforation dash on one end to the center back of the bow strip and glue in place.

4. Bring the opposite end to the dash and glue in place. Check and even out bows if necessary.

5. Fold each of the streamer ends down at their angled hash cut, then press to crease, and adjust them as necessary for best symmetry possible. The top portion of the streamers forms a sort of "knot".

6. Fold the bow down behind the knot and glue in place.
(This image shows the backside of the bow.)

7. Assemble the head/hair/face unit. Fold the dimensional nose at the center in a "mountain" fold, then fold side tabs upward in "valley" folds. Insert tabs into face slots. On backside, glue tabs to backside of head.
Add rouge to cheeks with artist's pastels or makeup blush and finger tip or q-tip. Add toe-part eyes, eyebrows, mouth. Center head over hair shape, with top edges aligned.
8. Assemble the suit panel. Insert brads into holes or place stud embellishments over holes. Place collar at top edge, centered. Add bow at top of collar (or wait until face and suit are attached to canister body to check correct placement. Add belt and buckle. (NOTE: cut file includes a small contrast shape for buckle prong which is not shown on this project.)

9. Bend the suit panel slightly downward on vertical perf lines. Position panel over canister front, bottom edges aligned, and glue center as well as side surfaces that touch. Position head centered on canister front, with top edges aligned. Glue center and any side surfaces that touch to canister front.

10. Build had. Fold center front section (includes top hexagon) and 5 side sections as shown.
11. Prepare and join the first two sections. Apply glue to the tab, then overlap the straight adjacent edge to the perf line. Make sure top and bottom edge/perf lines are aligned, then glue in place.
12. Repeat for the remaining 4 seams so that the crown is joined into one section.

13. Form the hat crown into a tube to align the edge and tab perf line of the final seam. Apply glue to the tab, overlap edge, adjust, and hold until secure.

14. Apply glue to the crown top tabs. Fold the top attached hexagon down, adjust the crown tube shape so that the hexagon edges align just inside of the per lines. Hold to secure.

It may be helpful to assist the top hex gluing process to invert the crown onto a table top then reach into the tube to press against the tabs to secure the seams.

15. Slide the upper brim ring over the crown assembly. Apply glue to the top surfaces of the tabs, then slide the brim ring down completely and apply pressure to secure the joining.

16. Prepare the flange ring for the underside of the hat. Fold the ring shape on vertical perforations to form it into a ring. Fold the rim tabs back. Overlap the straight END to the perf line on the opposite end and glue. Glue rim tabs in their "back" position.

17. Identify the long center front and center back tabs and sections of the ring. Also identify the long front and back slots on the under brim. Insert the corresponding tabs into matched-size slots. Work the ring down to sit flush against the backside of the brim.

18. On the brim backside, fold the tabs outward (makes it easier to press to glue), apply glue between brim and tab, and glue in place.

Assist the gluing process by inverting the brim face side up onto a flat surface, then applying pressure at the tab locations.

19. Apply glue to one side of the reinforcing plain brim circle. Place it over the backside of the lower brim circle (with flange tabs).

20. Prepare to attach the crown with upper brim over the lower brim assembly. Identify again the center front long section of the flange - this is the front. Locate the front face of the crown (interchangeable). Apply glue to the underside of upper brim. Place the upper and lower together and apply pressure around edges to secure.

21. Prepare the hat band. For the single band shape: form a ring, overlap end to tab perf dash, and glue. For the mulitple pece band: join the six segments into a single band ring.
Attach the hat buckle centered on the hat front panel.
NOTE: The individual hat band shapes allow flexibility in cutting from patterns, such as stripes.

22. Prepare the dimensional indian corn by folding the 5 shapes with center perf lines face sides together.
23. Apply glue and join the right side of first shape to the left side of the second shape, as shown.

24. Continue joining third, fourth and fifth shapes in similar manner.

25. Position (centered) the final whole, unperforated back shape behind the folded slices portion and glue in place.

26. Prepare the husk shapes by manually pleating or "grunge" fold/mashing the pointy ends. Also fold face sides together on the center vertical perforation line.

27. Attach one husk shape at the top of each face of the slice form, with perf fold angles tucked in as snugly as possible.

28. Apply randomly placed dots of glue to the slice form surfaces, then place or sprinkle the multi-colored punch circles to imitate the colored kernels of indian corn.

29. Position and securely glue in place on the front of the canister.

30. Place the hat onto the top of the canister by guiding the flange inside the rim of the top opening.


4. Bring the opposite end to the dash and glue in place. Check and even out bows if necessary.

5. Fold each of the streamer ends down at their angled hash cut, then press to crease, and adjust them as necessary for best symmetry possible. The top portion of the streamers forms a sort of "knot".

6. Fold the bow down behind the knot and glue in place.
(This image shows the backside of the bow.)

7. Assemble the head/hair/face unit. Fold the dimensional nose at the center in a "mountain" fold, then fold side tabs upward in "valley" folds. Insert tabs into face slots. On backside, glue tabs to backside of head.
Add rouge to cheeks with artist's pastels or makeup blush and finger tip or q-tip. Add toe-part eyes, eyebrows, mouth. Center head over hair shape, with top edges aligned.
8. Assemble the suit panel. Insert brads into holes or place stud embellishments over holes. Place collar at top edge, centered. Add bow at top of collar (or wait until face and suit are attached to canister body to check correct placement. Add belt and buckle. (NOTE: cut file includes a small contrast shape for buckle prong which is not shown on this project.)

9. Bend the suit panel slightly downward on vertical perf lines. Position panel over canister front, bottom edges aligned, and glue center as well as side surfaces that touch. Position head centered on canister front, with top edges aligned. Glue center and any side surfaces that touch to canister front.

10. Build had. Fold center front section (includes top hexagon) and 5 side sections as shown.
11. Prepare and join the first two sections. Apply glue to the tab, then overlap the straight adjacent edge to the perf line. Make sure top and bottom edge/perf lines are aligned, then glue in place.
12. Repeat for the remaining 4 seams so that the crown is joined into one section.

13. Form the hat crown into a tube to align the edge and tab perf line of the final seam. Apply glue to the tab, overlap edge, adjust, and hold until secure.

14. Apply glue to the crown top tabs. Fold the top attached hexagon down, adjust the crown tube shape so that the hexagon edges align just inside of the per lines. Hold to secure.

It may be helpful to assist the top hex gluing process to invert the crown onto a table top then reach into the tube to press against the tabs to secure the seams.

15. Slide the upper brim ring over the crown assembly. Apply glue to the top surfaces of the tabs, then slide the brim ring down completely and apply pressure to secure the joining.

16. Prepare the flange ring for the underside of the hat. Fold the ring shape on vertical perforations to form it into a ring. Fold the rim tabs back. Overlap the straight END to the perf line on the opposite end and glue. Glue rim tabs in their "back" position.

17. Identify the long center front and center back tabs and sections of the ring. Also identify the long front and back slots on the under brim. Insert the corresponding tabs into matched-size slots. Work the ring down to sit flush against the backside of the brim.

18. On the brim backside, fold the tabs outward (makes it easier to press to glue), apply glue between brim and tab, and glue in place.

Assist the gluing process by inverting the brim face side up onto a flat surface, then applying pressure at the tab locations.

19. Apply glue to one side of the reinforcing plain brim circle. Place it over the backside of the lower brim circle (with flange tabs).

20. Prepare to attach the crown with upper brim over the lower brim assembly. Identify again the center front long section of the flange - this is the front. Locate the front face of the crown (interchangeable). Apply glue to the underside of upper brim. Place the upper and lower together and apply pressure around edges to secure.

21. Prepare the hat band. For the single band shape: form a ring, overlap end to tab perf dash, and glue. For the mulitple pece band: join the six segments into a single band ring.
Attach the hat buckle centered on the hat front panel.
NOTE: The individual hat band shapes allow flexibility in cutting from patterns, such as stripes.

22. Prepare the dimensional indian corn by folding the 5 shapes with center perf lines face sides together.
23. Apply glue and join the right side of first shape to the left side of the second shape, as shown.

24. Continue joining third, fourth and fifth shapes in similar manner.

25. Position (centered) the final whole, unperforated back shape behind the folded slices portion and glue in place.

26. Prepare the husk shapes by manually pleating or "grunge" fold/mashing the pointy ends. Also fold face sides together on the center vertical perforation line.

27. Attach one husk shape at the top of each face of the slice form, with perf fold angles tucked in as snugly as possible.

28. Apply randomly placed dots of glue to the slice form surfaces, then place or sprinkle the multi-colored punch circles to imitate the colored kernels of indian corn.

29. Position and securely glue in place on the front of the canister.
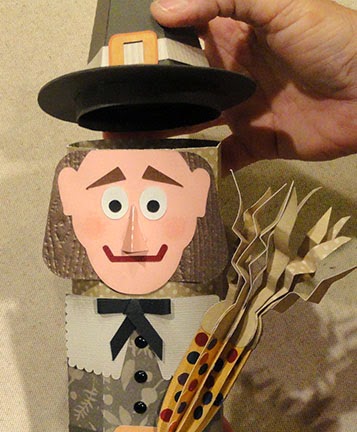
30. Place the hat onto the top of the canister by guiding the flange inside the rim of the top opening.
Your pilgrim man is all set
to welcome in a season of
gratitude and thanksgiving.


