
Countdown the days in October as the kids wait for Halloween
with this cardstock plus embellishments 3d pumpkin.

Thirty numbered drawers (five different sizes on six tiers)
pull out to divulge a treat, trinket, or activity to help enjoy the season.

For October 31st, hang the specially-coordinated
"Happy Halloween 31" circle tag with ribbon from the chunky stem.
Elaborate and large, this holiday decoration is also sturdy enough
to use year after year. Embellish with studs, jewels, etc.
Measures approx. 9.25" tall by 10" across at widest point.
SVG file available from Jodi Warner of SnapDragon Snippets
through SVG Attic, the Silhouette America online store
and soon from SnapDragonSnippets.com .
***IMPORTANT NOTE*****
The original cut file (purchased and downloaded prior to 10-20-14)
contains a mistake. The accent front drawer shape outline for drawer no. 2
is a top-to-bottom mirror image of what it should be.
To correct this, choose one of these options:
A. re-download the file from Silhouette or SVG Attic
B. email Jodi at the address found in response comment at end of this post
C. use your Silh Studio software to "release compound path", ungroup if necessary,
copy the shape in place, then "replicate tool" to make a mirror copy below, center the new shape over the old shape with the finger hole and brad punch in equiv positions center and top/bottom as original, eliminate the original outline, group the new shape .

ASSEMBLY:
1. Identify and cut the shapes.
A drawers: cut 6 each of drawers 1-5
B cubbies: cut 6 each of cubbies 1-5
C drawer front accents: cut 6 each of 1-5.)
(Also cut 6 each of two dome accents
D post
E base shape with slots
F optional reinforcing layer (or cut 2 of E)
G top disc shape with slots (supports dome)
H dome platform
I dome wedges (cut 6)
J stem with side and top accent shapes
K leaf with accent front and vines (2 sets)
L Happy Halloween 31 medallion
NOT SHOWN: stack divider shape: cut 6 (view this shape in Step 12 below)

2. Prepare the drawers and cubbies by folding on all perforated lines as inward, or "mountain" folds. (REMEMBER, there are 30 drawers and cubbies!)
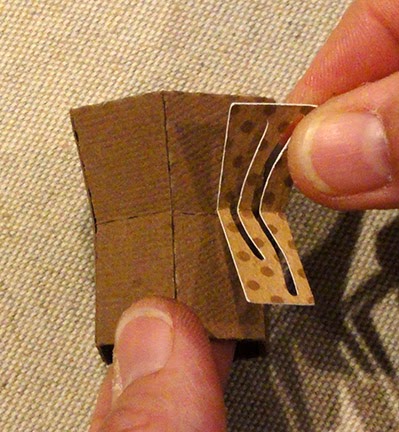
NOTE that each drawer and cubbie can be identified by the numeral in the back tab. Here I am indicating that this drawer is a no. 2 drawer. You can also see that the cubbie has the no. 2 cut in the tab. Drawers and cubbies orientation (which way up) can be checked by making sure the numbers appear in their normal, readable north/south form.

3. Attach the appropriate accent drawer front to each of the thirty drawers. Accent fronts are slightly offset. Make sure finger hole and eyelet punch holes align precisely. Use a brayer (roller) if available to help the fronts attach completely and smoothly.
NOTE that in the cut file, a tiny numeral is provided inside the accent shape finger hole space for reference. When moving the accent shape, the numbers will "fall out" and need not be cut.

4. Join each box side to the front side edges by applying glue to the flange/tab, folding the box so that the tab perf line and the front side straight edge come together, tab behind the drawer edge. Hold until glue is secure. Complete both sides.

5. Apply adhesive to the backside of the drawer front "lining" section, then fold it down behind the drawer front and apply pressure to secure. It will help this process to turn the drawer face down on a flat surface and apply finger pressure from the inside of the drawer.
NOTE that the drawer front shapes of some of the tiers make it necessary to "curl" the lining corners in toward the center as the lining is folded back into place. Make sure this process does not cause previous side seams to become unattached.

6. Insert and affix the eyelet at this point in the drawer construction, since once the drawer back end seams are completed, it will be much more difficult (if not impossible) to use an eyelet setter tool and hammer.
(If you have a different style tool to set the eyelets, this may not be as necessary. And of course, you can leave the eyelets off, or even eliminate the eyelet holes using your cut file manipulation software.)

Use setting tool and hammer to set the backside of the eyelet. Here you can see that the setting tool extends through the open drawer back end during the process

7. Join the drawer straight side edges to the back section by folding it upward into position, overlapping sides to align with back perforation line and gluing securely in place.

8. Prepare the cubbies by folding roughly into a "tube", bringing the long side tab perforation line to align behind the opposite side straight edge. Take care that the ends of the two also line up precisely.
Fold the back flanges in toward the center at the back of the cubbie, apply a little glue where they overlap, square the cubbie up and secure their attachment to each other.

This is how the cubbie looks when it is finished, viewed from the back.

This is my no. 2 drawer inside its cubbie.

9. Divide the thirty boxes into a set of drawers with cubbies 1 thru 5. Do a "dry fit" to make sure you understand how the tiers fit together, with no. 1 on the bottom, thru no. 5 on the top. Remove the drawers. Join the cubbies into a stack by applying sufficient adhesive to the top surface of the lower number cubbie, they position the higher number cubbie on top. Take care to precisely align backs and side edges.

Apply pressure to the two faces being joined by inserting fingers into the drawer cavities. Rotate pressure through the entire area to ensure complete adhesion.

10. Continue adding each cubbie in sequence to the stack until all five tiers are in place. Make sure to be precise and thorough in the joining process.
11. Complete all six stacks.
Here you can see the completed stack, with the cut-out numerals up the "spine", no. 1 on the bottom, etc.

12. Prepare the six divider shapes by folding the top reinforcing flange back and gluing in place.

13. Apply sufficient adhesive to the side of the stack (each side of the five cubbies that remain exposed). Position the divider so that the bottom straight edge (excluding the bottom tab) and the back straight edge align with corresponding edges of the stack.

Flip the stack with divider face down on a flat surface and apply pressure to help the surfaces join to each other, inserting fingers or other tools into the cubbies as shown.
Join a divider to each of the 6 stacks in this manner.

14. Prepare the post by folding along each of the long perforation lines as inward folds to form a hexagonal tube.
NOTE that the seventh section of the shape is the joining tab, identifiable by the slanted ends.

15. Overlap the lead straight edge over the tab so that it aligns precisely at the perforation line, then apply pressure to securely attach.

The best way to join this seam is to "squash" the tube flat and apply pressure along the edges being joined, as shown here.

When the seam is secure, "un-squash" the tube and help it form its regular, symmetrical hexagon shape.

16. Insert the tube through the hexagon opening in the base disc, and slide into position so that the bottom end tabs perforation lines are aligned at the disc edges.
If easier, you can insert the top end through the backside of the hex opening.
17. Fold the tabs back and glue securely to the base disc.

18. Prepare to attach the first stack to the base and post by applying adhesive to the bottom of the stack (cubbie no. 1). Insert the divider bottom tab through the base disc slot, make sure the stack's wedge "foot print" fits properly between the adjoining slot, true up the positioning, then apply pressure to secure it in place.

This view shows the stack from the top. NOTE that the "spine" of the stack corresponds to a face of the post.
It may seem wise to glue the spine to the post. HOWEVER, some "wiggle room" has been allowed in the engineering of this project, so that if you glue the first, or even first few stacks to the post, you may not be able to properly align the final stacks. THEREFORE, it is best to join the stacks to each other and not the post.

19. Position and join the second stack in place in a similar manner but this time apply adhesive to the exposed cubbie side faces of the new stack so that the two can attach.
20. Continue in the same fashion to position and join the remaining stacks until all six are in place.
(Stand back and admire your work!)

21. If desired, position and attach a reinforcing base disc to the bottom of the assembly.
(NOTE that the final cut file reinforcing shape does not include the hexagon cut out.)

OPTIONAL STURDY PLATFORM STEP
22. To make my project even more sturdy, I obtained a very thick "chip board" 12x12 sheet from my local paper store. Using a cut-out of the large hexagon shape "template" included in the cut file, I marked the shape onto the board ...
(NOTE that I conserved my card stock by cutting my reinforcing platform disc inside this template shape when preparing to cut.)

... then used a heavy duty art knife, rotary board and plexiglass straight edge to cut the hexagon.

Finally, I centered and attached the bottom of my pumpkin assemble to the face of the sturdy hexagon. For this attachment, I used a stronger adhesive, Fabri-tack.

23. Prepare the dome platform (this provides support for the center of the dome and the stem) by folding the tabs outward, all other perforations inward.

24. Bring each straight edge of the boxing segments to align with the adjacent tab perforation line and glue in place.

25. Position the platform on the top center of the top disc shape, taking care that the hexagon openings of each align exactly! Glue the tabs flat against the upper face of the top disc.

26. Prepare the dome wedge shapes by folding side tabs inward, horizontal perf lines inward, except most-inward "tab" folds outward (valley fold).
The tab at the pointy end of the wedge will rest on and attach to the platform in step 27.

27. Join the dome wedges to each other, aligning and attaching each segment of the edges being joined (straight edge aligned at corresponding perf line of adjacent wedge, etc.) one by one, except pointy-end tabs remain unattached.
Join all wedges to form this "donut" shaped dome.

28. Position over the top disc and insert bottom edge tabs through slots. This insertion process will probably require some patience to get all the tabs into place. It may be helpful to work the tips only into the slots, then move around until each set of tabs has tips inserted, then work the dome down until it is flush with the disc and all tabs are fully inserted.

29. Fold the tabs toward center and glue in place. (This may require patience, as well.)

30. Lift the dome tabs at the post edges, apply adhesive to the backside, then reposition to attach. Push the tabs outward slightly to adjust and refine the recessed stem "well" a bit, as desired.

31. Prepare the stem by folding side extensions back from hexagon top, fold mid-side perfs outward slightly, fold side and end tabs back.
32. Attach each extension side edge to the adjacent corresponding edge of the next extension, one at a time, and glue in place. NOTE that the stem has a wider top and narrower bottom, by design.

33. Apply glue to the end tabs, then fold to the inside of the tube and hold in place until secure. (This forms a rim for the stem.)
34. Bend the accent side shapes slightly to match the bend in the stem box side shaping. Attach each in place. Position and attach the slightly-offset top hexagon to stem top.

35. Dry fit the stem to test first, then remove. Apply adhesive to the rim edge, reposition, and hold until secure. (If you plan to lift your pumpkin using the stem as a handle, make sure this is a very secure joint. Consider using a stronger adhesive, such as Fabri-tack or hot glue.)

36. Layer leaf shape and accent. Audition for positioning, then attach vine shape end near stem base, also apply adhesive dot to vine backside near dome edge. Position and attach leaf over vine with limited adhesive application (that is, you won't want or be able to attach the complete leaf backside, so be selective).

37. Position and attach the numbers to the drawer faces.
There are several choices available. You could number 1-6 on the bottom tier, and work upward to attach 26-30 on the top tier, so that the closer Halloween is, the higher is the drawer being opened.
Or, as I chose, place the numbers randomly so that part of the discovery (and learning) involves thinking about which number was yesterday, determining which number is today, then finding that number.

38. Complete the layering and assembly of the October 31st medallion, if desired, including the optional back base shape that includes the punch holes pair. Thread with 24" or so of ribbon, then, on Halloween, instead of opening a drawer, the medallion is tied into position.
No drawer on Halloween, because the "treat" of that day is the actual Halloween festivities!

Here is the finished project.
(Hours of work - and fun - and hopefully worth it!
I have embellished my finished paper project
using self-sticking black stud swirls - 3 packages cut into sections
swirled down from the stem across dome & onto drawers.)
swirled down from the stem across dome & onto drawers.)