Showing posts with label snake. Show all posts

Monday, October 12, 2020

Snake 3D Segmented Form

Build shaped head, pointy tail, and multiple body segments, 
all based on an octagonal tube, with reinforcement tube-end inserts. 
Connect with overlapping top and bottom hole-punched 
tabs and join with pairs of brads to allow 
this imitation reptile to swivel and slither. 
Decoration details include ring eyes, 
lower jaw liner and optional tongue, double layered head, 
body and tail markings to simulate a corn snake coloration 
(or any other combination that you wish to customize). 
Additional variation possible by using the two-part body 
tube optional shapes to change belly color. 
Tube size is approx. 1.625” diameter. 
Head segment is approx. 2.25” long, body segment 1.75” long, 
tail segment 3.75” long (all excluding tab connectors). 
Ten-segment model shown with head and tail is approx. 27”. 

ASSEMBLY: 1. Identify and cut the shapes:
A head tube with eye rings and l/r fangs
B mouth interior liner, optional tongue shape
C head accent overlays
D, F & I tube end insert/reinforcement (1 each
for head and tail, 2 per each body segment;
NOTE that the final cut file shape includes a probe hole)
E body tube (sample includes 10; shown as optional
two-part belly contrast version, pre-joined)
G body tube accent overlays (1 set per segment)
H tail cone   J tail cone tip pyramid
K tail tube end accent overlays and cone overlays
2. Prepare each body tube shape by bending back
at each long perforation line to define eight segments
plus end flange tab.
3. Form the shape into to tube to join [final] side seam
by overlapping the straight side edge over flange to
align at perforation line, and glue in place.
4. Prepare the tube end inserts (ALL) by bending
the edge tabs forward.
5. Apply adhesive to the underside of each flange
and also the hole-punched connector tabs, then
carefully insert into the end of the octagon tube . . . 
. . . adjusting the tube to match the octagon panel,
and sliding into the end of tube (this is a tight fit)
until tab outer edges align precisely with tube end edges . . .
. . . and hole punches and connector tab edges align
as precisely as possible. Apply pressure all around
until joinings are secure.
6. Repeat step 5 for second tube end, using the probe
center opening to insert a rod-like tool such as a dowel,
skewer, or pencil shaft to help retract reinforcement if
it gets pushed in too far, as adjustments are made
toward "perfect" alignment.
7. Repeat steps 5-6 until all body segments are formed.
8. Prepare body tube accent overlays by bending
back along perforation edges.
9. Position center panel over top body panel,
wrap side segments around tube segments and
attach in place, first placing the outer darker accent  . . .
. . . and then the upper lighter accent, centered
within the larger accent. Perforation lines are positioned
to allow the wrap; paper thickness may affect this.
10. Prepare the head shape by bending back on
all perforation lines for structure, side tabs and wedge tabs;
also prepare the tube end reinforcement.
Position and glue the eye rings over the eye cut holes.
11. Begin to shape the top front of head by bending
and overlapping the side front head straight edge over
the adjacent wedge tab to align at perforation marks,
and glue in place. Repeat for same seam on opposite side.
12. Align and glue the angle seams at jaw in similar manner,
on both left and right sides.
13. Position each fang under the corresponding front
"nose" section so that perf guide marks align approx.
at head edge, with nostril cut hole aligned, and glue in place.
14. Form the head shape into a tube to bring together
the straight upper side edge segments to overlap
at the two-part tab segments opposite to align
at perforation lines, and glue the seams.
Here is the completed head tube.
15. Prepare the optional mouth lower contrast insert
by bending forward slightly on each of the perf lines.
16. Apply adhesive to the underside, then insert
the liner through tube back . . .
. . . until the edge nearly aligned with jaw cut edges,
and perforation lines match up, and glue in place.
Apply finger pressure until secure.
17. Apply back curl to the top half or third of tongue,
then apply glue to the underside of the back
end half, and . . . 
. . . insert the blunt end through mouth opening
to desired exposure length, centered, and glue in place.
18. Position, insert and attach the tube end
reinforcement as done in for body tube in step 5.
19. Prepare the head accent overlays by bending
back slightly at perforation lines, then positioning
over the top segment of head tube with perf lines
aligning over segment lines, and glue in place.
Repeat for smaller contrast overlay.
20. Prepare the tail cone tube shape by bending
back on all segment cone wall, side flange tabs
and wedge tabs. Pay particular attention to creasing . . .
. . . along the wedge tab seam perforations
to complete the fold ALL the way to end of seam.
21. Bend the sections together to overlap a straight
edge over the adjacent flange tab to perforation line,
and glue seam.
Continue to bend, adjust and complete each of the
wedge seams across the tail shape until all are joined.
21. Form the tube/cone to bring the final two-part
seam edge to overlap across tab flanges and glue
to complete the tail cone assembly.
22. Prepare the tip cone by bending back on
all the narrow wedge perforation lines, and also
bending back very slightly on end tabs.
23. Form the shape into a narrow cone to overlap
straight side edge over the long narrow wedge tab
opposite. Note that a pointed tool such as a knitting needle
or skewer tip may be inserted behind seam
to help provide a "press against" surface to secure seam.
24. Apply glue to the outside surface of the end tabs
of the tip cone, then . . . 
. . . insert the tip cone through the tail's wide end . . .
. . . until it can slide into place through
the bottom opening . . . 
. . . until it extends out to complete the pointed tail 
profile. Use a rod tool to help slowly and carefully
push the tip outward until end tab perforations
align under/at main tail tube edges; apply pressure to
attach tabs to inside of main tail tube.
26. Position and attach the wider and . . .
. . . narrow overlay for tube end, and . . .
. . . and for approx. midway down the cone portion,
where the perforations allow it to wrap to match.
27. Assemble the head and body units by bringing
together the connector tabs (select which overlaps
to top layer, then follow that choice consistently) . . .
. . . and insert a decorative mid small size brad
through both tabs and bend prongs back underneath . . .
(hide prongs behind connector tabs if possible).
Repeat for the bottom tabs.
28. Continue to add body units in the same manner.
29. Position, align and attach the tail unit
in the same manner . . .
. . with decorative brads through top and bottom.
Here is the completed snake.

Tuesday, September 20, 2016

Spooky Ensemble 3D Projects

Dimensional projects plus 2d 'S' form snake
can be created from paper for Halloween decorating fun
as stand-alone designs. Or, they can be added
to the 'SPOOKY' letter box ensemble as shown below
for a display bound to delight.
All five projects shown will be described in this post
as separate tutorials (order: snake, ghost, hat, pumpkin, bat).
The letter box ensemble is demonstrated as a separate tutorial
in this blog, including how to prepare the foam core base.

Assembly of the projects will be provided in order
left to right as they appear on the ensemble.
Please NOTE that placement or attachment to the
letter blocks ensemble will be described in
the SPOOKY 3d Letter Box Ensemble tutorial.

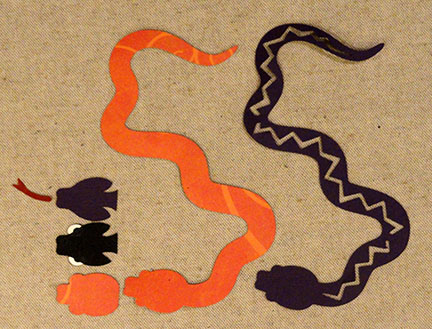
SNAKE (2D)
1. Identify and cut the shapes.
NOTE the head layers include a base shape
that shows thru as the head back markings,
a middle layer that shows through as eye balls
(shown here with the eye white shapes in place),
and a top "body color" shape.
2. Layer the body with zigzag cutouts with the
show-thru layer.
3. Layer the head layers: a) bottom markings layer,
b) middle eye pupil layer, and c) top body layer.
4. Add the eye white over the middle layer
eye protrusions that remain exposed
even when the top layer is in place.
5. Position and attach the head build up
onto the body unit.
6. Position and attach the tongue with the
end attachment "bulb" under the nose area.
Here is the completed snake design.
7. Position and attach the snake 2D onto
the front of the S letter box as shown,
so that it mostly fits without passing the
box's edges.


GHOST 3D SLICE FORM
8. Identify and cut the shapes:
A back body cover (for letter box ensemble,
use the alternate back "cover" with bottom extension)
B back body   C lower arc   
D upper arc with eye panel   E eyes
body slice shapes in order as assembled, 
l to r (counterclockwise)  1 thru 8
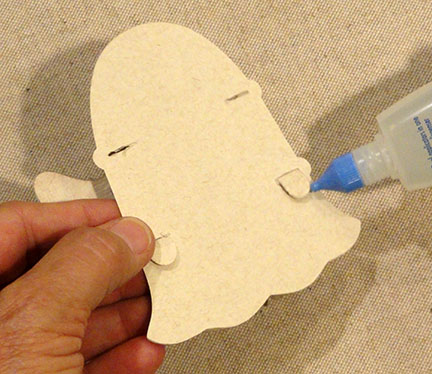
9. Prepare the slice shapes 1-8 by bending forward
(valley fold) at the vertical center line.
10. Pair them together as shown, then place backsides
of adjoining halves together, and glue in place
for all four "pairs". 
During the gluing process, it is very important to
align the backside creases as exactly as possible.
One way to do this is to treat the joining shapes as
stacks, and having them in folded positions as
they are placed together to attach.
11. Next, join the pairs together in the same fashion,
taking care that the backside creases are aligned
as accurately as possible. Place this folded assembly
onto a flat surface and apply pressure as the glue cures.
12. Fan out the slice assembly, then position the
left back (slice no. 1), position and attach on
the front of the back shape, lining up the notch slots
of the slice over the corresponding slots on back.
Apply pressure until securely attached.
13. Repeat the step 12 process for the opposite
right side (slice 8).
14. Gather the unattached slices at the center
as shown, then position and "slide" the
lower ring over them (thickness won't all fit)
matching center ring slot 
with lower slice slots. Then . . . 
. . . one by one, slide the slices outward
so that they match up with their corresponding
arc notch.
Once all slices are lined notch to notch,
gently work the arc fully into position.
15. Insert arc end tabs into the lower back body
slots . . .
. . . fold tabs down and glue in place on backside.
16. Attach eye contrast to the upper arc eye extension
(or wait until ring is in place to do this).
17. Position the arc over the slices at the notches,
and work to align each slice with corresponding
arc slot until the upper arc can be fully seated
and pushed in. Insert back tabs through slots
and attach to backside as in step 15.
18. Apply adhesive to the backside of the
back cover, position and attach.
NOTE that the covers have an offset along side
edges so they WILL NOT match up exactly.
For SPOOKY Ensemble, use the
back cover with the lower edge attachment
extension, shown here.
19. Bend the eye extension down and glue to the
two slices that it touches.


SKULL (2D) DANGLER
20. Identify and cut the shapes.
It is recommended to cut at least 
2 back shapes (L lower)
and 4-5 front shapes for strength 
and dimension.
21. Layer and join back shapes . . . 
. . . and front shapes, taking care to align all edges
as precisely as possible. It may be helpful
to place flat weights onto these shapes
during the build-up gluing process to help
avoid warping.
22. Position and attach front to back.
The skull dangler is ready at this point to
attach to whatever you are embellishing.
Notes for attaching inside the small O of
the Spooky letter box ensemble are provided
in the tutorial for that project, in this blog.

WITCH MINI HAT
23. Identify and cut the shapes.
24. Prepare the crown shape by bending back
(mountain fold) on all wedge sections and side tab,
also bend bottom tabs outward.
25. Form the crown shape into a cone to bring
the straight side edge to overlap opposite side tab
to perforation line, and glue in place.
26. Apply glue to the face side of crown tabs,
then slide the brim shape, face side up over
the crown and down until it seats fully over the
tabs. Apply pressure to secure tabs connections.
27. Apply adhesive to the underside of the
brim shape (and attached tabs), then position
and attach the accent under-crown, taking care
to match up interior hexagon openings of each.
28. Prepare the band by bending back on
all perforations.
29. Slide the buckle onto the band,
and carefully slide along until it is centered
onto one of the sections that can be
identified as the front.
30. Form the band into a ring to overlap the
straight end over the opposite tab to perf line,
and attach.
31. Slide the band over the crown point, and
down into position.
Add glue to secure it in place, then . . .
. . . add moon and star cutouts as you wish
to complete the hat.


PUMPKIN 3D SLICE FORM
32. Cut the shapes: 12 oval slices, 1 leaf ring,
1 strip for tendril.
33. Prepare the shapes by bending forward
on all center perforations.
34. Position first two slices with backs of two
adjoining halves together, and glue in place,
taking care to align outer cut edges as precisely
as possible. Also take care to align the perforated
folds exactly. 
Apply pressure along the stacked folds
to ensure crisp construction for better finished product.
35. Position and attach the next shape - slice 3, in similar
back-to-back fashion, and then continue to
 join remainder one by one until all 12 shapes are
attached into one assembly.
36. Bring the final unattached backs of slice 1 and 
slice 12  together, align and attach to each other
37. Prepare the leaf ring by adding slight curl
downward to each leaf extension.
Place decorative brad through center hole
(from face side toward back), then apply glue
to the center underside of leaf and to brad stem,
and insert into the center "tunnel" 
and hold in place until secure.
38. Add tight curl to the tendril strip by wrapping
it around a small gauge knitting needle or
skewer.
Insert one end under the leaf and secure
with dab of glue. Artistically trim tendril
to desired length.

BAT ON A WIRE (or string)
39. Identify and cut the shapes.
40. Position and attach the accent, offset wing shapes
on the front side of the wing/body unit.
41. Prepare the body shape by bending back
on ALL perforations for body panels and tabs.
42. Bend the upper side angle panels and front
upper panel inward to bring the straight front edge
to overlap the angle tab to perforation, and glue in place.
Repeat this seam process for the other upper
(right) side seam, and the two lower side seams.
43. Bend the upper side tabs inward,
then bend upper panel into place and glue to attach.
Repeat this process for the bottom panel.
44. Position body over wing assembly
to align and insert tabs into slots.
Since this is small scale and relatively snug fit,
it may be helpful to use a thin blade tool
such as the spatula shown to help guide tabs
into slots.
On the backside, bend the tabs inward
and glue in place. Use the back finger hole
to apply pressure to secure the tabs in place.
45. For bat-on-a-string, thread a length of twine
or perle cotton onto a needle, then insert the
needle through the hole on the top body panel . . .
. . . and out through the finger access opening.
 Tie the end into a significant size "stop" knot . . .
. . . then pull the string from top until 
knot stops inside.
46. Position and attach the back cover
to conceal the backside construction.
47. Layer the eye shape over the contrast eye shape
and attach. Position and attach the eye assembly
over the eye attachment tab and glue together
the surfaces that match.
48. Position the trapezoid panel of eye unit
over the corresponding top body panel of
the bat assembly, and glue in place.
49. Apply dab of glue under eye extension
then press back against body and hold
in place until secure.
50. For bat-on-a-pick, obtain floral wire,
cut a length of coat hanger wire, or
purchase prepared place setting wire picks
such as these available from craft stores
in the wedding decoration aisle (JoAnn's Fabrics).
51. Insert the wire through the body bottom hole . . .
. . . apply a generous dab of quick grab glue 
(hot glue used here) to end of wire before
quickly pushing the wire all the way into position
where it can be "caught" in the head top hole.
52. Complete the eye prep and attachment
steps described for string version.
Now bat is ready to place on the Spooky
Ensemble, in a floral arrangement, etc.