snugly over base. Lid front overlay includes
inner ears, cheeks and nose
inset cut outs
to assist with placement of eye lashes.

Forehead wrinkles cut as
a joined unit
which is then positioned over front, glued
then trimmed to match
top curved edge of head.

Layered-for-thickness tail can hook into base backside
slot to make the kitty stand upright (or use
opt. no-slot back panels to omit
tail).
Layered heart (with a message written
discreetly on the backside if
desired)
can be held by kitty’s cut out arms.
Box lid is large enough to have a
standard gift card
attached inside.
Box measures approx. 4” wide x 6” tall x
1.25” deep
(without tail) when fully assembled and closed.
ASSEMBLY: 1. Identify and cut the shapes:
A box front panel B front overlay with arms cut outs
C inset contrast shapes for nose & nose base,
cheeks inner ears, closed eyes
D LID top shape boxing strip
E-F LID left & right side boxing strips
G LID bottom boxing strip
H BASE box back panel
I BASE box back panel overlay
J BASE top boxing strip
K-L BASE left and right boxing strips
M BASE bottom boxing strip
N BASE cross bracing strip
O test strips (6-7) and slot
P tail (5-6) and reverse tail (1)*
Q large heart layers for stacking (3-4)
R smaller heart
*total quantity determined with test strips, slot

time lapse for glue to dry:
A) Layer and join together large hearts, taking care to
align outer edges as precisely as possible.
 Position and attach smaller heart in center of larger

heart stack front.
 Press under a heavy flat weight until thoroughly dried,

usually a few hours or overnight.
 B) To test your card stock thickness to determine how many

layers of tail will be required to fit fully but easily
into tail slot, first layer strips into a stack, then . . .

the stack fits fully but not too tight, allowing a little
bit of grace for the application of glue between layers.
When the target number of layers is determined,
adjust and cut the tail front multiples and the single back.
 C) Layer and attach each front shape, taking care that cut

outer edges are aligned as carefully as possible, particularly
the half-slot where tail will hook over box back panel layers.
 Layer the reversed back tail in same manner, then . . .
 . . . test, if desired, by hooking over the layered back panels.


Press the tail assembly under a heavy flat weight
for hours until completely dried.
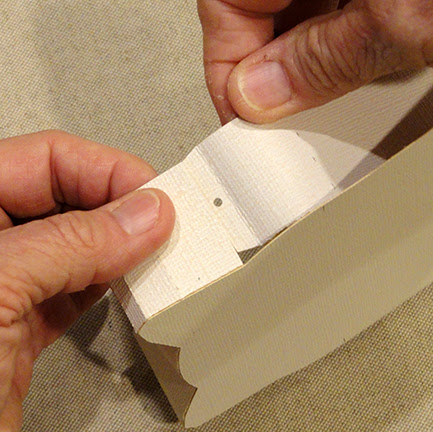
 3. Become acquainted with the boxing strips for LID.

NOTE the small cut-in symbols of circle, triangle, square
or 'X' in end tabs or joining end tabs. These will provide
guidance regarding joining sequence.
 Also NOTE the center tiny notch at center top of

top boxing strip.
 Finally, check out the difference between the BENDING

perforation lines (near end tabs and at corners of shapes,
and GUIDE MARK dash lines. The guide mark dash line
shown in this photo has been highlighted with pencil
for visibility. DO NOT BEND. Instead, use to help align
transition point between straight segment and curved.

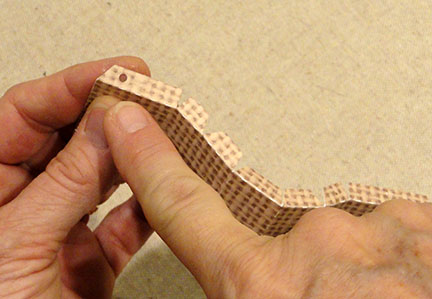
 4. Prepare the top strip by bending at the regular perf

At the multiple tab segments, use a rod-like tool such
as this narrow dowel to add back curl in a similar manner
as curl would be added to curling ribbon. Add the curl
ONLY in the curved segment, stopping as guideline.

lines across strip as shown, with "valley" bends on
each side of center, "mountain" folds at all others.
 5. Add slight back curl at the center segment where multiple

tabs will indicate a curved joining.
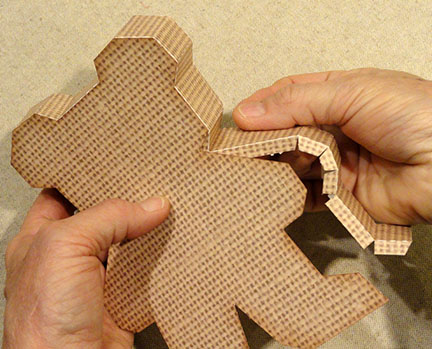
6. Position curved tab edge along top of front panel . . .

the perforation bends aligned at the edge's angles.
Add fingertip pressure to create initial joining, then . . .
 . . . flip over the apply fingertip pressure along the seam

until it is completely secure.
 7. Continue toward one side, bending and fitting

each segment along the plain edge of front panel,
bending the tabs inward and matching the edge
along perforation edge, then gluing in place.
 8. Repeat the process for the opposite side.
 9. Identify the next strip end to be joined by locating


the symbol (circle shown here) that matches to
the symbol in edge tab of previously attached strip.
 Add back curl with rod tool to the short end portion

taking care not to tear multi-tabs edge. Bend end tab
forward as a "valley" bend.
 10. Position the end tab under the previous strip end

edge, adjust and glue in place.
 11. Fit the curve and the straight portion to the panel
edge, matching the guide dash mark on the panel
to the guide mark "line" on the strip, and the end
of the strip at guide dash mark near foot curve.
 12. Prepare the bottom strip by identifying the center

curve edge with 'V' cut out marking the center,
then adding back curl . . .

. . . to all the multi-tab segments for center, and
rounded corners of bottom paws. Between rounded
paw segments, the bottom of paws have full perforation
lines where the strip should be bended forward as
"valley" folds.

to assist with previous strip end alignment.
 13. Position and attach side strip end straight edge

at new bottom strip tab guide mark line. Then . . .
 . . . fit the curve edge and straight edge sequence

that will wrap around first paw to "valley" bend
at panel corner, adjust, and attach in place.
14. Position, adjust and attach the center segment
curve edge, then repeat the around-paw step
for the final joining.
15. Position, join the final side strip at end tab, prepare
and position into final front panel edge to attach in place,
while at the same time tucking the end tab under
straight end of top strip.
 16. Begin preparing the front panel with decorations

by applying adhesive to backside of "wrinkles" shape,
then position at top center with tiny gap between top
of head and header as shown.
 17. When glue is dried, use scissors to hand-trim away

header and excess EVEN with head edge.
(NOTE that this may be easiest to accomplish
by turning front overlay panel face side down
to see the head edge more clearly.)
 18. Position and attach the closed eye shapes

on each side of nose base cut out as shown.
 19. Turn overlay shape face down to apply adhesive

to backside, excluding the front paw/arm shapes,
as shown.
 Then position the overlay over the top of the LID

assembly, with outer edges even and aligned.
 20. Position the inlay shapes of inner ears,

cheeks and nose base.
 Finally, position and attach nose shape over base.
 21. Repeat the LID boxing strip assembly process


to complete the box BASE.
22. Prepare the base cross brace by bending end tabs
and bottom flange tab to forward to perpendicular.
 23. Apply glue to backside of tabs and flange,

then position inside of BASE, in line with the upper
"shoulder" curve guide mark lines on each side.
Take care that tail slot remains clear.
Apply pressure to attach in place to side walls
and backside of back panel.
 24. Position and attach back panel overlay over

BASE assembly, taking care to align slot opening
edges as precisely as possible.


25. If appropriate, a standard gift card can be
attached behind the front panel of LID assembly.

26. To close the box, fit the BASE inside of the LID.
 NOTE that there may be slight gaps that need

a little double-sided adhesive tape assistance
to keep both wall layers close together.
 27. To add tail, slide top end into slot, then . . .


on the backside, then tuck under the free paws.
Use sticky tape or dots to hold heart in place.