Thursday, September 16, 2021

Goose Shaped Box

Canadian goose shaped box has accent assemblies 
attached to front and back offset panels of 
a flattened crescent-shaped, boxing-strip container. 
(Or, omit the extra contrast accent layers 
for a simpler “white” goose.) 
This unique gift box is designed specifically for
 “Twelve Days of Christmas” giving, and includes 
a number ‘6’ hint tag to attach with neck ribbon at provided slot
cut through front of box layers only. 
Neck extensions of front and back are reinforced 
with short “post” support. 
Box measures approx. 5” wide x 4.5” tall x 
1.5” deep when assembled. 

ASSEMBLY:  1. Identify and cut the shapes:
A right body hull front plus 
B right body hull interior to stack (4)
C right body hull inside shape
D left body hull front plus 
E left body hull interior to stack (4)
F left body hull inside shape
G right body accent BASE shape
H container right & left side walls
I container boxing strip
J head post reinforcement & K post strut supports
L wing accent layers: base, over wing, wing caps
M (right) neck, neck mark, beak, eye, breast accents
N (left) body & wing accents
O number 6 tag and offset base
2. Prepare and glue up the right and left body hull shapes
that are layered into a stack for sturdiness so that
they can be "curing" while other assembly progresses:
stack the front hull and three interior shapes, one by one,
and glue together, taking care to line up ALL cut edges,
including the ribbon slot interior edges as accurately
as possible.
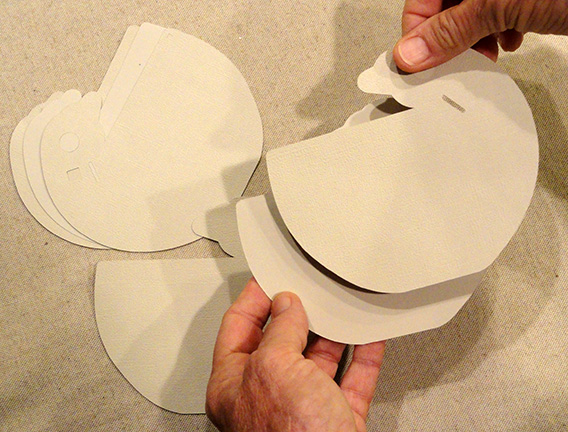
Place each glued-up stack on flat surface and under
a flat heavy weight such as this thick book.
Consider placing something heavy on top of the book
for extra pressing weight, and leave in place until dry.
This could require several hours or overnight.
Pressing will help the shape glued with liquid adhesive
remain flat, avoiding warping or curling.
3. Assemble the wing units by positioning and attaching
the over wing onto the contrast (shows-thru) base
with outer edges aligned precisely.
Position and attach the top long and shorter wing cap
shapes onto the front end of each wing base assembly
with outer edges aligned, and glue each in place.
Press each wing assembly under a flat weight
while drying.
4. Position and attach the neck/head accent shape
on top of the body base accent where edges
correspond.
5. Position and attach the wing assembly onto
the body base where upper for top front curve edges
correspond. Position and attach the head marking shape
and the breast shapes where they fit onto the base.
Position and attach the beak and eye shapes.
(Repeat for left body assembly.)
Position and attach the accent assembly on top
of the corresponding hull body shape, with narrow
offset margin all around. For right hull and accents,
take care that the ribbon slot is visible next to
the goose's neck edge (not covered up, that is).

6. Prepare the neck reinforcement post by bending
the post tube shape back on all longer vertical
perforation lines, and forward on short end tab
perforation lines, as shown.
7. Form the shape into a tube to overlap the straight
long edge across the opposite tab to perforation line,
and glue in place.
NOTE that the tube can be pressed flat to apply
fingertip pressure along the seam to assist proper joining.
After seam is dry, open the tube up into its
square form.
8. Slot together the two interior strut supports
by interlocking the cut ends as shown.
Push together until ends align.
9. Insert the X strut shape into the square tube interior
with each "arm" extension fitting into a corner.
Push the reinforcement strut fully into the tube
so that ends align with tab perforations.
10. Insert the tabs end of tab through from right side
through to backside of left inside hull shape . . .
. . . until tabs are fully through and tab perf cuts
align at edge of opening. Bend tabs back and 
glue to the underside of hull shape.
11. Position and attach left post/hull shape over
inward surface of left hull stack, aligning outer cut
edges as precisely as possible. To assist with gluing
and to avoid warping, consider placing flat heavy
objects onto the stack, working around the post,
and allow to dry.
12. Prepare the container boxing strip by bending
back on all cross perforations and side or end tabs.
13. NOTE the arrow symbol cut into one side end tab
that indicates that this is the FRONT end of boxing.
NOTE also the corresponding arrow symbols
cut into the container side wall shapes, to indicate
the front ends.
14. Position the first front tab of boxing strip next to
the front top edge of right container side panel, then
overlap the wall edge across the tab to align at perf
line, adjust for top and bottom edges/perforation
alignment, then glue in place.
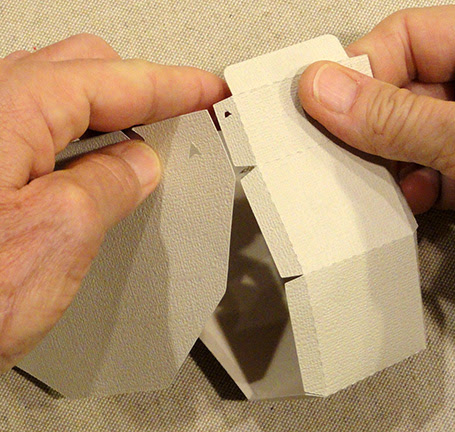
15. Bend the boxing strip into position to continue
to align and glue the boxing edges to corresponding
side wall edges.
NOTE that as the assembly progresses, it will be
helpful to place the side wall face down on flat work
surface and press with fingertips along the seam.
16. Continue to complete the right panel to boxing
assembly, then repeat for the left panel joining.
17. Bend the end tabs to the inside and glue in place.
18. Apply glue to the LEFT side wall of container
assembly, then position over the inside face of
the left hull stack with post, aligning the top end
corners with cut guide marks on the hull . . .
. . . as well as lining up the container and stack
straight bottom edges, and glue in place.
Reach fingers inside the container - working around
the post - to apply pressure. Consider finding short
heavy flat objects that can be placed inside the container
volume to help press the glued-up surfaces flat while drying.
19. Bring the exposed post end and inside right hull
interior shape together to insert post tabs 
through square opening, then . . . 
. . . bend tabs back and glue to backside surface.
20. Locate the guide marks then position and attach
the right side of container to inside surface of right hull.
Manipulate and press to attach the two surfaces together
as was done previously for left assembly. 
21. Position and attach the right hull shape over
the right interior panel, with outer edges and
ribbon slot edges all aligned as precisely as possible.
Press (face down) with fingertips and weights.
22. If desired, position and attach the optional 
number 6 shape onto the tag base, with offset margin
around the number. Tie a twine loop through tag hole.
Thread decorative ribbon through the neck slot
and around the front panel inside the box ONLY.
Pass ribbon end through tag twine loop and tie
decorative bow.
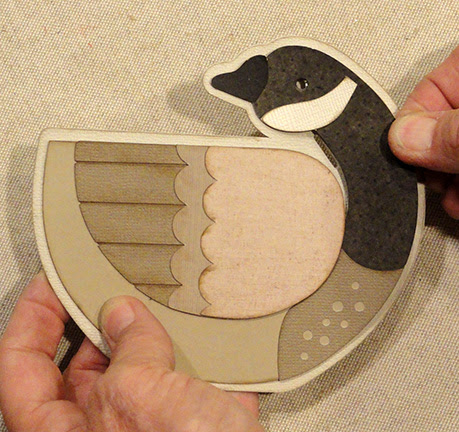
Here is the completed goose box, prior to
filling and Twelve Days of Christmas gifting.

Goose Shaped Gift Tag

Simple goose shape on a narrow offset base 
can function for many gifting occasions,
including as herald of “Six Geese A-Laying”
 from the Twelve Days of Christmas. 

Tag back base has perforation line across neck
 to allow back to bend outward to reveal 
message space behind front panel, 
if desired, with slot for narrow, soft ribbon 
to insert and tie. 
Tag measures approx. 2.8” wide x 2.75” tall. 

ASSEMBLY: 1. Identify and cut the shapes:
A front tag base
B back tag base (with perforation line; shown reversed)
C goose body base   D wing accent
E beak accent   F under-breast contrast show-thru
G eye dot accent
2. Position and attach wing and beak on top of
body base where edges correspond.
Also position the breast under accent onto the backside.
3. Position and attach the body assembly onto
tag front, taking care that the ribbon slot remain
visible and accessible next to the goose's neck.
Position and attach the eye.
4. Prepare the tag back shape by bending forward
 at the perforation line.
5. Position the tag back behind the tag, with the upper
portion aligned at top, and glue ONLY the upper portions
together, back to back.
6. Thread narrow ribbon through the front neck slot,
then re-direct around the neck back (front of tag only)
to tie neat knot and bow; trim ends.
7. Attach twine loop through hang hole (add
decorative bead as desired) and form hanging loop
as desired.
Here is the completed goose tag to attach to
Twelve Days of Christmas gift - or other gift.

Saturday, September 11, 2021

Five Sided Dome Box with Gold Rings

Five sided dome lid fits over shallow base, 
with thickened-layer lid and base rims, 
and lacey-edge “drop” walls from lid edge. 
Two-layer sprig wreath adorns top, with accent overlays on 
angled lid panels holding two-part twist rings, tied on with twine. 
This unique box can suggest the “Five Golden Rings” 
for Twelve Days of Christmas gifting. 
Or, substitute non-punched panels and omit rings 
for an all occasion gift or treasure container. 
Box measures approx. 5.5” long x 5.25” wide x 2.75” tall. 

ASSEMBLY: 1. Identify and cut the shapes:
A dome lid shape   
B rim thickening layers (2 guidemarked; 6 interior)
C lacy "drop" lid side panels (5)
D base interior pentagon
E base side walls (short plus long sections)
F base rim thickening layers (1 guidemarked; 7 lower)
G dome accent panels (5)
H wreath whorls in large & small
I twist rings (5)   J twist rings with split (5)
2. Prepare the layered for thickness stacks so they
can be drying during the other assembly process:
Identify the corner guidemarks on base top shape
(and on dome layered rim top and bottom shapes).
Layer and glue together the base shapes, one by one,
so that the cut edges line up precisely. Then
layer and attach the top layer with guidemarks onto
the stack.
Immediately place a flat heavy object such as this
thick book volume on top of the stack (including something
else heavy on top of the book if possible) until the stack
is thoroughly and completely dry - this may require
several hours or over night. Pressing as described will
assist to keep the liquid-glued up shape flat and avoid
warping and curling.
3. Repeat the process in step 2 for the rim shapes,
layering and gluing with the corner guidemark shapes
on top and bottom.
4. Prepare the base wall shapes by bending back
on all perforation lines for wall segments, fold-in wall
liners, bottom tabs and end tabs.
5. Join the walls into one length by aligning, overlapping
the straight end wall edge over the adjacent
tab, adjusting top to bottom, then gluing the seam.
6. Form the walls strip into a "ring" to align and join
the second side seam.
7. Bend wall section bottom tabs inward, top liner tabs
back slightly, then apply glue to the bottom tabs backside
surfaces. Insert the pentagon interior base shape so that
the edges fit snugly into the bottom tab bends, adjust if
needed, then apply pressure and glue the interior shape
into place. 
Apply fingertip pressure all around until the edges
are ALL joined firmly in place.
8. Apply glue to the backsides of each wall liner
flange, then bend inward to attach to the backside
of each of the wall segments. To apply fingertip
pressure to help walls join thoroughly, place each
wall in turn flat on work surface, rotating each wall
to complete the pressing step.
9. Prepare the dome lid shape by bending back on
all perforation lines for trapezoid wall segments, end
tabs and bottom tabs.
10. While the dome is still flat, position and attach
each accent shape, with punch holes aligned
and narrow offset around outer edges within the edges
or perforation lines that define the angle walls.
11. A) Begin the ring twist "assembly" by taking
the regular (non-split) ring and positioning one "bump"
at center top. Next, position the narrow area between
two "bumps" of the split ring UNDER the center bump
of first ring as shown. 
B) Handling the split ring with CARE,
arrange/weave the split ring under the ring to the left,
and over the ring to the right.
C) Continue the weaving process to wrap split ring
end to the right of previous weaving over and . . . 
. . . under toward the end, finishing with the hook
of the end at split wrapping BEHIND the whole ring
bump to backside.
D) Return to work the left portion of the assembly,
following the same over/under arrangement . . .
. . . repeated many times . . . 
. . . until the final "wrap" of the end "hook" under
so that it aligns with the opposite end split end
that should fall behind the whole ring and be hidden.
E) Adjust the two ring twists if needed, then apply
a dab or two of glue in hidden strategic locations
to "lock in" the weaving that has been done.
Here is the completed twist ring. Repeat to complete
five total rings.
12. Position one of the narrow between-bumps locations
of ring assembly between the two punch holes
of the angled wall accents (which should be . . . 
. . . attached to the main dome shape at this point 
in the assembly).
Thread an 8" length of tying twine through the lid
assembly/accent panel, and . . . 
. . . bring the lower end UP through the twist ring.
Glue the ring in position . . . 
. . . then tie the twine into knot and neat bow;
trim ends. Secure the bow in place with dab of glue.
Keep the twine ends from unraveling by dabbing
clear nail polish on ends, if desired.
13. Complete the dome assembly by bending two
adjacent wall side edges together, overlapping
the straight edge over the adjacent tab to perf line,
and gluing the seam. Complete all 5 seams.
14. Bend the come bottom tabs inward, and apply
glue to the outward face of each.
Position the dome rim stack under the dome . . . 
. . . and align each corner at the guidemarks cut
into the rim of the top layer of rim. Hold in
place until initially secure, then . . . 
. . . flip the assembly to allow fingertips to apply
pressure to further attach rim to dome tabs.
NOTE that the narrow angle of dome wall may make
it difficult to reach fingertips around rim edge.
Use a thin blade tool such as the spatula tool shown
here, placed inside and under the rim to provide
a "press against" surface on which to apply pressure
all around.
15. Position the somewhat-narrower (outer tips) 
wreath ring on top of the second wreath ring,
and align the middle ring rims and glue together.
16. Position the wreath unit on top of the dome,
center and rotate so that the largest-point leaf tips
reach toward the pentagon corners, as shown,
then glue in place.
17. Prepare the lacy strips by bending back on side
and top tabs/flanges.
Position the strips end-to-end to join short side seams,
taking care to adjust so that the lace cutouts
align and holes are "open".
18. Form the strip into a "ring" and join the final side seam.
19. Bend the top flanges inward, apply glue to
the outer/top surface, then position against
the bottom of the lid rim, align corners at
corner guide marks, and attach in place.
20. Apply glue to the bottom of the base "tray",
then position over the base rim stack, align corners
at corner guide marks, and apply pressure to join.
21. To assemble or close the box, position lid's
lacy edges so that the base top edge will snugly
fit within, and slide the two components together.
Here is the completed five golden rings box,
ready for Twelve Days of Christmas gifting.