
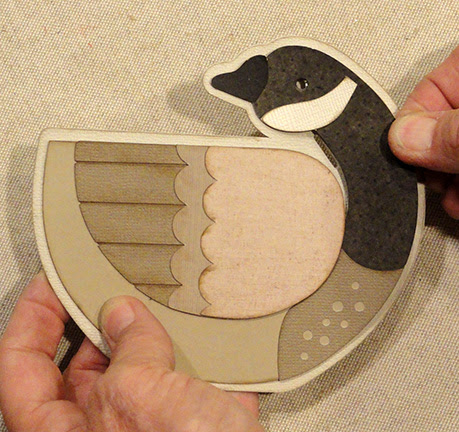
Canadian
goose shaped box has accent assemblies
attached to front and back offset panels
of
a flattened crescent-shaped, boxing-strip container.
(Or, omit the extra contrast
accent layers
for a simpler “white” goose.)
This unique gift box is designed
specifically for
“Twelve Days of Christmas” giving, and includes
a number ‘6’ hint
tag to attach with neck ribbon at provided slot
cut through front of box layers only.

with short “post” support.
Box measures approx. 5” wide x
4.5” tall x
1.5” deep when assembled.
ASSEMBLY: 1. Identify and cut the shapes:
A right body hull front plus
B right body hull interior to stack (4)
C right body hull inside shape
D left body hull front plus
E left body hull interior to stack (4)
F left body hull inside shape
G right body accent BASE shape
H container right & left side walls
I container boxing strip
J head post reinforcement & K post strut supports
L wing accent layers: base, over wing, wing caps
M (right) neck, neck mark, beak, eye, breast accents
N (left) body & wing accents
O number 6 tag and offset base

that are layered into a stack for sturdiness so that
they can be "curing" while other assembly progresses:
stack the front hull and three interior shapes, one by one,
and glue together, taking care to line up ALL cut edges,
including the ribbon slot interior edges as accurately
as possible.

a flat heavy weight such as this thick book.
Consider placing something heavy on top of the book
for extra pressing weight, and leave in place until dry.
This could require several hours or overnight.
Pressing will help the shape glued with liquid adhesive
remain flat, avoiding warping or curling.
 3. Assemble the wing units by positioning and attaching

the over wing onto the contrast (shows-thru) base
with outer edges aligned precisely.

Position and attach the top long and shorter wing cap
shapes onto the front end of each wing base assembly
with outer edges aligned, and glue each in place.

Press each wing assembly under a flat weight
while drying.

4. Position and attach the neck/head accent shape
on top of the body base accent where edges
correspond.

5. Position and attach the wing assembly onto
the body base where upper for top front curve edges
correspond. Position and attach the head marking shape
and the breast shapes where they fit onto the base.
Position and attach the beak and eye shapes.
(Repeat for left body assembly.)

Position and attach the accent assembly on top
of the corresponding hull body shape, with narrow
offset margin all around. For right hull and accents,
take care that the ribbon slot is visible next to
the goose's neck edge (not covered up, that is).
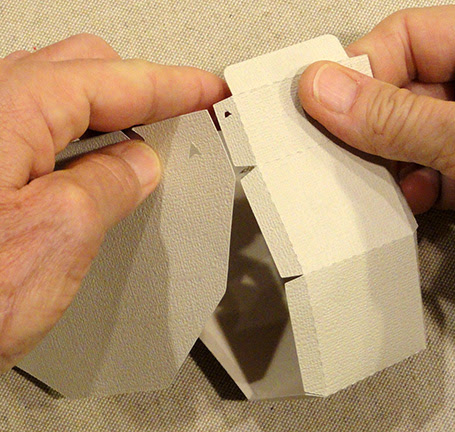
6. Prepare the neck reinforcement post by bending
the post tube shape back on all longer vertical
perforation lines, and forward on short end tab
perforation lines, as shown.

7. Form the shape into a tube to overlap the straight
long edge across the opposite tab to perforation line,
and glue in place.

NOTE that the tube can be pressed flat to apply
fingertip pressure along the seam to assist proper joining.
After seam is dry, open the tube up into its
square form.

8. Slot together the two interior strut supports
by interlocking the cut ends as shown.
Push together until ends align.

9. Insert the X strut shape into the square tube interior
with each "arm" extension fitting into a corner.

Push the reinforcement strut fully into the tube
so that ends align with tab perforations.

10. Insert the tabs end of tab through from right side
through to backside of left inside hull shape . . .

. . . until tabs are fully through and tab perf cuts
align at edge of opening. Bend tabs back and
glue to the underside of hull shape.

11. Position and attach left post/hull shape over
inward surface of left hull stack, aligning outer cut
edges as precisely as possible. To assist with gluing
and to avoid warping, consider placing flat heavy
objects onto the stack, working around the post,
and allow to dry.

12. Prepare the container boxing strip by bending
back on all cross perforations and side or end tabs.

13. NOTE the arrow symbol cut into one side end tab
that indicates that this is the FRONT end of boxing.

NOTE also the corresponding arrow symbols
cut into the container side wall shapes, to indicate
the front ends.

14. Position the first front tab of boxing strip next to
the front top edge of right container side panel, then
overlap the wall edge across the tab to align at perf
line, adjust for top and bottom edges/perforation
alignment, then glue in place.
15. Bend the boxing strip into position to continue
to align and glue the boxing edges to corresponding
side wall edges.

NOTE that as the assembly progresses, it will be
helpful to place the side wall face down on flat work
surface and press with fingertips along the seam.

16. Continue to complete the right panel to boxing
assembly, then repeat for the left panel joining.
17. Bend the end tabs to the inside and glue in place.

18. Apply glue to the LEFT side wall of container
assembly, then position over the inside face of
the left hull stack with post, aligning the top end
corners with cut guide marks on the hull . . .

. . . as well as lining up the container and stack
straight bottom edges, and glue in place.
Reach fingers inside the container - working around
the post - to apply pressure. Consider finding short
heavy flat objects that can be placed inside the container
volume to help press the glued-up surfaces flat while drying.

19. Bring the exposed post end and inside right hull
interior shape together to insert post tabs
through square opening, then . . .

. . . bend tabs back and glue to backside surface.

20. Locate the guide marks then position and attach
the right side of container to inside surface of right hull.
Manipulate and press to attach the two surfaces together
as was done previously for left assembly.

21. Position and attach the right hull shape over
the right interior panel, with outer edges and
ribbon slot edges all aligned as precisely as possible.
Press (face down) with fingertips and weights.

22. If desired, position and attach the optional
number 6 shape onto the tag base, with offset margin
around the number. Tie a twine loop through tag hole.

Thread decorative ribbon through the neck slot
and around the front panel inside the box ONLY.
Pass ribbon end through tag twine loop and tie
decorative bow.

Here is the completed goose box, prior to
filling and Twelve Days of Christmas gifting.
No comments:
Post a Comment