Monday, January 8, 2024

Snowflake Vellum Fauxrigami


Fold along perforations of two layers of 
uniquely-folded hexagonal shapes which
form base to arrange 6 folded points 
radiating from center. This creates a hanging ornament 
for interior decor or as window-hanging sun catcher. 
Cut from opaque vellum so that the layers create 
gradations of color values. 
Top point includes hang hole for narrow ribbon or twine. 
Snowflake measures approx. 5.5” wide x 6.3” tall 
when fully assembled. (Enlarge as desired). 
Since liquid adhesive is likely to cause warping 
of vellum as it dries, use ONLY dry “dot” style 
sticky tape in carefully placed locations. 

ASSEMBLY 1. Identify and cut the shapes:
A bottom layer that creates outer points
B hexagon layer that creates middle "pie" layer
C points: regular (5) and top with punch hole (1)
This snowflake was sized to make use of 8.5x11" vellum
sheets, the most readily available. All required shapes
for one snowflake of this size can be cut from 2 sheets.
On one of the sheets, this is now the A shape and 4 points
are laid out.
Once the shapes are cut, USE EVERY CARE to
gently lift the shapes from a "used" cutting mat,
taking time at angle cuts and narrow points so that
tearing is avoided. Below, a spatula tool is slid under
the inward angle to support it as it is separated
from the cutting mat.
2. Prepare the middle shape by carefully
bending and creasing the side flanges of each point 
inward, first one side . . .
. . . then the second side, until the edges meet at 
the center of the point. Fold all points in this manner.
3. Once side flanges are folded inward, carefully
bend the point inward so that the tip aligns at
the center guide hole.
4. Unfold triangle tip. Using a "dry" adhesive tape 
such as this  Scotch Double-Sided Tape runner, 
apply a small amount at tip only, then re-fold to attach
the tip in place around center. 
Repeat for all six points to create the "pie" shape.
5. Prepare the bottom layer shape by bending and
creasing the slim flanges inward, first on one side . . .
. . . then the other.
Take care that the creases extend straight and
neatly all the way to the cut point tip.
Repeat for all 6 points of the shape.
6. Open up the slim flanges and apply a tiny bit of
adhesive dot tape at the bottom widest point of flange,
then re-fold. Repeat for both side flanges of each point.
7. Prepare each of the 6 points:
A) bend the top "collar" portions inward and crease . . .
. . . first one, side then the other. Unfold collar shapes
to add adhesive dot tape under the bottom "tips" of
each end of collar shapes, then re-fold and attach
in place.
B) Fold the first complete side portion on the long
diagonal edge and crease.
C) Bend and crease the inward-most slim flange
outward, folding back on the connected portion of
the side portion - only a short attached fold here.
Then . . .
. . . fold the narrow "wing" extension on
the angled, short perforation line.
D) Repeat steps B and C for the second side portion.
E) Unfold each side section to add a small bit of
adhesive dot tape at top of narrow flange, then
re-fold and attach in original creased-to position.
F) Apply small amount of adhesive dot tape to
the underside of the outer slim flange top portion
as defined by the "wing" perforation lines,
then re-fold into position. Repeat for all point shapes.
SNOWFLAKE ASSEMBLY
8. Turn the "pie" shape face down, then apply
a small bit of adhesive at each of the points,
and also across the center where guide hole is.
9. Place the bottom points layer face up on work surface,
then identify the point guide mark cuts just down from
each point.
With the pie layer returned to face up, position each
point above the guide marks all around. When ready
and aligned, push down into place and apply pressure
to secure all adhesive bits between base and middle layers.
10. Apply bits of adhesive dot tape at narrow end of
first point, also along the very narrow tips all
the way to the ends. NOTE it may be helpful to use
a "catch pad or sheet" when applying adhesive tape;
remove/rub off any excess adhesive that hangs over edges.
Also add adhesive on pie layer at center of
each hexagon side edge.
11. Place inward tip of point AT center guide hole 
(not beyond), with point centered between 
bottom and middle layer points, and . . . 
. . . with "wing" tips laying over corresponding
folded flanges of base points. Adjust as necessary, 
then press to attach in place. 
Re-crease as needed to ensure that all edges
are crisp and align with under layers.
12. Repeat for remaining points, to apply adhesive,
position and attach, including the hang hole point.
As desired, thread a length of coordinated twine
or narrow ribbon through hang hole, thread ends
through a decorative bead, then knot and trim
ends to form a hanging loop.


Wednesday, January 3, 2024

Card Kit Snowflakes Trio Band

Seasonal 5x7 side fold card features snowflakes 
on layered offset squares, with band or ribbon that covers 
intersection of full and lower-half front panels. 
Print and cut sentiment can express either “warmest wishes” 
or “thinking of you”, or stamp or pen your own selected 
sentiment onto plain panel. 
Optional punch dot texture panel can add low relief contrast 
to lower panel. Add studs or jewels 
at snowflake centers if desired. 
Companion snowflake flap envelope is also available: 
Env Snowflake Flap Accent. 

ASSEMBLY: 1. Identify and cut the shapes:
A main front panel with snowflake square punch guides
B optional hole punched texture lower front panel
C print and cut front sentiment plaque
D snowflake trio sets 
(3 ea. snowflake, sm & lrg squares)
E card base with side fold perforation
2. Assemble the three snowflake square units by
layering the smaller square over the larger square,
keeping edges parallel, then . . .
. . . position the snowflake centered - all three layers
should have center punch holes aligned - with one arm
oriented at east/west center line, and glue all in place.
Press these under a heavy flat weight until dry.
3. Position the plain or textured lower panel over
the main front panel, with sides and bottom edges
aligned, then glue in place. Press until dry.
4. Since the textured lower panel being used for
the model card does NOT include lower two
guide punch circles, use an awl or similar pointy
tool to push a small hole through from backside . . .
. . . so they will be visible to use as guides.
5. Position each of the snowflake trio units over
the front panel so that center holes of all layers
align, then glue each in place. NOTE: take care
that square edges of snowflake units remain
parallel to card side or top/bottom edges.
6. Prepare narrow ribbon to embellish the front
panel at panels intersection. One way to do this
is to estimate how long each ribbon section will
need to be to tie a double overhand knot and
position as desired (model is slightly offset to
the left), then position and tack knot in place.
Trim ends with 1/4-1/2" extra allowance to
wrap over panel edges and be glued in place.
7. Prepare print and cut sentiment panel, then
position and attach as shown.
8. Fold card base panel on perf line.
9. Position front panel assembly over card base
with even narrow offset all around, and attach in place.
Consider preparing the companion snowflake envelope
as a way to package and send the snowflake card.


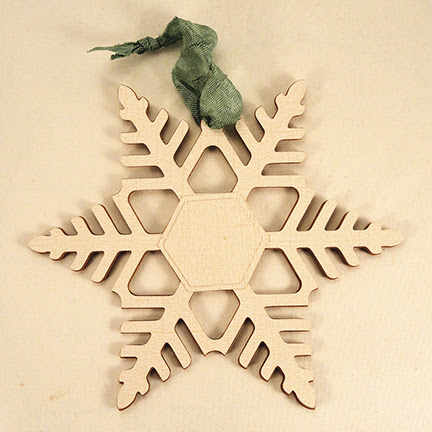
Snowflake Ornament with Year Date


Six-pointed classic snowflake has multiple layers 
glued together to be thick and sturdy like 
a balsa cut out. Hang hole at center top can be threaded 
with twine or narrow ribbon. 
Center hexagon overlay with cut out windows 
that can be filled with separate contrast numerals 
to mark a memorable “first” Christmas for couple or baby, 
the New Year, or winter season. 
Model shows 2024, with other year overlays 2022-2028 
also included in the file. 
Alternately, create a simpler ornament with 
no center dated overlay. 
Snowflake measures approx. 5” wide x 4.3” tall when fully assembled. 

ASSEMBLY: 1. Identify and cut the shapes:
A interior snowflake shapes 6-8 for thickness
B & C contrast front and back snowflake shapes
to layer
D date overlay hexagon plus numeral cut outs
(be sure to collect the interior shapes - see next image)
E opt. plain outer and inner hexagon overlays
in place of dated hexagon, or for backside
As the date hexagon is cut and removed from mat,
be sure to collect and retain the interior shapes 
from '0', '4', '6' or '8'.
2. Layer each of the interior snowflake shapes . . .
. . . and front, back snowflake shapes and glue together,
one by one, taking great care to align all cut edges.
Watch for the top position hang hole and match
all shapes using that as a bearing.
Immediately press the stacked shape under a heavy
flat weight such as this thick book, possibly with something
else heavy placed on top for more weight.
Leave weight(s) in place for several hours or over night
to help prevent warping or curling of the liquid glued up stack.
(NOTE this image shows the date hexagon in place;
it is recommended to press the snowflake stack alone
before adding the hexagon [then potentially replacing
flat weights for a period of time] so that the stack is
as flat as it can be for even pressing.)
3. Position the date cut out hexagon onto the front
of the snowflake, matching cut edges, and orienting
the date appropriately below the hang hole at
top center. Next . . .
. . . position the numerals into the windows
and glue in place, then finally . . .
. . . position and attach the interior shapes within
the numeral openings.
Here is the completed ornament.
4. Cut, thread, and knot a hang loop through hole.
5. As option alternative to date hexagon,
center the plain smaller hexagon on top of
the full size hexagon and glue together.
Then center and glue onto front and/or back.