Sunday, July 27, 2014

Jet through Clouds "You Soar" Penny Slider Card

Create this fun interactive card for someone who enjoys air flight,
or who has just accomplished something worth celebrating.
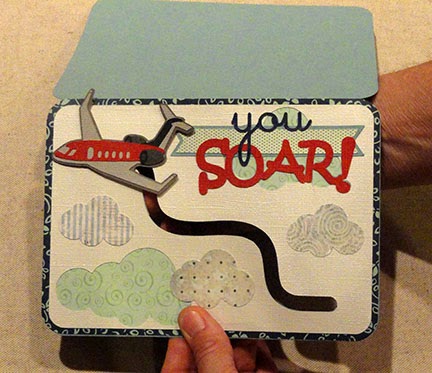
Layered card front includes the stair-step slot
that allows the miniature jet (attached with foam square to a penny behind)
to be lifted to increasingly higher altitudes.

This tutorial will show the simple assembly steps
to create the interactive part of the card.

ASSEMBLY:
1. Cut the front card layers and elements, including:
A. card base with horizontal perforation line
B. cloud show-thru layer with cut channel 
C. front layer with channel & cloud cuts
D. base banner layer with word silhouette
E. banner top layer
F. word cut outs "you" and "soar!"
G. 3 smaller cloud shape cut outs

Assemble the card as it appears here, taking care to align channel edges of each layer.

2. Cut and assemble the jet moving part layers, including:
A. jet base echo shape with position cutout
B. jet echo upper base shape
C. jet body
D. jet contrast upper hull
E. contrast tail
F. left and right jet engines & rims

(Other options include wing and tail contrast shapes, available as part of the cut file.)

3. Trim a 1/4" foam dimension square to remove corners, resulting in roughly octagonal shape (roundish).


4. Attach the modified foam square over the jet base shape cutout on the backside of the assembled jet.


5. Position the foam square within the edges of the channel on the card front . . . 


. . . so that it extends through to the back of the card front.


6. Securely attach a penny to the backside of the foam square. Hot glue is a good solution for this, but take care that excess glue does not join the jet and penny to the card layers. Once the glue is set, make sure that the penny and jet unit can move freely in the slot.

In place of a penny, you can use the backside cover circle provided, cut in many layers then joined together.


7. Glue the penny cover over the penny on the inside of the card as a cosmetic touch.


Now you "fly" move the jet up its channel, so that it really does SOAR!


Starting at lower right . . .


. . . zooming to mid altitude . . .


. . . climbing higher . . . 


. . . until it almost soars off the card!


Sunday, July 20, 2014

3D Tiki Torch Decoration Tutorial

Dimensional tiki torch can be the featured design
on your banquet table for a pool or luau party.
Why not create a line of torches, both small and tall down the center?
Or place a few on the buffet serving table with prepared sign tags
to offer clues about the dishes
(such as "'desserts", "salads", "spicy", "gluten-free", etc.).
Separated into its component parts,
it is easy to construct.
Includes two sizes of stand posts for 
short version that stands approx. 13" tall,
or a taller one that is approx. 17".


CONSTRUCTION:
1. Identify and cut the shapes:
A stand base box upper
B stand base box lower
C decorative panel shapes
D pole body tube with dec strip
E pole cap tube with dec strip
F pole cap top hexagon
G fuel vessel tube
H fuel vessel tube bottom hex
I support straps main
J support straps lower reinforcer
K torch nozzle contour panels (6)
L torch top hex with flame hole
M flame strip (cut from print weight paper)


2. Form stand base box bottom by folding inward ("mountain") on all base and side (tab) perforations. Bring straight side edge to align with perforation angle, then align and attach tab to backside of side panel.

Repeat for all four sides.


3. Form stand base top by in similar fashion to box bottom by joining each side straight edges to tab perforation edge.


4. Fold pole shape at perforations to form a tube. Bring straight side edge and tab perforation edge together, align and attach.


5. Fit pole end tabs into the slots in the box top, then slide the pole in fully until tabs are completely inserted. (NOTE this will be a tight and secure fit.)


6. On the inside of the box lid, fold the tabs back and glue in place.


Fit the upper box/pole unit over the box bottom.


7. Fold pole cap shape on perforations at sides and upper tabs. Form into a tube by bringing straight side edge to align with tab perforation, align and glue in place.


8. Align and attach the cap top hexagon. One way to do this is to attach one straight edge at the tab perforation edge, then attach the opposite side and perf edge. When these joins are completed, adjust one remaining PAIR of edges and attach, then the final PAIR of edges.


9. Attach the lower strap reinforcement to the backside of the main strap shape, aligning all matching edges accurately.


10. Attach each strap end tab into corresponding slots in pole cap, working around until all six are in position. Glue tabs to the inside of the cap.


11. Attach the wide decorative strip at the slot level with seam to correspond with the strap shape's back seam panel.

Attach the narrow decorative strip at the bottom edge of the cap.


12. Fit the pole cap over the pole end. Glue in place, if desired. This is a snug fit, so gluing may not be necessary.


13.  Fold the fuel vessel shape on side and tab perforations, then form into a tube and join tab to side straight edge.


14. Attach vessel bottom end hexagon.


As the hexagon is being attached, it may be helpful to use a long tool with flat end (like a new pencil/eraser end) to help the seam attach. Insert the pencil end into the tube to press against tab and hexagon with flat surface underneath, moving along each edge to make sure a good consistent attachment is achieved.


15. Fold each of the (6) flame nozzle contour shapes as shown with alternating inward ("mountain") and outward ("valley") folds. Fold top and side tabs back.


16. Align the lower segment edge and tab perf line of the first two sections, taking care to align the lower edges and the cross perf lines of teach. Attach in place.


17. Align and attach the mid segment edges, then the upper segment edges.


18. Continue to join the remaining sections in the same manner. When the sixth section is in place, form a tube to bring the last section's tab edges under the first section's straight edges, and complete the seaming process one final time.


19. Prepare the flame by making sure each of the cut ends is separated, then begin at on end and roll the shape's connected end into a tube.


20.  Insert the short tab end of flame through the nozzle end hexagon hole (insert from the face side to the back).


On the backside, fold each of the tabs outward, then glue in place.


21. Position the flame hex over the top tabs (folded inward) of the nozzle assembly and glue in place.


22. Fit the nozzle assembly over the upper end of the vessel.


23. Attach the upper decor strip at the lower segment top edge (see next image to view the strip in place).


24. Insert the vessel assembly between the straps, rotating until the decor strip seam panel aligns with the connector mid strap tabs (this is the center back location). Align the mid strap lower edges even with the vessel lower edges, with the vertical straps extended up the centers of each panel, then attach all to the vessel edges.

Overlap center back straight edge and tab and glue.


Here is a shot of the pole and box base section with the pole cap, strapping, vessel and nozzle assemblies.


And here is the completed torch.


Island Lei Flowers Project

Festive tropical lei is assembled from multiple cut shapes
from two sizes of two flower styles plus leaf
strung together on jute twine 
with beads to separate the clusters.
Since this may be a craft project for older elementary school age,
you may choose to plan a family luau or island party
and have the lei stringing activity part of the fun.

1. Plan and cut the flowers for your lei. The sample lei pictured above is approx. 34 to 36 inches in length, using 20 cut shapes of each of the flowers pictured here from the cut file (large and small posie five petal, large and small daisy eight petal, leaf), and 40 leaves.

One leaf shape is paired with each petal strung onto the twine.


The cut files are arranged with one set of individual shapes, plus one large 12x12 layout of 20 or more petals for easy positioning onto the cutting mat. NOTE: the smaller flower petals have more than 20 shapes per mat configuration, so extras will be cut. Ungroup and eliminate any extras beyond the 20 you may NOT wish to cut.

The leaf shape configuration includes 70 leaves, but you may need more, so ungroup and rearrange as needed.


2. Assemble the other tools and materials you may need. Shown here are small natural colored wooden beads, jute twine (these were purchased from JoAnne Fabrics, or other retailers), paper glue, prepared flower shapes and leaf, small scissors (for curling). Masking tape may also be useful.

For the lei length noted in step 1, you will need approx. 81 beads, 1 1/2 yards of twine.


3. Use the edge of scissors (or other curling tool) to curl each petal of all cut flower shapes.


Also curl the tips of the leaf shapes.


4. Prepare the shape the flowers into their final "cupped" shapes. Apply a dot of glue to the right edge above the center "hole" slot, but not very high up the edge.


5. Bring the edges together, overlapping the right edge with the left edge on top over the glue dot, but not overlapping very much (1/8" or so).


Here you can see the glue being added to the posy style flower at the right edge below the curve.


Press the edges together and hold until secure.

Repeat for all flower shapes.


6. Fold the hole end of each leaf in half slightly.


7. Thread the twine onto a large needle (size 18 chenille tapestry used here), then thread the first bead and flower onto the twine. For the sample, the needle is inserted front-to-back through flower centers and leaf holes.

Move the bead down to the halfway point of the twine.


8. Wrap a piece of masking tape at the center to keep the first half from sliding too far along twine.

The sample shown is threaded in halves, with the face side of the petals oriented inward toward the center from each side. You may choose to string the whole length with the faces oriented toward one side only. IN THAT CASE, you may skip this step, or put the tape stop at the end.


9. String the flower sequence you have decided on, moving each addition down snugly against the previous additions.

For the sample shown, the order is: small fuchsia posy & leaf, bead, orange daisy & leaf, bead, pink posy & leaf, bead, yellow daisy & leaf, bead.


10. Continue stringing in sequence until you have reached your target half length (if assembling as halves).


11. Be sure there is a tail for tying off at the end of assembly, then attach a small piece of masking tape above the final bead of the sequence as a stop.


12. Remove the center tape stop. Complete the second half assembly to match the first half.


13. When the second half is completed, tie the ends together with a secure double knot of your choice, then use the needle to thread each end down through part of the lei so that a tail is "buried" in the lei assembly.


Your lei is now completed.
Put the lei around your neck,
and start the "Hawaiian Holiday" music now!