Sunday, September 25, 2022

Halloween Cat with Pumpkin Cross Stitched Tag

Fun and unique Halloween accent for gifts, as card focal point, 
or as decoration. Round tag with offset contrast base 
and hang hole offer a spot to display a seasonal character 
with curly tail, contrast collar and companion pumpkin. 
Design is created with 4-ply floss cross stitches, 
straight stitches (whiskers 2-ply, vine) and
 French or colonial knots (eyes). Stitching chart is included. 

ASSEMBLY:
1. Identify and cut the shapes:
A stitching disc (2 to layer for sturdiness)
B offset contrast border plus stitching buffer opening
C tag base layers (3 for stiffness)
D printed (or on-screen) stitching diagram
E floss selected colors for stitching:
Obtain blunt-end tapestry needles size no. 24 and
floss colors (DMC selections shown here for the sample project):
3021 dark gray contrast cat tail
3787 med. dark gray for cat body, head
613 cream for colonial knot eyes
310 black for whiskers
900 orange for pumpkin, collar
469 green for pumpkin stem
2. Prepare the stitching discs by poking through all holes
using some suited tool such as this un-bent standard size
paper clip, to make sure that all the "crumbs" are moved
out of the way and brushed off the shapes.
3. Layer the two cut stitching discs on top of each other
and glue together, taking care . . .
. . . that ALL the holes and cut edges align as
precisely as possible. One way to check for alignment
is to use the paper clip tool to push through corner
and other random holes, and make adjustments as needed.
Once adjustments are made, press the layers on
a flat surface with a heavy flat object such as this large
book volume - possibly with something else heavy
placed on top of it - and leave in place until completely
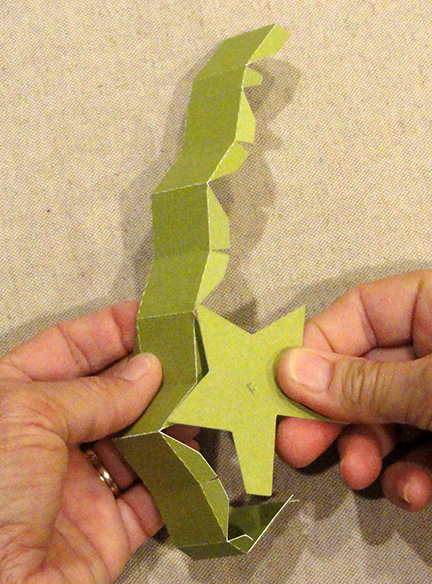
dry, several hours or over night. This will reduce or
prevent warping or curling of the glued-up shapes.
4. Layer the disc base shapes in a similar manner
by aligning all cut edges precisely, then gluing 
the layers together, and pressing under heavy flat
object until completely dried.
5. Prepare to complete the stitching by becoming
familiar with the extra "detail" stitching holes that are
included in the stitching discs, referring to this diagram
to assist in locating them.
Red marked holes are used to create half X stitches foe ears slant.
Yellow holes are used for colonial knot eyes.
Blue holes (small plus 2 reg.) are used for whisker long stitches.
Green holes (plus other reg. holes) are used for vine straight stitches.


6. Study this diagram to understand how to form
cross stitches for uniform appearance and tension.
NOTE that the RIGHT SLANT stitches are generally
placed across the row first, followed by the LEFT SLANT
stitches placed coming back across the row.


7. (NOTE: these images use a different 
color floss than is used in this project.)
Prepare to stitch cross stiches by cutting a 30-32 inch
length of 6-ply floss for CAT BODY COLOR. 
Separate two of the plies,
place the two plies side by side and . . .
. . . line up the ends. Holding the ends together,
smooth together to create a loop at the half-way point.
Thread the loop (or the four ends if preferred) through
the needle eye. Pull the loop through so that it is . . .
. . . the long end.
8. For this project, begin at the bottom row, left body edge
of cat, at the top left hole where the first cross stitch
will be created.
Each square on the pattern represents 4 holes that
would be needed to create both the right and left slants.
It may be helpful when counting where to begin to think
about the spaces between four holes as the STITCH.
NOTE that each stitch will SHARE holes with the side-by-side
stitches - this is why counting the spaces may be wise.

A) Count along the bottom row the 8 SPACES that
represent the 8 cross stitch units that will be left blank,
then insert the needle with thread UP from backside
in the top left hole where the first cross stitch will be made.
B) Pull the floss through UNTIL about 3-2 inches
of the loop end remains, then . . .
. . . insert the needle
diagonally to complete the first right slant stitch . . .
. . . and on the backside of work, insert the needle
through the loop and . . .
. . . pull the loop tight to remove all slack.
This is the "tying on" process.
C) Continue along the bottom of the body to complete
the 5 RIGHT slant stitches of BODY color. Then . . .
. . . return back along the row to complete the LEFT
slant stitches to complete the cross stitches.
D) Refer to the diagram to determine that the next
row up begins one cross stitch to the left of bottom row.
Accordingly, insert the needle up through the top left
hole of the four holes (one is shared) to create
the first cross stitch of that row . . .
. . . and make the LEFT slant 6 stitches per diagrammed
design, then return to complete the cross stitches. 
NOTE that at the RIGHT end of this second row,
the cross stitches are even with each other.
E) As stitching proceeds, thread length will eventually
be used up. Before length is unmanageably short,
pause when the needle is on the backside of work
as a slant stitch is completed. Slip the needle under
3-4 stitches on the backside, then . . .
. . . slide the needle off, and trim the tails close
to the surface of the work.
This is the "tying off" procedure.
9. Continue the project by referring to the diagram to
complete stitches of the BODY color first. Near the top
of the head, the ears will be shapes with half-cross stitches -
represented on the diagram by triangle units.
To create these half-cross stitches (left lower half shown here),
first the short slant stitch is completed using the extra
smaller hole at the center of the "square" unit. 
In sequence, (bottom illustration) the regular "long" slant
stitch is completed across the end of the short slant stitch.


Here is the short slant stitch created, then . . . 
. . . the long slant stitch is laid in.
Here is the first ear shaping created with
the half-cross stitches of the top 3 rows.
Once the ear rows on one side are completed . . .
. . . move the stitching floss across to the second ear side
by working on the backside to slide needle under
the middle stitches below ear level to get it in position
to complete the second ear. Tie off in the usual manner.
10. Thread the needle with the tail color to complete
the diagrammed contrast tail stitches.
12. Complete the orange cat collar and pumpkin block.
13. To add the whisker straight stitches,
thread the needle with 2-ply black floss.
Tie on, then complete the three stitches on each side
of face, using the extra small holes plus regular large
holes as shown in diagram in Step 5.
13. To complete the eye colonial stitches (or French stitches
if you prefer), begin - or tie on - on backside by
sliding loaded needle under backside of already-completed
stitch, then pass needle through loop and cinch up.
Then, locate the extra small hole for first eye and
pass needle through to the front.
A) Create the colonial knot by creating a "figure 8"
around needle with this illustrated first step, then . . .
. . . completing "8" around tip in second step,
then re-inserting needle into same small hole
through which it originally passed; cinch up "knot"
onto needle and hold fast while needle and floss are
pulled gently through until taut to create knot.
B) These images present again the colonial knot steps,
with the "figure 8" being created around needle, then . . .
. . . knot being cinched tight as needle tip is
re-inserted into original hole.
C) Repeat the knot for the second eye.
14. Complete the 4-ply pumpkin vine straight stitches
using extra holes as diagrammed in Step 5.
15. Apply glue to outside edge on BACKSIDE of
stitching disc, and just beyond window edge of
accent/window disc shape, then position on backside
of stitched disc, taking care . . .
. . . that offset margin is even all around (best accomplished
while viewing from front) and ribbon holes are
accurately aligned.
16. Position and attach - centered - on front of base disc.
Here is the completed assembly.
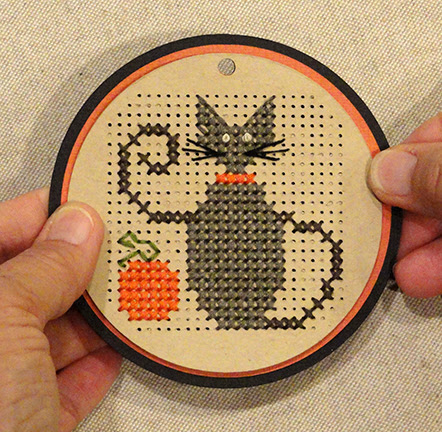
Add a ribbon cockade tied with twine, as desired.


Saturday, September 17, 2022

Halloween Cat Countdown 3D Box

Sawtooth-topped trio of walls form short outer and tall center 
narrow-depth boxes that are joined to create two-level platform  
where cat-fronted 3D star box can move 
to count down days until Halloween. 
Design includes vinyl word art to help explain 
the decoration’s function: “Meow ... many days ‘til Halloween?” 
to be centered on the exposed tall walls using built-in
positioning guides. Stencil-style cut-out numbers 1 thru 30 
show thru across pairs of panels on box fronts and backs, 
arranged so that star/cat marker begins at #30 and moves left 
across lower box then right across top box for . . .
. . . the first half of October. Then it jumps to reverse side 
and #15 to continue moving until it gets to #1 
on the day before Halloween. Hidden 1/4” ceramic magnets 
are attached inside star box “legs” to gently connect 
where small zinc washers are attached behind saw tooth top, 
assisting cat marker counter to stay in place. 
Checker panels "squares"  are extensions downward
or upward from contrast number "underlays".
Joined saw tooth boxes ensemble measures 
approx. 11.7” across x 7.75” tall x 3” deep. 
3D Star measures approx. 2.5” tall x 2.5” wide x 1” deep. 
2D Cat decoration is approx. 4” tall. 
(Requires approx. nine 12x12 sheets of orange for hull components.) 

ASSEMBLY: 1. Identify and cut the shapes for
SHORT BOXES (2 sets):
A box sawtooth front (checker background) & F back
B black upper and lower contrast & checker underlays
C number overlay  (back - 8-15; front - 23-30)
D lower "accent" strip (matched to hull)
E boxing strips
G "base" insert hull   H interior strut reinforcement strips
I insert end boxing strips (2)
TALL BOX:
J & R hull front and back panels
K & S contrast & checker extensions
L number panel overlays (back 1-7; front 16-22)
M checker light strip (2)
N - Q boxing strips    T side lower accents
U vinyl word art (cut and weeded)
TALL BOX INSERT:
V front hull & W back hull
X side boxing strips (2)
Y & Z interior strut reinforcement strips (2 ea.)
CAT FIG. & STAR BOX:
A star boxing strip   B star front   C star back
D front star decoration contrast
E front star decoration panel
F cat body base silhouette (to assemble on)
G tail overlay
H body (NOTE this shape should NOT have tail)
I face   J tongue inlay   K muzzle overlay
L nose and whiskers  M eyes inlays
2. Obtain the magnetic components for this project:
2 - .5" diam ceramic magnet discs for star "legs"
46 - metal flat washers approx. .5" diam.
   VINYL APPLICATION
3. Follow standard vinyl transfer process to prepare
vinyl marquee word art panels (cut, weed, attach to
transfer tape, etc.), including the center hashmark
and corner registration marks. TIP: remove a narrow
margin of backing paper only so that registration marks
can be positioned and "stuck" to the card stock paper
front panel while maintaining some adjustability.
4. Locate the center mark and side-ward dash line guide
marks on the card stock panel, then align the vinyl centers
while at the same time positioning the upper EDGE of
corner cutout at or just below the side dash mark.
Secure this positioning, remove remaining backing,
and attach vinyl in place.
Use a tool to carefully remove the vinyl positioning guides.
Set panels aside until assemble continues in Step 20.
SHORT BOX ASSEMBLY - make 2
5. Identify the short box boxing strips with center edges
that include the double circle symbols. Then . . .
. . . bend back the side edge tabs. Also bend and
crease the cross perforation lines to imitate the outer
edge shape of the front/back panels.
NOTE that the edge tabs across top are shaped to
include deep angles where the segment edges fall
at the sawtooth points, and slit cuts at the valleys.
6. Join the two strips at the center seam by overlapping
the straight end edge across the opposite tab to
perf line, adjusting top to bottom, then gluing in place.
ALTERNATE ASSEMBLY ORDER NOTE:
After tutorial images were shot, it was determined that
the number panel and checker strip decorations could also
be attached to the front panel prior to attaching the boxing.
If you prefer to follow that order, skip forward to complete
Steps 11-12, then return to continue with Step 7, here.
7. Begin to attach boxing at one end, aligning the side long
segment along side panel edge, overlapping panel across
boxing flange, adjusting for precise top and bottom alignment,
then glue the segment in place.
8. Bend the first sawtooth segment into position
and glue in place.
9. Continue in the same fashion to position and attach
sawtooth segments across top of front panel.
NOTE that it may prove helpful to position and attach
pairs of segments in one step, such as the left and
right segments shown here that are adjacent across
the "valley" bend. 
Also, as segment seams are completed,
it may be helpful to turn the work face down to apply
pressure along the seam from backside.
10. Complete the boxing strip attachment at the second
end, positioning and attaching final segments as shown.
11. Prepare the number overlay and checker decoration
assemblies by layering the selected number sawtooth
overlay on top of the upper checker underlay,
with "accent" strip on top of lower checker underlay,
adjusting so that corresponding edges align accurately,
then attaching in place.
NOTE that - as always - any layers that are thoroughly
glued together using liquid adhesive should be pressed
flat with heavy flat object during the drying process,
until thoroughly dried. This prevents or minimized warping
or curling.
12. Position and attach the top assembly . . .
. . . and lower assembly to the front of 
the partially-assembled box, matching corresponding
cut edges as precisely as possible.
Reverse the assembly face down on flat work surface
and apply ample fingertip pressure to backside to ensure
complete attachment in place.
13. Before attaching back panel, position and glue
in place with sturdy quick-grab adhesive such as
the Fabri-Tack glue shown here one metal washer
onto the center of each sawtooth boxing segment.
(This positioning will eventually align with magnets that will
be attached to the inside of 3D star marker "legs".)
14. Position the back panel in place to match up
with the boxing edges, then . . .
. . . work along the edges to attach fully and
accurately in place.
SHORT BOX INSERT
15. Bend back the insert hull sides at long perforation
 lines. Also bend back the end boxing tabs.
Position each end between the wall and bottom ends . . .

. . . and attach in place at three edges. Repeat
for opposite end.
16. Prepare the reinforcement strut strips by bending
tabs forward, and cross perf lines in alternating
zigzag fashion. Position and attach straight end
of right-position strip to cross tab of left strip.
17. Compress the accordion folds, apply glue to
the underside of tabs, then insert into the base box . . .
. . . and adjust so that it spreads nearly end to end
with outward corners at least .25" inside box edge.
Apply pressure to attach tabs to inside of box.
18. Complete final assembly of short box by tucking
the insert into the bottom opening of sawtooth "lid" . . .
. . . and carefully pushing insert in until approx. .25"
remains visible. Apply glue to this margin, then
continue to push in until bottom edges align flush.
(NOTE this is a snug fit by design.)
Apply fingertip pressure or brace between books
or blocks, etc., to ensure that walls completely
attach in place all around.
TALL BOX ASSEMBLY
19. Assemble the 2 number panels with checker strip
decoration in similar manner to Short Box decoration,
except that the contrast narrow strip is attached
behind the checker "teeth" extensions as shown here.
20. Position each number assembly at the top of
the tall wall/vinyl panel assembly with corresponding
edges aligned as precisely as possible, and attach, press.
21. Identify the 4 boxing strips as they will be joined
in order by noting that small symbols are cut into
the end tab and the nearest-to-end side tab where
they will connect. 
Prepare the boxing by bending side
tabs back, cross perforations to match panel shape.

(NOTE the next few assembly steps will show the front
panel without the number/checker decoration panels
in place, but it is recommended that they should be.)
22. Position the first side boxing section along
corresponding panel edges, then align and join
in place in manner similar to short box assembly.
23. Continue to bend the boxing into position to
align, adjust and attach each progressing segment.
As tabs and flanges are attached, reverse the assembly
face down on flat work surface to apply fingertip pressure
along the edges to ensure complete attachment.
24. Position and join seams of second boxing strip
then continue to position and attach in place around, as well as . . .
. . . third and fourth boxing strips.
25. Position and attach metal washers behind each
sawtooth segment across top of assembly in manner
similar to the short boxes shown in Step 13.
26. Position the back panel over the previous assembly,
align edges with boxing tab bends, adjust and attach
in place. NOTE that it may be helpful to begin at center top
and work across one half first, then second half, then
work downward to complete sides attachment.
TALL BOX INSERT
27. Bend back the panel with bottom and long flange,
then align and join the seam.
28. Bend back the side and bottom flange of side boxing
panels, then position at main hull ends . . .
. . . and join in place.
29. Prepare the strut reinforcement strips by bending
and joining end to end into two sets, as with strut strips
for short boxes, Step 16. 
In case there is any confusion about which strut strips
are for the Tall box, these have a 'T' symbol cut in.
30. Repeat similar process for compressing the first
joined strip as for short box in Step 17, inserting
it inside the base insert box.
Push the first strip down inside to lie across the bottom
half, spread and adjust (use the finger access cut out holes),
then apply pressure to secure the adhesive-applied tabs.
31. Repeat the process for the second strip which will
lie across the top half. (Strut reinforcements supply
structure so the base will not collapse flat.)
32. Place the insert inside the tall box and . . .
. . . push into place (this is a snug fit) until a narrow
margin remains. Apply adhesive to the margin of front
and back panels only, then . . .
. . . push in completely
until bottom edges of hull and insert are flush.
Apply fingertip pressure (or set up with braced flat
objects to help hold walls pressed together) until dry.
33. Bend the bottom end tabs to prepare to insert
into position, add adhesive to all tabs, then push
into place to attach tab surfaces to adjoining walls.
BOX-TO-BOX ASSEMBLY
34. Apply quick grab adhesive to backside of front
short box, then position onto front of tall box
at lower edge and attach in place. 
Sides and bottom edges should align. 
(Make sure the number panels correspond as designed - 
these number ranges are FRONT.)
Repeat for the back side and second short box.
35. Position and attach side accent, with narrow
offset margin at side, lower and upper edges (within
the "panel" created by joined box side faces).
STAR BOX AND CAT
36. Prepare to assemble the cat figure so that it can
be pressed and thoroughly dried.
NOTE that the cat body shape highlighted by '*'
in this layout should NOT include the tail silhouette.
A. Add tail to silhouette base shape.
B. Position and attach body on top of silhouette
with corresponding outer edges aligned precisely.
C. Position and attach tongue in body cutout.
D. Add muzzle to head lower edge.
E. Add nose to upper center muzzle.
F. Add star accent front on top of contrast accent.
G. Add head to assembly.
H. Add eyes into sockets, whiskers to muzzle.
I. Position and attach star assembly at lower center
where the "legs" edges align.
37. Press the body/star assembly under a heavy flat weight
until thoroughly dried.
38. Identify the star box front by locating the 'F'.
Prepare the boxing strip by bending to match
the star outer edge shape. NOTE that the tab cut away
or dash line cuts will follow same patterns as for
sawtooth box tops as described in Step 5. 
39. Begin at the center of the strip, and at center top
star point to line up, adjust and join the first edge
to boxing.
40. Bend the boxing strip to align, adjust and
attach the segment tabs down the remainder of
the first half side . . .
. . . noting that it may be helpful to reverse the assembly
face down on work surface to apply fingertip pressure
along edges and as far up into points as possible.
Complete the first half, with the strip seam tab at end.
41. Return to center top to repeat the process to
position and attach the second boxing half.
When the final segments remain, it will be helpful
to apply glue to these, as well as opposite end tab,
then swing two segments into position, align
and join all including seam.
42. Apply strong quick-grab glue on the inside of
the star box at the center of the 'leg' segments
at the bottom, then position and attach one .5"
ceramic magnet disc . . .
. . . as can be seen here in place.
43. Re-bend the back edge tabs to perpendicular,
then add glue to the tab faces, position and attach
the back star. Work around the edge to use finger
pressure to adjust and hold points in corrected
positions until all are secure and neatly in place.
44. Position the cat decoration over the front
of the star box, with lower straight edges that
correspond aligned as precisely as possible,
and securely attach in place.
45. To work the count down, place the cat/star
magnet over the sawtooth crest at #30 on
October 1st - this will indicate that there are
"30 more days" 'til Halloween. Each day, the cat
is moved along the bottom ridges, then back
toward right along top on same side. On October 15th,
the box is reversed and the process imitated for
the remainder of October days, until cat/star is above
#1 on October 30!
Magnets in star legs will gently "attach" to the washers
placed in each of the sawtooth crest segments
so that it will stay in place.
Enjoy your "Meow-y" October!