
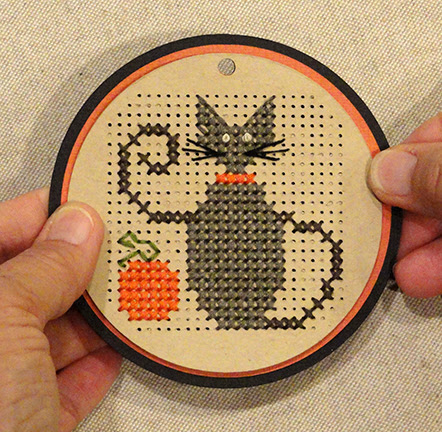
Fun
and unique Halloween accent for gifts, as card focal point,
or as decoration.
Round tag with offset contrast base
and hang hole offer a spot to display a
seasonal character
with curly tail, contrast collar and companion pumpkin.
Design is created with 4-ply floss cross stitches,
straight stitches (whiskers
2-ply, vine) and
French or colonial knots (eyes). Stitching chart is included.
ASSEMBLY:
1. Identify and cut the shapes:
A stitching disc (2 to layer for sturdiness)
B offset contrast border plus stitching buffer opening
C tag base layers (3 for stiffness)
D printed (or on-screen) stitching diagram
E floss selected colors for stitching:

Obtain blunt-end tapestry needles size no. 24 and
floss colors (DMC selections shown here for the sample project):
3021 dark gray contrast cat tail
3787 med. dark gray for cat body, head
613 cream for colonial knot eyes
310 black for whiskers
900 orange for pumpkin, collar
469 green for pumpkin stem


2. Prepare the stitching discs by poking through all holes
using some suited tool such as this un-bent standard size
paper clip, to make sure that all the "crumbs" are moved
out of the way and brushed off the shapes.
 3. Layer the two cut stitching discs on top of each other

and glue together, taking care . . .
 . . . that ALL the holes and cut edges align as

precisely as possible. One way to check for alignment
is to use the paper clip tool to push through corner
and other random holes, and make adjustments as needed.

 4. Layer the disc base shapes in a similar manner

Once adjustments are made, press the layers on
a flat surface with a heavy flat object such as this large
book volume - possibly with something else heavy
placed on top of it - and leave in place until completely
dry, several hours or over night. This will reduce or
prevent warping or curling of the glued-up shapes.

by aligning all cut edges precisely, then gluing
the layers together, and pressing under heavy flat
object until completely dried.

5. Prepare to complete the stitching by becoming
familiar with the extra "detail" stitching holes that are
included in the stitching discs, referring to this diagram
to assist in locating them.
Red marked holes are used to create half X stitches foe ears slant.
Yellow holes are used for colonial knot eyes.
Blue holes (small plus 2 reg.) are used for whisker long stitches.
Green holes (plus other reg. holes) are used for vine straight stitches.

6. Study this diagram to understand how to form
cross stitches for uniform appearance and tension.
NOTE that the RIGHT SLANT stitches are generally
placed across the row first, followed by the LEFT SLANT
stitches placed coming back across the row.

7. (NOTE: these images use a different
color floss than is used in this project.)
Prepare to stitch cross stiches by cutting a 30-32 inch
length of 6-ply floss for CAT BODY COLOR.
Separate two of the plies,
place the two plies side by side and . . .

. . . line up the ends. Holding the ends together,
smooth together to create a loop at the half-way point.

Thread the loop (or the four ends if preferred) through
the needle eye. Pull the loop through so that it is . . .

. . . the long end.

8. For this project, begin at the bottom row, left body edge
of cat, at the top left hole where the first cross stitch
will be created.
Each square on the pattern represents 4 holes that
would be needed to create both the right and left slants.
It may be helpful when counting where to begin to think
about the spaces between four holes as the STITCH.
NOTE that each stitch will SHARE holes with the side-by-side
stitches - this is why counting the spaces may be wise.

A) Count along the bottom row the 8 SPACES that
represent the 8 cross stitch units that will be left blank,
then insert the needle with thread UP from backside
in the top left hole where the first cross stitch will be made.

of the loop end remains, then . . .

. . . insert the needle
diagonally to complete the first right slant stitch . . .

through the loop and . . .

. . . pull the loop tight to remove all slack.
This is the "tying on" process.

the 5 RIGHT slant stitches of BODY color. Then . . .
 . . . return back along the row to complete the LEFT

slant stitches to complete the cross stitches.
 D) Refer to the diagram to determine that the next

row up begins one cross stitch to the left of bottom row.
Accordingly, insert the needle up through the top left
hole of the four holes (one is shared) to create
the first cross stitch of that row . . .
 . . . and make the LEFT slant 6 stitches per diagrammed

design, then return to complete the cross stitches.
NOTE that at the RIGHT end of this second row,
the cross stitches are even with each other.
 E) As stitching proceeds, thread length will eventually
 . . . slide the needle off, and trim the tails close


be used up. Before length is unmanageably short,
pause when the needle is on the backside of work
as a slant stitch is completed. Slip the needle under
3-4 stitches on the backside, then . . .

to the surface of the work.
This is the "tying off" procedure.

9. Continue the project by referring to the diagram to
complete stitches of the BODY color first. Near the top
of the head, the ears will be shapes with half-cross stitches -
represented on the diagram by triangle units.
To create these half-cross stitches (left lower half shown here),
first the short slant stitch is completed using the extra
smaller hole at the center of the "square" unit.
In sequence, (bottom illustration) the regular "long" slant
stitch is completed across the end of the short slant stitch.

Here is the short slant stitch created, then . . .

. . . the long slant stitch is laid in.

Here is the first ear shaping created with
the half-cross stitches of the top 3 rows.
Once the ear rows on one side are completed . . .

. . . move the stitching floss across to the second ear side
by working on the backside to slide needle under
the middle stitches below ear level to get it in position
to complete the second ear. Tie off in the usual manner.

10. Thread the needle with the tail color to complete
the diagrammed contrast tail stitches.

12. Complete the orange cat collar and pumpkin block.
13. To add the whisker straight stitches,
thread the needle with 2-ply black floss.
Tie on, then complete the three stitches on each side
of face, using the extra small holes plus regular large
holes as shown in diagram in Step 5.

13. To complete the eye colonial stitches (or French stitches
if you prefer), begin - or tie on - on backside by
sliding loaded needle under backside of already-completed
stitch, then pass needle through loop and cinch up.
Then, locate the extra small hole for first eye and
pass needle through to the front.

A) Create the colonial knot by creating a "figure 8"
around needle with this illustrated first step, then . . .

. . . completing "8" around tip in second step,
then re-inserting needle into same small hole
through which it originally passed; cinch up "knot"
onto needle and hold fast while needle and floss are
pulled gently through until taut to create knot.

B) These images present again the colonial knot steps,
with the "figure 8" being created around needle, then . . .

. . . knot being cinched tight as needle tip is
re-inserted into original hole.

C) Repeat the knot for the second eye.
14. Complete the 4-ply pumpkin vine straight stitches
using extra holes as diagrammed in Step 5.

15. Apply glue to outside edge on BACKSIDE of
stitching disc, and just beyond window edge of
accent/window disc shape, then position on backside
of stitched disc, taking care . . .

. . . that offset margin is even all around (best accomplished
while viewing from front) and ribbon holes are
accurately aligned.
16. Position and attach - centered - on front of base disc.

Here is the completed assembly.
Add a ribbon cockade tied with twine, as desired.

No comments:
Post a Comment