
Medium-size
tag with layers that create
a hole-punched panel, framed by tag front
with
faux-stitched layered overlay and plain back tag.
Doubled-stitching panel is
cross stitched with 4-ply floss
to create the diagonally-placed leaf.
Tie
ribbon through two holes at tag top.
Special on its own, completed tag can also
be mounted
on the front of a stock A6 card.
Cross-stitch design is included in
the cut file to print
and refer to as stitching proceeds.
Tag measures approx. 3.25” wide x 4.5” tall.
ASSEMBLY: 1. Identify the cut the shapes:
A tag front stitching panel
B second reinforcing stitching panel
(Not shown: front tag frame panel)
C tag faux stitches overlay front panel
D contrast panel for faux stitches panel
E tag back panel (hides stitching)

2. Assemble supplies and equipment needed, including
floss and tapestry needles (no. 24 recommended).
The sample tag was stitched with #4130 Chilean Sunset
Color Variations variegated floss by DMC.

layering the front panel over the contrast panel
and gluing in place. Press under a heavy flat
weight until dry.
 4. Prepare the front and reinforcement hole-punched

stitching panels by ensuring that all the "crumbs"
are pushed through and removed. One recommended
way is to create a "tool" from a standard paper clip
by bending the outer "arm" straight. Use the end of
the "arm" to push through each hole where
a crumb remains.
 4. Layer the tag front and reinforcement layers and

attach together, then . . .

 Press the tag assembly under a flat heavy weight

. . . use the paper clip tool to push through corner
holes of both layers to ensure that all the holes
are as precisely aligned as possible.

such as this thick book volume, possibly with
something heavy placed on top as well. Leave weights
in place for several hours or overnight until
thoroughly dried to minimize or eliminate warping or curl.

 . . . line up the ends. Holding the ends together,

5. Prepare to stitch cross stiches by cutting a 36-40 inch
length of 6-ply floss. Separate two of the plies,
place the two plies side by side and . . .

smooth together to create a loop at the half-way point.

 . . . the long end.


Thread the loop (or the four ends if preferred) through
the needle eye. Pull the loop through so that it is . . .


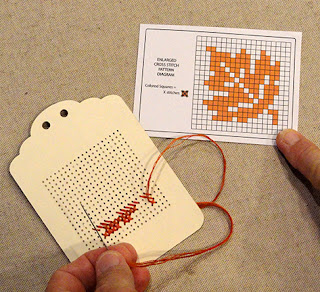
6. Study this diagram to understand how to form
cross stitches for uniform appearance and tension.
NOTE that the RIGHT SLANT stitches are generally
placed across the row first, followed by the LEFT SLANT
stitches placed coming back across the row.
7. Determine where on the chart is the best place
to begin. Since it is often easiest for stitching progression
to work upward from row to row, it is recommended
to begin at the bottom row at the farthest left stitch.
Each square on the pattern represents 4 holes that
would be needed to create both the right and left slants.
It may be helpful when counting where to begin to think
about the spaces between four holes as the STITCH.
NOTE that each stitch will SHARE holes with the side-by-side
stitches - this is why counting the spaces may be wise.

Count 5 sets of four holes across the bottom of
tag panel, then count 3 sets of four holes up.
The stitching will begin at this set of four holes,
with the first stitch a right slant stitch, from
UPPER LEFT hole.

In this closeup of the previous photo image, see that
the counting of stitch sets can also be stated as:
count 5 holes along the bottom row,
then count 4 holes up - THIS IS WHERE TO INSERT NEEDLE.

8. Pull the floss through UNTIL about 3-4 inches
of the loop end remains, then insert the needle
diagonally to complete the first right slant stitch . . .

through the loop and . . .
 . . . pull the loop tight to remove all slack.

This is the "tying on" process.
 9. Continue to refer to the chart to see that there are

four consecutive stitches - continue to create
the right slant stitches for that group.

the two next stitches.
10. Now return along the same row to add
the left slant stitches to complete the 'X' stitches.
 11. Move up to the second row and add the right slant

stitches across in the group of 8, then return to
complete the left slant stitches.
12. As stitching proceeds, thread length will eventually
be used up. Before length is unmanageable,
pause when the needle is on the backside of
as a stitch is completed. Slip the needle under
3-4 stitches on the backside, then . . .

to the surface of the work.
This is the "tying off" procedure.


12. Continue to Row 3 to work across toward right,
skipping spaces as charted, then continue to complete
the "stem" stitches at the end of this row and
also the two "single" stitches at the ends of
previous rows. (This helps minimize length of
the "floating" floss on the backside of work.)
 13. Complete the stitches shown on chart.

14. Position and attach the frame tag front layer,
taking care to line up all outer cut edges
and ribbon punch holes.
 15. Position and attach the faux stitching overlay

assembly, lining up the bottom and side edges.
 16. Position and attach the back plain (cover) layer

to cover stitching work. Immediately press the assembly
under a flat heavy weight until thoroughly dried.
 17. Thread a length of appropriately-sized ribbon

through the holes to tie a knot and bow on front.
Trim ends as desired to complete tag.


No comments:
Post a Comment