
Dimensional
Jack O’ Lantern character stands on
two skinny legs anchored in angular shoes
to help deliver
Halloween or autumn greetings.
Leg tubes are wrapped around
cut-to-size
1/2” wooden dowels (with optional metal washer weights
hidden
inside shoes to provide stability).

Other details include dimensional stem,
leafy arms,
leafy ruff accents at dome stem, shoe and leg tops.
Pumpkin figure
measures approx. 8.875” tall x 4.25” deep
x 8.5” wide (arms tip to tip).
ASSEMBLY: 1. Identify and cut the shapes:
A & B dome "lid" halves with top attached octagon
C connector tabs (8)
D dimensional stem E dome leaf accents (2)
F facial features: eyes & mouth with bend perfs
G reg. hull wedges (6)
H hull edges with arm end slots (2)
I rim ring stabilizer
J hull bottom octagon with leg openings
K interior mid height stabilizer disc
L leg end cover circles (2)
M arm leaf assemblies left & right
(each includes front, back, interior layer for rigidity)
N hull bottom leaf accents (2)
O leg tube wraps (2)
P left & Q right shoe box shapes
R shoe top leaf accent (2)
Sole: 2 sets --
S left & right sole with hex leg end cut out
(4 for thickness)
T sole whole bottom layer

2. NOTE that the sole shape has been modified
slightly so that inward edges are straight cut -
thus creating a specific left and right unit.
Layer each set (one left, one right) sole stacks
by gluing together cut out shapes, taking care that
all cut edges (especially cut out opening)
align as precisely as possible. Then . . .
 . . . position and attach the whole sole shape (face side

out) on the bottom of the stack.
 Immediately press the sole stacks under a heavy flat

object such as this large book volume, possibly with
something else heavy placed on top, and allow to
dry completely - several hours or over night.
This is help reduce or eliminate warping or curling.
 3. Prepare the two sets of leafy arms front and back

shapes by bending forward the top end tabs.
 Layer and attach the interior (no top end tab) reinforcement

shape behind the front shape, taking care to align
all cut edges as precisely as possible. Then . . .
 . . . reverse the assembly to position and attach

the back shape onto the assembly.

need to have the top end tabs remain unattached.
Press under heavy flat object until dried.
 HULL ASSEMBLY

4. Become familiar with and possibly lay out the 8 hull
shapes so that the side panels will have the arm
tab insertion slots.


5. Prepare each hull wedge shape by bending back
side edge tabs, also bending the cross perforation lines
back slightly to create the preliminary hull curve.

6. Position wedges #1 & 2 side by side and line up
the middle segments. Overlap the straight right edge
across the tab of left wedge to perforation line,
adjust so that segment lines top and bottom match,
and glue the first seam segment.

7. Work downward along the seam to align and
join the two segments below the first middle joint.
Then . .

. . . follow the same procedure to work upward to position
and join the top two segments. This completes the first
wedge seam.

8. Position wedge #3 to join the middle segment
as with the first seam, then continue the process
to work downward to join two lower seam segments,
and upward to complete the full seam.

9. Continue in the same manner to position the remaining
wedges in order until all 8 are joined into one unit.
10. To complete the form with the final seam, it will be
necessary to flex the assembly open to be able to
align the middle segment of #1 and #8 wedges.

Make sure the middle segment seam is fully secure,
then bend and adjust the two "edges" being joined
to complete the lower and upper seam segments.

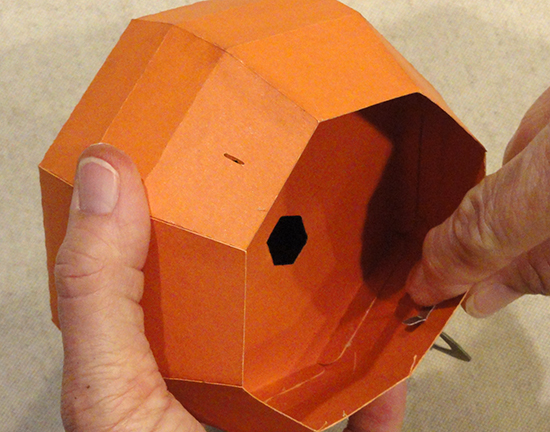
11. Prepare the hull bottom octagon disc by pushing
the star-cut opening tabs inward (these will later be
used to attach leg tubes in place).

NOTE that the hull discs each include a directional
arrow symbol cut into the shape to assist with
orienting assembly to ensure that the hexagon openings
for legs will all align correctly. The arrow should point back.

12. Apply glue to the hull bottom tabs then position
the bottom octagon disc so that the arrow symbol
is pointing toward which ever hull wedge will now be
the back panel, with the side/slot wedges opposite
the arrow to fall at the hull SIDES.

Position the bottom disc so that edges align as precisely
as possible with the hull tab perforation lines,
then attach and secure in place.

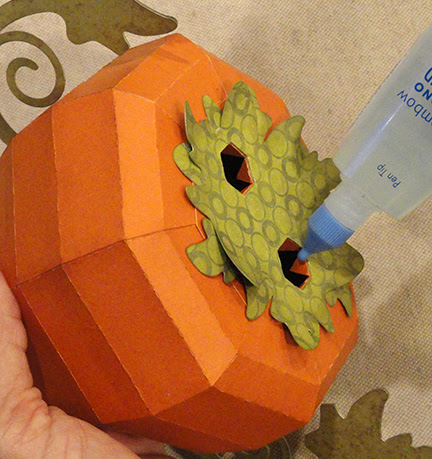
13. Prepare the leafy accents (all) by adding back curl
(shoe top and dome top shapes) and forward curl
(hull bottom shapes) to the extension "points",
using a rod tool such as knitting needle, pencil, etc.

NOTE: if the selected leaf accent paper is "blank"
on the backside - which will be visible at the hull bottom
position - it may be desirable to color or ink the backside.
The sample project was colored using two green
distress inks.

14. Position and attach the hull bottom leaf accents
to hull bottom disc, taking care that the hex openings
align at leg openings of hull. NOTE the leaf accents
should "offset" - with points NOT aligning.

LEG & SHOE ASSEMBLY
15. Prepare each leg tube by bending back on long
perforations, and also bending forward on top tabs.

16. Form the shape into a tube to overlap the straight
side edge across the opposite long tab to perf line . . .

. . . place over the 1/2" wooden dowel (as a glue-up form)
and add glue to the tab face. Push/force the edges together
to overlap straight edge across tab/flange to perf line
and glue the seam.

17. Prepare to measure the dowel for cutting to size
by pushing one dowel end even with tube, with
end tabs bent back out of the way.

. . . use a fine tip pencil to mark the end of tube.
Remove dowel and cut to marked line, then repeat
for the second leg dowel.

18. Insert and glue dowel lengths in place inside tubes.
One way to accomplish this is to push dowel slightly
out of alignment, adding glue inside tube end(s) then . . .

. . . pushing dowel back into position so that it is
even with bottom (and top) end.

19. Prepare the shoe shapes by bending back on all
perforation lines for panels and tabs.
 Also push through the star-cut hex openings.
 20. If desired (it is advised) to stack and glue together


4-5 .5" metal washers, then position and attach to
backside of shoe interior bottom panel, just in front
of the leg hex opening, as shown here. Use a strong
quick-hold adhesive such as Fabri-Tack or hot melt.
 21. Bend the front shoe extensions into position with

tabs behind the edges of side panel and glue in place.
 Repeat for the simpler panel and tabs at the back

of the shoe " box".


22. With the top of the shoe "box" still unattached,
position the sole stack under the shoe box, and align
the shoe hex cut out with the cut out of sole.
NOTE that the modification of the sole shapes will
make a straight edge on the "instep" for unique
right and left sole edge, and these should align
with the "instep" edges of shoe box.

NOTE it may be helpful to use the bottom end of
leg tube/dowel pushed into position through all layers
to assist with precise alignment. Glue
box and sole together securely.

23. Bend shoe box top tabs down into position,
apply glue, then bend the top of box down into
position, adjust for "squareness", then . . .

. . . attach in place.

24. Position a leaf accent on top of each shoe assembly,
aligning hex cut out openings precisely, and attach.

Once glue is dried, identify the "instep" side of unit
where sole has straight cut, then trim away leaf accent
even with shoe box corner.

HULL CONTINUING ASSEMBLY
25. Locate the back directional arrow on the interior
disc shape, then . . .

. . . identify the "strata" bend of the assembled hull
where the disc will fit on the inside of hull to provide
stabilization and an anchor point for leg tops.

26. Orient the disc with arrow toward back (slots for arms
will be on opposite side hull panels, then . . .

. . . flex or roll-bend the disc to fit it into the hull's
interior. Once fully inserted, adjust and fit the disc
so that octagon edges and tabs line up with the
correct "strata" bend inside the hull.

Reach into hull and apply quick-grab glue to hull
backside or disc tabs backside . . .

. . . then work quickly to work the disc into position
with disc perforations aligning at the correct bend,
tabs falling into the strata above. Use tools like
hook weeder to pull upward into position, as well as . . .

. . . finger tips on inside and outside of hull to slide
tabs against hull wall.

It may also be helpful to use the tool's handle tip to
push through the leg openings at hull bottom
to ease into position.

ARMS ATTACHMENT
27. Insert arm tip tabs through side slot, then . . .

. . . on the inside of hull, adjust so that arm tab per cuts
are even with the wall. Bend back tabs and attach to
inside surface of wall. Repeat for second arm.
28. To help stabilize the arms in place, use a neat dab
of quick-grab glue placed where the tendril swirl touches
the hull. It may also be possible/necessary to bend
the leaf tip that touches slightly, then glue it in place.

LEGS & SHOES ATTACHMENT
29. Prepare to insert and attach legs by applying
glue to the triangle tabs inside each leg opening
at bottom of hull.
30. Bend leg-top tabs slightly toward tube center,
then insert that end through bottom of hull and
through hull to exit . . .

. . . through holes of interior support disc.

Bend leg-top tabs back and attach to top of
interior support disc. Repeat for second leg.

31. Apply glue to backside of cover circles, then
position and attach to top of legs and surrounding
support disc surface.

32. Prepare the rim disc by bending the tabs forward . . .

. . . then apply glue to the margin at top inside of hull.

33. Orient the octagon rim disc to match up with the octagon
hull opening edges, then slip into position just inside rim.
Slide down into hull just enough so that TOP of tabs align
with TOP of hull.

34. Orient the left and right shoes appropriately so that
straight-cut sides are next to each other at center.
Apply glue to the pushed-down wedge tabs inside
shoe top opening, also into the "well" at the bottom
of shoe box. Then immediately . . .

. . . insert one leg end, then the other through shoe
top openings and completely down into the hex recess
in the sole stack.

Push and adjust until you feel the leg
hex end seat into the recess. (Repeat for second leg.)

FACIAL FEATURES & DOME ASSEMBLY
35. Bend the ends of smile on tiny perf cut so that
it will contour across the front mid panel.
Also bend the eye shapes at perf cut.

36. Position and attach smile at front second-from-top
panel. Position and attach the eyes across the bend
on each side of center panel at seam bend.

37. Prepare the two hull shapes by bending back
on all panel edges, tabs and flanges.

38. Bend the first upper straight edge to cross the adjacent
wedge tab to perf line to join seam.
Repeat for the other two seams of this shape, then
repeat for the second dome shape seams.

39. Bring the two dome half shapes together to align
the two-part seam, then overlap straight edge across
corresponding side tabs and glue the seam.
Repeat for the remaining opposite side seam.

40. Apply glue to the top edge tabs, then bend
the top "cap" octagon into position, adjust to align
cap edges with tab perf lines, and apply pressure
to glue in place.

NOTE it may be helpful to reverse the dome assembly
on flat work surface to apply pressure to backside.

41. Bend dome bottom rim tabs to inside and glue
each in place . . .

. . . placing rim segment flat on work surface
and applying fingertip pressure until each rim tab
is fully secure.

42. Note the back directional arrows of the two
leaf accents, then position and attach one, then
the second at dome top.

43. Prepare the stem shape by bending back on
all panels, tabs, and bending forward at bottom tabs.

44. Form the stem into a tube to bring edge to
overlap opposite tab to perf line and join seam.
If fingertips don't fit inside tube to help with joining,
use a pencil or other rod tool inserted inside to
provide a "press against" surface.

45. Bend top tabs inward, apply glue to tabs,
then bend the "cap" hex down into position,
adjusting fit so that cut straight edges align
with tab bends.

Hold in place until secure.

It may be helpful to insert the flat end of a "new" pencil
eraser to help apply pressure to secured the cap/tabs seams.

46. Insert tabs end through dome top opening. . .
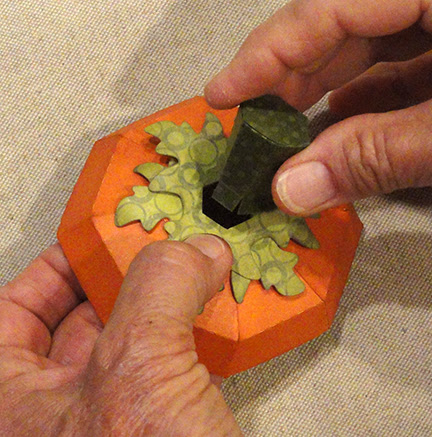
. . . then on underside, bend tabs outward and
glue in place.

FINISHING ASSEMBLY
47. Prepare the connector tabs (8) by bending back
slightly at cross perf lines. Position each behind
the hull rim edge so that the perforation line is
exactly at the rim layers' cut edges.

48. Apply quick-grab glue to bottom margin of
dome rim on inside surface. Then . . .

. . . orient the dome "lid" as desired (for seam placement)
and place on top of hull. Hold in place until secured.

Here is the completed pumpkin-on-stilts figure.

Is the lid attached to the body or does it come off to use as a small container for candies or such?
ReplyDeleteApparently the lid is intended to be glued in place. But perhaps it could be left unattached. I don't recall it being part of the integral strength of the design.
DeleteWhat a darling Pumpkin! Thanks for all the details, they were great!
ReplyDeleteNice of you to write this! I appreciate it more than you can know.
Delete