
Familiar
Halloween character composed of torso lid and
base boxes, leg and shoe boxes,
and exaggerated tall
head box with dimensional hex side bolts.
Layered-for-thickness ear and arm features add interest.

Spooky-cute facial
expression and built-on hair “tray”
top him off. Interior glued-in metal
washers
(10 @ 1/2” – 5/16” diam.) placed in shoes bottom panel
add weight and
stability.
Frankie figure measures approx.
10.375” tall x 8.5” arm span x 1.5”
depth.
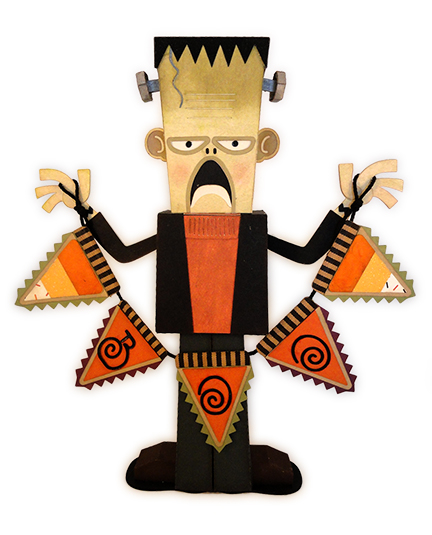
Imagine his upraised arms waving
in spooky fashion, or string from hands
the “Mini Swag
Flags Boo Candy Corn”
or “Mini Swag Flags Eek Candy Corn”
separate designs.
ASSEMBLY: 1. Identify and cut the shapes:
A head box shape B face overlay
C hair "tray" D eyes and teeth
E eyes and mouth/nose underlays
F head bolt hex and stem assembly (2)
G ear assembly (2)
H torso "lid" box (circle cut outs have been removed)
I torso "base" box
J shirt overlay K jacket overlays L collar
M arm/hand assembly (2)
N metal washers for weight/stability (10)
O leg tube (2) P shoe "boxes"
Q shoe sole stacks (2 sets of 6 ea.)

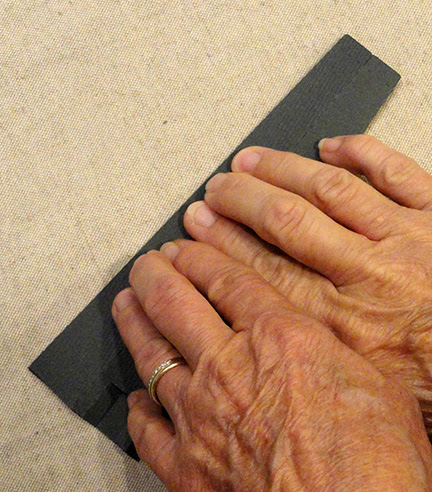
2. Begin the prep assembly so glued-up stacks or units
can be drying:
A) shoe soles - (NOTE that the dowel holes have
been removed in the final cut file version)
layer and glue together 6 shapes to create a stack
and sturdy standing base for figure; take care
to align all outer cut shapes as precisely as possible.

immediately press the stack under a heavy flat weight
such as this replica antique iron or heavy book, etc.
and allow to dry thoroughly, for several hours or
overnight. This helps prevent curling
and warping when using liquid adhesive.

B) ear - bend back tabs on front "hollow" and back
layers, then layer the "contrast" with contour cut out
onto the middle layer, taking care that all outer
cut edges are aligned as precisely as possible;

layer the front hollow ear over the middle layers,
with outer edges aligned, tab remaining unattached;

position and attach the back "reversed" layer on
backside of stack, with curved edges aligned,
back tab remaining unattached. Complete 2 ears,
then press until dried.

C) jacket, shirt and collar - position and attach
the jacket overlays onto the shirt front base with
outer edges aligned;

position and attach the collar between jacket inward
edges and aligned at top straight edge;
press until dried.

D) arm/hand assembly - using these shapes for one . . .

. . . layer an attach the interior silhouette shapes
(without the arm-end tabs); also position two-finger
and thumb shapes onto hand silhouettes and attach;

position and attach the jacket sleeve over corresponding
front or back silhouette (with end tabs);

add the joint-scar zigzag shape at front and back wrist;
position and attach front, then back over corresponding
face of the interior layers assembly . . .

. . . taking care that the end tabs remain free;
assemble 2 arms, then press under weight until dried.

3. Prepare the head box shape by bending back
all head panels, edge tabs or flanges on perforations.
4. Position and attach the mouth and eye hollow
overlays onto the face overlay.
Add inked highlights to cheeks, etc. if desired.

5. Position the face overlay over the corresponding
panel of head box shape, aligning straight edges
of face with perf lines of head, and attach.

6. Position the mouth/nose (black) underlay behind
the mouth opening of head box shape, with bottom
straight edge aligned at tab perforation line.
Position eyes (white) underlay above mouth/nose shape,
with curved cut out interlocked, then attach both
to backside of head.

7. Position and attach tiny eye pupil circles inside
eye sockets as shown; also position teeth shape
inside at lower edge of mouth cut out.
Press under flat weight until all are dried.

8. Form the head box into a tube to bring side
straight edge to overlap opposite flange perforation
line, adjust for top and bottom alignment, and glue seam.

9. Prepare the hex bolt stems by bending back
the curved "head" end tabs and the straight cut
bolt end tabs at perf cuts. Layer and attach the
interior stem layers (without end tabs).

10. Layer and attach the interior stems between
the front and back tabbed stems, between
the perf cuts. Prepare 2, then press.

11. Prepare hex cap by bending back on all perforations.

12. Bend edge walls back to overlap straight edge
across wedge tabs to per line and join seam;
complete all 6 cap seams.
13. Bend edge tabs to inside of cap and glue in place.

14. Insert straight end tabs of stem through slot
of plain hexagon, then . . .

. . . bend tabs back and glue in place.

15. Add glue to the bottom of the hex disc then insert
into the underside of the "cap" and glue in place.

16. Bend the head-end tabs back, then . . .

. . . insert tabs through upper slot in head box.
On the inside, apply glue to tabs face, bend back
and attach securely to wall. Repeat for the other side.

17. Repeat the process with the ears, inserting tabs
into the lower slots, bending back tabs and attaching
the inner walls.
18. If desired, use a graphite pencil or ink pen to
darken the forehead scar.
19. At head top opening, bend three tabs inward,
apply glue to tab faces, then bend top head panel
into position and attach to tabs.

20. Prepare the hair "tray" overlay by bending back
on all side panels and tabs.

21. Bend the sides inward toward each other to
overlap, align and join short seams.

22. Apply glue to the underside of top panel, front and
side panels, then position hair over top of head box,
slide head edges into corners at sides and front panels.
and apply pressure to attach in place. Then . . .

. . . bend side back tabs inward, back panel down
into position to join seams and attach back hair
to back of head box. Apply pressure all around
until secure in place.

23. Prepare the Torso Base panel by bending back
on all panels and tabs.

NOTE that you can identify the 'BASE' (inner) box
by locating the 'B' on the front panel of Torso base.

24. Form the torso base box into a tube to overlap,
align and join the side seam.

25. Bend side tabs inward, apply adhesive to their
face surface, and also to the face side of the back
flap tab, then tuck the top flap in
behind the back wall, and apply pressure to join
end panels in place.
26. Repeat for the opposite end of box.

27. Prepare the Torso lid box in the same manner
as for the base box, including . . .

. . . forming a tube, but wait to bend the top panel
down into position.

28. Insert arm assembly end tabs into slot on side
of torso lid box, then . . .

. . . on inside, apply glue to the face surface of
the arm end tabs, and press back into place
to attach to inside wall surface.
Repeat for opposite arm and side.

29. Bend top tabs inward, apply glue to tabs,
then bend top panel down into position, adjust
and glue in place.

30. Prepare to attach head to top of torso lid by
bending large flanges inward. Then . . .

. . . orient the head with face toward front, and
insert head tabs into top panel slots. On the inside
of torso lid, apply glue to tabs and bend back
to attach in place to underside of torso lid.

31. Prepare two shoe boxes by bending back on all
perforations for panels and tabs.

32. Bend toe shaper center panels back, side toe
panel into position and join edges to shape toe.
Repeat for second toe side.

33. Bend heel panel tabs inward, then up into position
to join heel seams on both sides.

34. Prepare the metal washer weight stacks by
applying quick-grab, strong glue between 5, then . . .

. . . stack and attach them together. Allow to dry
thoroughly. Prepare 2 stacks.

35. Position and attach one stack onto the backside
of "sole" panel of each shoe.

36. Prepare to join shoe box to top face a sole shapes
stack by applying glue to underside face of shoe.
Then center shoe box onto sole, with straight sole back
edge flush and even with the straight backside edge
of shoe heel panel. Hold in place until secure and dry.

37. Complete the shoe boxes by bending upper edge
tabs inward, applying glue to them, then bend top panel
over tabs and into position and attach in place.

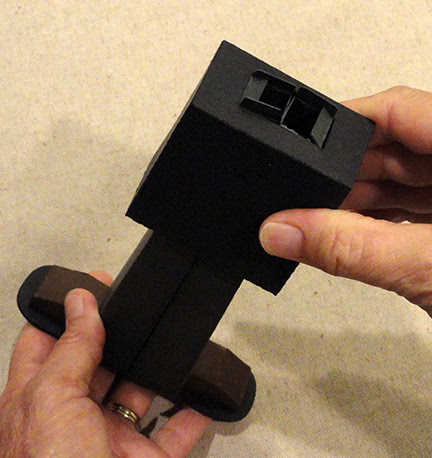
38. Prepare leg tube shapes by bending back
on long perforation lines, and also small flanges
at shoe "arch" cut out. Bend top tabs forward.

39. Form the shape into a tube to overlap
straight edge across opposite flange to perf line
and glue seam.

NOTE that the symmetry of this shape will allow
it to be depressed into flat format and apply
fingertip pressure all along the seam.
40. Bend shoe arch flanges inward at right angle.

Apply glue to backside of shoe,
also to faces of leg flanges. Then . . .

. . . fit a leg tool over top of shoe, and push shoe
toward back of leg tube . . .

. . . to adjust bottom of leg tube with bottom of shoe
so that sole is visible. Hold in place until dry.
Repeat for second leg tube and shoe assembly.

41. Position legs together so that "back" panels
will attach, apply glue then press together, taking care
that the soles are even so that the figure will stand
straight. Allow to dry securely.

42. Bend leg top tabs inward.
Insert top of legs through bottom rectangle
window cut out and push through . . .

. . . until tabs emerge through smaller rectangle
window cut out.
Apply glue, bend the tabs outward and attach
in place.

NOTE that it will be helpful use hand
pressure to keep the torso base box high and
fitted into the bends of the tabs until fully secure.

43. Apply glue to the inside lower margin of
torso lid box, then fit it over the base box . . .

. . . and carefully push together until
bottom edges of lid and base come together.
(This will be a snug fit.)

44. Position and attach the jacket/shirt front assembly
to the figure front with outer edges until secure.

Also position and attach the "wrap over" shirt
strip exactly above collar on top front edge
of torso lid.

The Frankenstein figure is now complete.

Consider preparing the "BOO" or "EEK" flag swag
to string between the figures hands.


No comments:
Post a Comment