
Front
card includes stitching circle cutouts at
pumpkin contour and stem outlines.

When no. 5 “perle cotton” (or 6-ply embroidery floss)
horizontal stitches are
added, the simple “shadow” design appears.
Edge straight stitches can also be
added, or use
the faux stitch front optional shape for more simplicity.
A2
top-fold card measures approx. 4.25” tall x 5.5” wide.

ASSEMBLY: 1. Identify and cut the shapes:
A card base with top fold perforation at shape center
B stitching buffer shape (2-3 for thickness)
C card front with stitching holes
D duplicate layer of front with stitching holes
E perle cotton no. 5 for stitching pumpkin & stem

2. Obtain stitching "thread" and blunt tapestry needle
approx. size 24. NOTE use the smallest gauge
that will accept the perle cotton. (6-ply embroidery
floss can also be used, but it is more difficult to keep
the six plies looking neat and consistent.)
For the sample project DMC 946 which was readily
available through regular craft suppliers but which
was too bright for my taste. I wound off 6 yards
and tea dyed that in a pan of steeped black tea
for about 3 minutes to achieve the deeper shade.

3. Prepare the stitching hole panels by poking through
all holes using the needle size with which stitches
will be added. Remove all "crumbs".

panels (to provide strength for stitching process
and to hold stitches flat) . . .
 . . . then immediately use tool to push through at

corner holes, and several random places across design,
to ensure that holes in both layers are aligned.
 Press under a heavy flat object, such as this thick book,

on a flat surface, possibly placing other heavy object(s)
on top to press thoroughly. Leave several hours or
overnight.
Also layer and glue up the stitching buffer panels
into a stack, then press under flat heavy weight
in same manner.

 5. Insert needle into bottom right hole of first contour

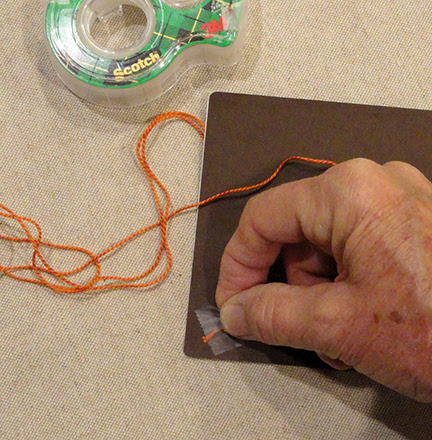
4. Cut a length of stitching thread approx. 40" long
(or according to comfortable arm extension length).
Thread through blunt needle. Position opposite end
on panel backside near the first stitching hole and attach
using a small piece of cello tape. (This constitutes
"tying on".)
row of stitches, and push through to front, drawing
up all thread until stopped by tape anchor.
 6. Move across to left to insert the needle through

bottom (row) next hole, and draw needle and thread
through to backside.
 7. Continue to stitch the bottom row of 5 straight

stitches.
 This image shows the work from backside.
 8. On backside of panel, move needle and yarn up


to the first hole of second row, and follow the same
stitching process of straight stitches back to the right.
 9. Continue the process to apply straight stitches

across the panel, working row by row.
When the yarn is nearly used up, draw the needle
and remaining yarn to the backside of work
and pull up flat. Trim end approx. 1" from panel
backside, then . . .
 . . . use a small piece of cello tape to secure the end

in a place where it will not interfere with
subsequent stitching.
This is the "tying off" process.
 10. Continue to work stitches to the top of the pumpkin

contours, row by row, as begun. Tie off and on as needed
to add more yarn, until pumpkin is completed.
11. Tie on a length of contrast (cream) yarn near the base
of the stem, and complete the few stitches there.
Then, without tying off, carry the needle on backside
of work - after final stem stitch is complete . . .
 . . . up to the edge stitching holes. Work around

the panel to where first edge stitching began,
then tie off in usual manner.
(If using faux stitching panel, simply thread a shorter
length of cream yarn, and tie off
when stem is complete.)
 12. Reverse stitching panel so it is face down.

Apply glue to backside of buffer assembly, then
position on stitching panel backside, adjust so that
outer edges of both components are aligned as
precisely as possible - with single cutout opening
surrounding pumpkin stitching . . .
 . . . as shown here, and press to attach buffer panel

in place.
 13. Position and attach stitching panel to front panel

of folded card base, with narrow margin all around.
PRESS flat under heavy weight until thoroughly dried.
 14. Following completion of Step 13, card is finished.

Consider embellishing your stitched card with
the companion (separate cut file design)
Harvest Blessed tag.

No comments:
Post a Comment