
Five
rectangular boxes plus a shaped head, hat canopy
and thickened brim evoke a stylized Pilgrim gentlewoman
and thickened brim evoke a stylized Pilgrim gentlewoman
for Thanksgiving decorating. Interior support
“struts”
give boxes structure so they won’t collapse downward.
Add decorative
“half doily” apron with tiny
accent buttons or studs.

Back closures of bottom compartments are
tuck-in tabs so that small treats or goodies can be added
if desired – to
convert her into a unique gift box.
(Alternative “body” box shapes included for
glued-closed assembly.)
Ensemble measures approx. 3.75” wide x 3.75” deep
(at
bottom) x 6.75” tall.

Coordinates with “Pilgrim Fig 3D Box Stack”.
ASSEMBLY: 1. Identify and cut the shapes:
A body box #1 (bottom) with support strut strip
B body box #2 (middle) with support strut strip
C body box #3 (top) with support strut strip
D collar "box" with support strut strip
E neckband box
F head "box" front panel with attached top & bottom panels
G side and back head panels (3)
H face panel overlay with eye cut outs I eye contrast oval
J head box X support panels
K hat box L front "brim" overlay (4-5 for thickness)
M heart applique for hat (3-4 for thickness)
N half doily apron

A) layer hearts applique with edges precisely
aligned. Press under a heavy flat weight until dry.
 B) Layer hat brim shapes with all cut edges aligned

as precisely as possible. Then . . .
 . . . immediately press under a heavy flat object

(such as this imitation vintage flat iron) until
dry - several hours or overnight. This will help
prevent warping or curling of glued-up shape.


3. All body boxes are assembled in similar manner
as box 3, which is demonstrated here. All body boxes
and strut strips include an identifying and pairing
number cut into side tab or panel.

Prepare box hull by bending back on all perforation
lines for panels, flaps, tabs.
Also prepare the "container" strut strip by bending back
on center perforations, and forward
at tabs and strip end tabs.

4. Form the body shape into a tube to bring straight
side edge around to overlap opposite side tab perf
line, adjust for top to bottom alignment, then join seam.

NOTE that the symmetry of this cut shape allow it
to be flattened onto work surface so that finger tip
pressure can easily be applied along the seam.

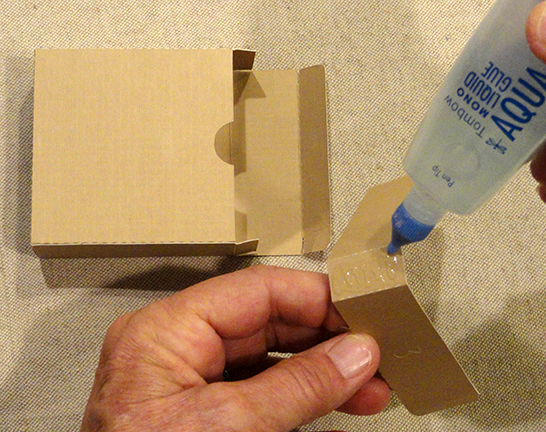
5. At the end opposite to the opening flap,
apply glue to the small side tabs, and to the face
of the end panel flange, then tuck tab into
the box and glue closed.

NOTE that to assist with these seams, it may be
possible for smaller size boxes to insert finger tips
inside box to apply pressure. Or, use the end of an
unsharpened pencil (or new eraser end) to insert
to apply pressure to tabs until secure.

6. For the sample being assembled in this tutorial,
the "contained" style struts. Here, its final positioning
on the interior of box is demonstrated where it can
be more easily seen.

Apply glue to the backside of strip between perforations,
and also on ends before perforations, and on
bottom faces of tabs. Then . . .
. . . insert the strut strip into the box with tabs
toward bottom (flap-attached face) and attach
in place.

Apply pressure to attach all glue-applied components.

7. (View steps 10-12 for similar assembly of collar box.)
If using the non-opening box variation, the struts
are configured into a square frame as shown here.

Bend on perforations, then form into frame and
attach end tab. Follow similar steps to apply glue
to tabs then insert strut into box, center and adjust,
then apply fingertip pressure to tabs that
can be reached.

8. For container box style, bend side tabs inward
and then tuck flap in to close box.
(For alternative design, apply glue and tuck tab
inside to close and seal seams.)

9. Prepare he collar box in similar fashion to body
boxes. Also . . .

. . . prepare interior strut support strip by bending
back on all short vertical perf lines, bending
tabs forward.

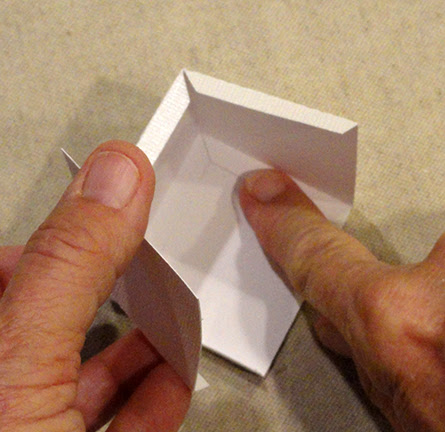
10. Form the strut into a square frame to
join end seam.

11. Bend side panels back and join corner seams.

12. Apply glue to bottom face of strut frame tabs,
then insert and center in "tray" before . . .

. . . bending side flanges inward and top wall downward,
tucking end flange tab down into position to close box.

13. Prepare the main head shape by bending back on
all perforation lines for panels, tabs, top and bottom.
Prepare the other three head shapes by bending back
in similar manner.

with the next (right) side separate panel with straight
left side plain edge laid over side tab (adjust to align seam
at top and bottom). Repeat for the remaining two sections.
 15. Position the face panel at the bottom of

the main head shape, using perforation folds
to help, and glue in place.
 16. Add glue to the backside of face that shows thru

the oval cutout, then slip contrast eye oval
into the recess and attach.
 17. To complete the lower shaped portion of head

box, bend the first right section back from front head
section at right angle. Bend triangle panel back to
tuck tab under the adjacent angled straight edge
(shown in top arrow below), and tuck horizontal tab
under the corresponding straight edge of extension
from right panel (shown by middle arrow), and
tuck bottom vertical tab under adjacent straight edge
(bottom arrow).
18. Repeat for the other three seam groups.
 19. Form the head assembly into a tube to align

the final upper and lower seam sequence of
straight edges and tabs.

 21. Prepare the interior support by interlocking

20. Finish the bottom panel assembly by bending wall tabs
inward, bottom platform down into position, and glue in place.

the two panels at center slots, then pushing together
completely.
 22. Insert into top of head box with "arms" of

supports extending between corners. Push fully
into the box.
 23. Bend top tabs inward, then bend . . .


. . . top panel
into position and glue in place.

24. Prepare the neckband box by carefully bending
back the center "cavity" walls along smallest
perforation lines square.

Then bend back on all
remaining perforation lines for panels, walls, tabs
and end flange.

25. Form the neckband shape into a tube to bring straight
side edge around to overlap opposite side tab perf
line, adjust for top to bottom alignment, then join seam.


26. Bend side flanges in, apply adhesive to upward
faces, and to end face of tab, then close top and
tuck in end tab to seam and close the box.

and to folded back downward tabs, then slide
the head bottom bottom into opening. Push
down until the head is seated snugly on bottom.
 28. Prepare the hat shape by bending back on

top, sides, and back panels and tabs, taking care . . .

the narrow span near front opening.
 29. Bend side panels back, top and back panels

back into position . . .
 . . . to join seams.
 Invert to insert fingertips into interior to apply


pressure along seam tabs.
 30. Position and attach heart applique to front
of brim assembly, centered, as shown.
31. Position and attach brim to front of hat box,
with front "opening" edges aligned.
 FINAL ASSEMBLY

32. Arrange the body boxes into a centered stack,
bottom to top in descending sizes.

33. Apply quick grab glue such as "Fabri-Tack" to
underside of smaller box being attached, then
position and center it onto larger box, checking
the exposed margin all around for evenness.
Hold in place until secure.

34. Repeat for the smallest, top body box.
NOTE that for the "container" style box, the finger tip
cut out for all three in the stack should be aligned
together at the "back" of the stack.

35. Position and attach head/neckband box assembly,
centered onto top of thin collar box, with even margins
all around.
36. Position head/neckband/collar assembly, centered,
on top of body stack (apply glue to top of box #3)
and attach in place. Be sure to orient the face panel
side of assembly toward the "front", opposite
finger tabs, if using the container style body boxes.

then slip the hat over the head box, center so that
the brim thickness at front is in front of face plane.
Hold until secure.

then position at top front corner ridge of
middle body box, center from side to side,
then hold in place until secure.
 To help apron stay in desired position, add

a dab of quick grab glue at center top ridge edge,
then re-position and hold til secure.
 39. Add tiny buttons, if desired, at apron corners.


No comments:
Post a Comment