First, a simple project. I used Snapdragon Snippetts build a jack o' lantern eye, nose and mouth sets, resized to fit my solid orange ceramic plates. I played with combinations, then cut them from brown vinyl and applied them to the plates.
I made two. Here is my favorite - the happy pumpkin!
Here is the second plate with a "scary" face.
Which do you like best?
Next, I needed something tall for a shelf display, so I created a "BOO" cubes tower from Snapdragon Snippetts flourished 3d 'b' and 'o' box files.
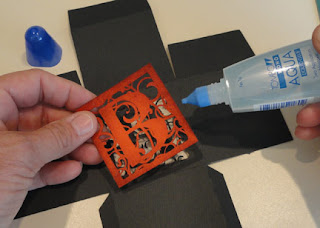
I initially cut the B and both Os from black card stock, but then decided I wanted a little bit more pizzazz. So I cut a second layout from solid orange card. You can see the main construction steps in the following few images.
I used my rotary cutter and ruler to trim away just the ornate letter square, cut slightly smaller than the original black panel. That way, there is a little bit of black left to frame the orange square on the front.
I used my Distress Ink to "antique" the orange edges a bit....
then glued the cut panel over the black.
To make the three cubes into a stack, I poked a tiny center hole in top and bottom of the top two, and in top only of the bottom. I dressed up a Jack O'Lantern pick and cut it to exact length, then threaded it's wire stem through the holes. I also used a tiny "bean bag" (from black fabric) in the bottom cube to weigh it down a bit.
Next project: to update my entryway with a seasonal saying. An online search turned up the "Witches fly.." poem. Using the text tool, I set up the lines in Vivaldi, then found something spooky to enhance it. This creepy tree is a single shape from the Snapdragon Snippets 3d bare-branched tree design (with side notches smoothed out).
Here it is shown with a colorful Halloween wall quilt hung nearby. (If I were to re-do this project, I would enlarge both the phrase and the tree to the largest my Silhouette would permit.)
Finally, I created this long skinny pillow with Vivaldi text styling tool, then cut it from Clean-Cut Fabric Interfacing. I fused it to the pillow front panel, then machine over-edged each letter so it will last. Then I finished up the pillow with this cool black twill tape fringe.


Wonderful projects! Love the Boo blocks and the wall art - they are now on my "to do" list.
ReplyDeleteThe "Boo" is my favorite. The detail of the lace open work is just fantastic. The distressing of the box just adds the finishing touch.
ReplyDeleteLoved the Boo blocks, so I made me a set for me today. Thanks for the idea!
ReplyDeleteLove these boxes too!
ReplyDelete