
Create this perky little decor accent wreath sized at around 9" x 11"
using the wreath form and heart shape with stem
which are now available as a download design
from SnapDragon Snippets
through the Silhouette America on-line store.
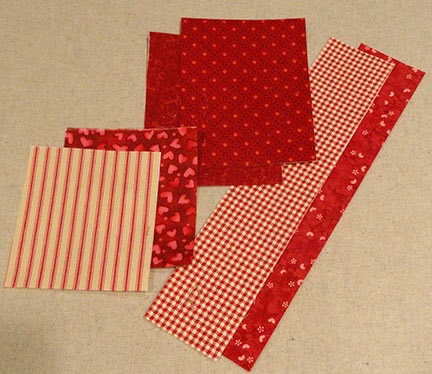
Here's a quick overview of the fabric hearts prep:
Choose ten fabrics matched up as pairs,
set up your Silhouette cutting screen to cut 8 from each fabric piece,
determine most efficient cutting layout then cut fusing to match (with margins),
cut fusing (Silhouette's "interfacing") and apply to fabric trimmed to match,
then load and cut each fabric section Cut 40 hearts.
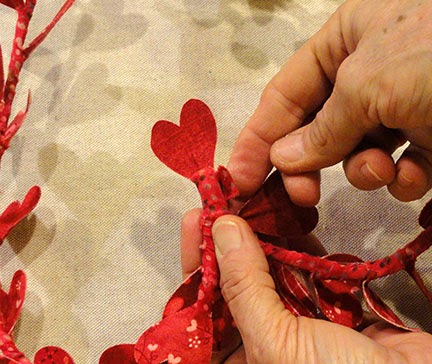
Arrange heart pairs back-to-back, insert a 1 3/4" wire between in stem,
then fuse together, using fingers to seal heated stem area.
Attach to shaped wire form with torn fabric strip and hot glue.
Arrange heart pairs back-to-back, insert a 1 3/4" wire between in stem,
then fuse together, using fingers to seal heated stem area.
Attach to shaped wire form with torn fabric strip and hot glue.
TUTORIAL
PREPARING THE FABRIC HEARTS:
Also shown: wire coat hanger, electrician's tape, florist wire 19 gauge or equiv. (straight stem wire AND coiled wire shown).
Not shown: 5/8 yard of no-sew paper-backed fusible web such as Silhouette's "fabric interfacing" or Ultra Hold Heat N Bond.

2. Cut a wreath form "template" from paper or card stock. Obtain, untwist and straighten a regular wire hanger. Bend at the center to form the heart's point.

3. Bend each side to match the template. Use something rounded like a rolling pin, cardboard tube, cylindrical jug, etc., to help the "lobes" take their best rounded shape.

4. When the shaping is done, overlap the excess wire ends, determine where they will line up, then cut away ends you won't need. Flatten the two ends about 3/4" in so they can be tape-joined.

5. Use a piece of electrician's tape (or equivalent) to securely tape the joint, wrapping several times tightly.

6. Position the hearts on screen in the most efficient cutting arrangement possible to match your fabric patches. Drag-select the hearts group to see their "footprint" size on your Silhouette Studio screen. Add a margin of 3/4"-1" to these measurements, then prepare to cut fusing and fabric.
NOTE:you may need to figure a cutting arrangement for the fabric sizes available. Some of my fabric was in large sections and some in strips. For each different size shape, I re-configured how the hearts were arranged on my cutting mat on-screen. Sometimes creating a rectangle on my screen using the "Draw a Rectangle" tool, then seeing how best to fit the shapes helped me prepare to cut with confidence. However, BE SURE TO DELETE THE AREA RECTANGLE BEFORE CUTTING!

7. Once you know the target size to cut, cut fusing rectangle, fuse to fabric backside, then trim fabric to match fusing shape.

8. Position the fabric shape on the cutting mat and load to be cut.
(NOTE: Silhouette tutorials suggest that the paper backing be left in place during the cutting step. I prefer to remove the backing before positioning fabric on the mat, to avoid time it takes to remove the backing shape from mat, since the fabric usually peels from the fusing backing when being removed.)

Peel the excess cut fabric from mat, then use the spatula tool to lift the heart shapes from the mat.

10. Layer the pairs of print hearts so all cut edges line up exactly. Use hot iron (follow product instructions) to tack-fuse top portion ONLY.

11. Cut wire into 1 3/4" lengths. Pull back the top layer and insert a wire down the center with ends even. Re-position top layer.

12. Apply hot iron to melt the fusing adhesive. Then finish the fusing process for the stem area around wire by pressing and smoothing between fingers.

This image shows that the heart with stem can now be bent to the shape and position required. Shaping will be completed at the end of the construction process.
CREATING THE WREATH


14. Position first heart so that base of heart shape is at divergence point. Add a dab of hot glue, if desired, to hold shape in place. Bend wire to match wire form. Wrap strip in a tight spiral where only about half of the previous wrap remains exposed. Wrap 3-4 times, to cover approx. 3/4" beyond heart transition to stem point.

15. Position the second heart, again placing the transition point approx. 3/4" below similar place on previous heart. This time try to angle the heart along the outside of the wire form. (Hearts will be angled in alternating inside or outside positions.)
Tightly wrap/spiral 3-4 times to cover the 3/4" spacing.

16. Continue adding hearts in a similar fashion (this image shows the assembly from the backside) adding a dab of glue for each new heart or as desired. Rotate through the different fabric groups in order. Alternate the inside/outside of wire form positions, and also alternate the face down/up orientation so different prints are exposed on top (for the sake of variety).

17. When the attachment of hearts is nearly completed, the second to final heart may need to be trimmed slightly so that the wire and end doesn't extend past the joint tip.
18. Position the final heart pointing downward in back of the joint area. Trim off the end where the "valley" of the wrapped form is. Complete the wrapping along the heart stem, trim the strip excess on the backside of the wreath. Lift strip end, add a dab of hot glue under the strip end, then re-position and hold in place until glue is secure.
Bend the heart upward to be in front of the joint area on the wreath's front.

19. Work around the wreath to bend the hearts that may be laying "downward" up to match the "upward" positioned side. Flare the hearts away from the wire form slightly, then adjust all hearts so the wreath has a pleasing appearance.
NOTE: As alternative to having all hearts added in a "clockwise" fashion, complete the first half, then begin again at the top center to attach hearts counter clockwise for the second half.


21. Prepare and attach a decorative bow. For mine, I cut six 7 inch long pieces of coordinate ribbon, and one 24-26" main bow ribbon. I tied the long piece around the wire form just above the joint (just a single over-hand knot), then laid the center of the short pieces cluster over the knot and tied another knot and then the bow. Trim ends ....
then ENJOY!

This is awesome. Thanks for the instructions.
ReplyDeleteLove this, you could do the same with clovers for St. Patricks Day!
ReplyDelete