
Say "thank you" to a special teacher or school official
with this unique and choc-full dimensional card.
First, build the "bottom-less" box that can fold flat for
inserting in an envelope. Add patterned paper accent shapes on the flaps
and box sides, two bridge strips to "support" the decor shapes,
then build and attach the shapes.
These include (back to front): "Thank you!" layered phrase,
star trio, A+ shape, books stack, cut apple, pencil, "Teacher" layered plaque.
These include (back to front): "Thank you!" layered phrase,
star trio, A+ shape, books stack, cut apple, pencil, "Teacher" layered plaque.
 CONSTRUCTION:
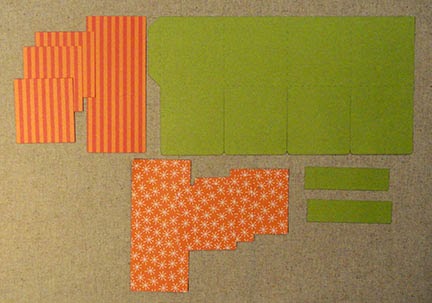
1. Identify and cut the parts for the box. Top row includes the four outer box decor shapes and the box body. Bottom row includes the flap decor shapes and the two bridge strips.
 2. Position and attach the box decor shapes. These are offset at the sides and top, but the bottom edges should fit flush against the bottom edge of the box body.
 3. Position and attach the flap decor shapes. These are offset and aligned similarly to the box decor shapes, as described in Step 2 above.

4. Fold the box into a "tube" shape, and attach the side tab to the opposite straight side edge. Take care that the bottom edges both align exactly as the seam is made.

5. Prepare the bridge strips by folding back the end tabs.

6. Insert the bridge into the box, then glue each end tab to box sides, placing the bridge approximately 1/3 of the way back from the box's front.
 7. Before glue dries, fold the box flat as shown so that the bridge can adjust itself as needed to allow the folding flat. Apply pressure with fingers at the bridge's connector points to box, to ensure the adjustment, and firm re-attachment of the tabs inside the box.
8. Repeat the placement of the back bridge, approx. 1/3" forward from the box's back. Repeat the folding/adjusting step also.

This image shows both bridges in place.
9. If you plan to use the plaque with the hole punch and brad, you will need to transfer the punch hole through the front flap. Use an instrument like this sharp awl to push through the existing hole of the front flap decor shape.

10. Assemble the layers to complete each of the decorative shapes as shown.

11. Position and glue the plaque in place. Attach the brad through the hole.

12. Attach the "Thank You!" arch phrase on the back "flap" near the top. Attach the stars cluster below. To provide added dimension, attach a few foam squares to the back of the stars shape before attaching.

13. Attach the books stack with tab extension behind the back bridge, and as far left as possible.
14. Attach the A+ shape on the front of the back bridge, centered. For added dimension, attach foam squares to the A+ backside where it will touch the books stack behind.

Here is the placement of the A+ shape.

15. Attach the bottom edge of the apple and pencil to the front of the front bridge as shown, left and right. Aim at placement that allows as much of the behind layers to be seen from the front as possible. (Tricky, I know, with this much going on!)
 16. With the shapes in place, fold the card flat to make sure it can still fold flat easily.
NOTE 1: This "fold test" should be performed after each set of layers is added, in case adjustments are needed.
NOTE 2: If you plan to use the SnapDragon custom envelope design, make sure the shapes don't extend beyond a 7x7 inch square (actually, slightly inside that perimeter measure, so it will slide inside).
4. Fold the box into a "tube" shape, and attach the side tab to the opposite straight side edge. Take care that the bottom edges both align exactly as the seam is made.
5. Prepare the bridge strips by folding back the end tabs.
6. Insert the bridge into the box, then glue each end tab to box sides, placing the bridge approximately 1/3 of the way back from the box's front.
8. Repeat the placement of the back bridge, approx. 1/3" forward from the box's back. Repeat the folding/adjusting step also.
This image shows both bridges in place.
9. If you plan to use the plaque with the hole punch and brad, you will need to transfer the punch hole through the front flap. Use an instrument like this sharp awl to push through the existing hole of the front flap decor shape.
10. Assemble the layers to complete each of the decorative shapes as shown.
11. Position and glue the plaque in place. Attach the brad through the hole.
12. Attach the "Thank You!" arch phrase on the back "flap" near the top. Attach the stars cluster below. To provide added dimension, attach a few foam squares to the back of the stars shape before attaching.
13. Attach the books stack with tab extension behind the back bridge, and as far left as possible.
14. Attach the A+ shape on the front of the back bridge, centered. For added dimension, attach foam squares to the A+ backside where it will touch the books stack behind.
Here is the placement of the A+ shape.
15. Attach the bottom edge of the apple and pencil to the front of the front bridge as shown, left and right. Aim at placement that allows as much of the behind layers to be seen from the front as possible. (Tricky, I know, with this much going on!)
NOTE 1: This "fold test" should be performed after each set of layers is added, in case adjustments are needed.
NOTE 2: If you plan to use the SnapDragon custom envelope design, make sure the shapes don't extend beyond a 7x7 inch square (actually, slightly inside that perimeter measure, so it will slide inside).
Hope you've enjoyed creating this dimensional card!
Please check out the other "box card" designs
available from SnapDragon Snippets.
This card is amazing, Jodi!
ReplyDeleteThanks for sharing
ReplyDeleteVery nice tutorial !~Mel
ReplyDelete