Showing posts with label teacher card. Show all posts

Sunday, August 9, 2015

Teach from the Heart Cascade Card Assembly

Say "thank you" or "you've made a difference" 
to an educator with this one-of-a-kind card. 
Measures approx. 6x6" when closed. 

Scalloped edge cascade base shapes 
bend in opposing V shapes and 
interlock to provide surfaces for embellishments. 

ASSEMBLY:
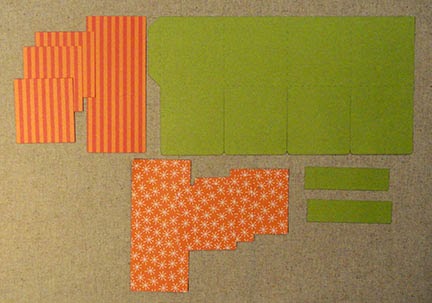
1. Identify and cut the shapes:
A left card base shape with accent panels
B right card base shape with accent panels
C front accent panel
D back accent panel
E arch banner with cardstock paper clips
  (cut two sets, then glue pairs back-to-back)
F "teach" letters, offset base
G "teach" stringer
H lattice heart, base heart, lace edge heart
I word cutouts "from the heart"
J floral and leaf decorations


2. Prepare the left (top) and right card base shapes by bending at the center perforation line of each to bring the smaller end to lay on top of the taller end.

(NOTE: use paper that is nice or the same on both front and back for best results.)

3. Attach the accent panels to the appropriate card base divisions. The tall and med. shapes attach to the "front" of the base, and the shorter attaches in the third division on the "back".

NOTE: for the sample card, the offset accent shapes have been adjusted downward slightly to allow space for attaching the rows of pearl jewels.

This image further illustrates the accent shapes positioning.

The left folded shape in the image here is the top shape shown in the previous image.

The right folded shape is the bottom shape shown above.


Here, again, the the left shape . . .


. . . and the right shape.


4. Slide the slot cutouts of the right shape over the left shape cutouts to interlock the halves.

Slide the two completely together, then square up the bottom edge.


5. Position and attach the back shape to the back panel of the card that is created by the two halves that now form one back panel.


6. Position and attach the front panel.


7. Prepare the arch banner by centering and attaching the word cutout shapes.

NOTE that the model card has a mirror image shape cut and attached to the arch backside to reinforce it.

8. Overlap the arch bottom points on the large scallop "tabs" at the top sides and glue in place.


9. Attach the paper paper clip accents on the ends of the arch.


10. Prepare the main heart unit by layering (centered) the heart base and lattice heart shapes on the lacy heart base. If you plan to embellish with tied-on ribbon like the model, leave the upper right lobe of the lattice layer unattached. Thread ribbon length(s) through top cutouts as shown, and tie knot or bow, then complete the joining in place of the lattice layer.


11. Give the heart assembly added dimension by attaching foam squares on the backside of the heart in the approximate areas shown.


12. Position and attach the heart assembly onto the front panel, point near the bottom center edge of the card front.


(NOTE  leaf accent shapes have aready been attached here.)


13. Position and attach the "from the heart" word cuts.


14. If desired, prepare the petal shapes for the two flowers (or more if you choose), by "embossing" with the rounded stylus from the McGill tools set.

For more information on this technique and tools, visit http://www.mcgillinc.com/shop/pc/Paper-Blossom-Videos-d13.htm

15. Layer the three petal shapes with largest on bottom, smallest on top and glue to join. Attach a small bead or other "found" center for each blossom. Attach below the ribbon bow over the leaves that are shown with step 13.


16. Position and attach each of the "teach" letters on the offset base shape.

Position and attach the base shape assembly onto the "stringer" which will bridge across the cascade base in the final assembly.


17. Position the "teach" shape so that the cut slots fit loosely over the second slant level on each side of the card.

This loose stringer styling will allow the card to lay flat for sending and storing, yet hold its "open" standing shape when the "teach" stringer is in place.


Here is the completed card.


Sunday, May 18, 2014

Teacher Appreciation Dimensional Box Card Tutorial

Say "thank you" to a special teacher or school official
with this unique and choc-full dimensional card.
First, build the "bottom-less" box that can fold flat for 
inserting in an envelope. Add patterned paper accent shapes on the flaps
and box sides, two bridge strips to "support" the decor shapes,
then build and attach the shapes.
These include (back to front): "Thank you!" layered phrase,
star trio, A+ shape, books stack, cut apple, pencil, "Teacher" layered plaque.

CONSTRUCTION:
1. Identify and cut the parts for the box. Top row includes the four outer box decor shapes and the box body. Bottom row includes the flap decor shapes and the two bridge strips.


2. Position and attach the box decor shapes. These are offset at the sides and top, but the bottom edges should fit flush against the bottom edge of the box body.


3. Position and attach the flap decor shapes. These are offset and aligned similarly to the box decor shapes, as described in Step 2 above.


4. Fold the box into a "tube" shape, and attach the side tab to the opposite straight side edge. Take care that the bottom edges both align exactly as the seam is made.


5. Prepare the bridge strips by folding back the end tabs.


6. Insert the bridge into the box, then glue each end tab to box sides, placing the bridge approximately 1/3 of the way back from the box's front.


7. Before glue dries, fold the box flat as shown so that the bridge can adjust itself as needed to allow the folding flat. Apply pressure with fingers at the bridge's connector points to box, to ensure the adjustment, and firm re-attachment of the tabs inside the box.

8. Repeat the placement of the back bridge, approx. 1/3" forward from the box's back. Repeat the folding/adjusting step also.


This image shows both bridges in place.

9. If you plan to use the plaque with the hole punch and brad, you will need to transfer the punch hole through the front flap. Use an instrument like this sharp awl to push through the existing hole of the front flap decor shape.


10. Assemble the layers to complete each of the decorative shapes as shown.


11. Position and glue the plaque in place. Attach the brad through the hole.


12. Attach the "Thank You!" arch phrase on the back "flap" near the top. Attach the stars cluster below. To provide added dimension, attach a few foam squares to the back of the stars shape before attaching.


13. Attach the books stack with tab extension behind the back bridge, and as far left as possible.

14. Attach the A+ shape on the front of the back bridge, centered. For added dimension, attach foam squares to the A+ backside where it will touch the books stack behind.

Here is the placement of the A+ shape.


15. Attach the bottom edge of the apple and pencil to the front of the front bridge as shown, left and right. Aim at placement that allows as much of the behind layers to be seen from the front as possible. (Tricky, I know, with this much going on!)
16. With the shapes in place, fold the card flat to make sure it can still fold flat easily.

NOTE 1: This "fold test" should be performed after each set of layers is added, in case adjustments are needed.

NOTE 2: If you plan to use the SnapDragon custom envelope design, make sure the shapes don't extend beyond a 7x7 inch square (actually, slightly inside that perimeter measure, so it will slide inside).


Hope you've enjoyed creating this dimensional card!
Please check out the other "box card" designs
available from SnapDragon Snippets.