
This post explains one of the fun ways to use
this new Paris-theme stencil or vinyl design
available from SnapDragon Snippets:
custom canvas bag.
If you've used your digital cutting tool
to prepare a painting stencil, you already know how fun it can be.
If you haven't yet, this tutorial will show you
the steps that make it so easy.
Hope it gives you the momentum to try!

1. Set up the "c'est la vie/Eiffel Tower" design on your cutting area so that it will have at least 2-3 inches of margin all around, or center the design in the area that your sheet of vinyl covers.
The piece of vinyl used in this example was approx. 10" x 12". Clear stencil vinyl can be used, but I find it easier to position colored vinyl.
Adjust the digital cutter settings for "vinyl", adjust the blade depth, etc., then send the job to cut.
(NOTE: the Silhouette Cameo cutter does NOT require placing the vinyl on a cutting mat, but I prefer to do it this way.)
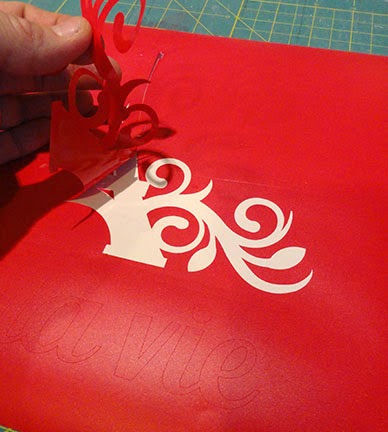
2. Remove the cut sheet from the machine and mat. Use a tool to help release the unwanted parts of the design - called "weeding".
In this case, we are trying to create openings where the paint will enter, so it is the Eiffel Tower, horizontal bar and words that are "weeded" away, and the background areas are KEPT in tact.
3. Place a matching size transfer adhesive sheet over the weeded design, rub (burnish) over the whole design area with scraper tool to prepare it to attach, then lift the vinyl away from it's carrier backing sheet.
4. Position the vinyl (attached to its transfer sheet, as shown here) in its final position on the front of your purchased bag or your prepared fabric panel. Use the scraper tool to rub or burnish the vinyl area (underneath) so that it will attach to the fabric.
5. Carefully peel back the transfer (sticky) sheet to leave the vinyl stencil in place. This is a patient process, since many of the tiny, narrow areas of the design may stick to the transfer sheet better than the fabric, and will need to be coaxed with scraper or spatula tools (or anything else that works) to remain in place.
Take special care around letters, and flourish tails.

6. Take a few moments to burnish over the top of the design to make sure that it is thoroughly sticking, especially at EACH edge around all openings. This is important to make sure that stencil paint will NOT seep behind the vinyl.
I like to use my scraper tool as shown, then follow with fingertip pressure, for a very thorough job.

7. Mask off all areas around the vinyl stencil to protect the entire project from paint overspray.
Here I have used a waste plastic sack split in two pieces, as well as waste transfer sheet (after it has been used at least twice, it is difficult to keep it straight for re-use, so I find this a perfect way to recycle it). Masking tape has been used to attach the strips overlapping the edges of the vinyl panel.

8. Apply the stencil paint. I prefer to use spray paint, but gentle sponge daubing may also work, with "dry" style paint to avoid pushing the paint under the stencil edges.
I found with the sample project that it required 4 light coats of paint, since the paint continued to soak into the fabric at each coating. Allow to dry in between.

9. When the paint is thoroughly dry, carefully peel away the stencil and masking materials. Weed any pieces away also.
(Take care that paint on the vinyl is REALLY dry, since it tends to remain wet on the non-porous surface.)

Here, my in-process tote panel (with contrast bottom area in black) is now ready to have the construction completed to turn it into a tote bag.

So the paint you used was just Rustoleum spray paint? I never thought of using any kind of spray paint for fabric stenciling. Do you know if it can be laundered?
ReplyDeleteThat's a good question. I assume it would launder as well as any acrylic decorative paint would. I would follow the same precautions and procedures, i.e., turning item inside out, perhaps laundering by hand with mild detergent, hang dry, avoid hot iron directly touching, etc.
ReplyDeleteThanks for your input, Jodi!
Delete