
Pleats give these hearts - large and medium plain edge,
or scalloped layered large and medium - dimensional shape
when .125” dowel (or
bamboo skewer) is cut to size (8.5" to 10.5"
for the projects shown), then threaded through center holes.
Trim the stick to
desired length(s) then insert bottom end
into
trapezoidal base “anchor” with scalloped edge round
platform that will allow
heart to stand.
Display on mantel, table top, as centerpiece, and more.
Projects as shown range from approx. 8.5" to 11.75"
when inserted in stands.
Plain large corrugated heart assembly will be described
in detail, with stand that is the same for all four versions.
Differences will be noted and illustrated, for scalloped
versions beginning in Step 15.
ASSEMBLY: 1. Identify and cut the shapes:
A heart (lrg) with pleat perforations, stick holes
B stand box hull C box accents (1 heart, 2 plain)
D stand base scalloped circle with slots
E stand base build up shapes for thickness (3)
F stand box top reinforcement "collar" (5)
G stand box base reinforcment "collar" (5)
H .125" diam. wooden dowel, "stained" pink

shapes so they can be curing:
A) layer and glue together the scalloped base shapes,
taking care to align and match up ALL cut edges
as precisely as possible.

Immediately place the glue-up stack on a flat surface
under a flat heavy weight such as this thick book (or 2)
and leave until thoroughly dried (several hours or
overnight). Pressing in this manner will help
minimize minimize warping or curing of the stack.

B) In the same manner, glue-up two stacks of 5 each
of the collar reinforcements, taking care to align
cut edges, particularly the center stick opening.
Check to make sure that the stick can fit through
the stick opening. Then press under flat weight.

3. Prepare the stand box shape by bending back
on all panel edges, but bending forward bottom tabs.
4. Position and attach the accent panels on the front
of the hull within the edges or perforation lines
that define each of the four side walls, centering
and leaving even narrow margin all around (offset).
Press and allow to dry.

5. On the underside of the box hull, and the top
of the scalloped circle base with slots, position
a collar stack, using strong adhesive.


Check to make sure that the stick can fit through
the stick opening.
6. Form the hull shape into a box form by bending
the side edges up to overlay straight side edge
across adjacent flange tab to align at perforation line,
and glue side seam. Repeat for remaining 3 side seams.
7. Insert the box hull bottom tabs into scallop circle
top layer base slots, and push fully through to backside.
Bend tabs outward and glue in place.
8. Position the box hull/base top layer onto
the base build up assembly, adjust to align outer
edges precisely, then glue in place. Use flat weights
on flat surface, or folio clips, etc., to help thorough
attachment of outer edges.

9. Prepare corrugated heart shape by bending
back along the bottom tiny perforation line,
then forward on the second line, back on third, etc.,
until all perforation lines have been bent.

10. Cut and prepare the .125" stick: cut to desired
length for your display needs, then apply paint color
if desired by applying with paper towel, then quickly
rubbing off so that stick is only "stained" and size
is NOT affected.
NOTE: these stick suggested cut lengths update those
lengths suggested in the online design descriptions:
med plain stick 8.5" med scalloped stick 9"
lrg plain stick 10.5" lrg scalloped stick 11"
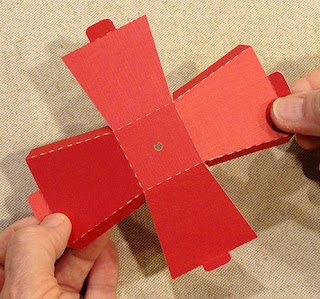
11. Beginning at bottom again, place the stick behind
the tip, then insert through the bottom hole, then
continue through successive holes . . .

. . . until stick is threaded through all pleat holes.
When the stick has exited through the final hole
it will be on the backside of the pleated heart,
and rest behind and touching the panel above.

12. Adjust the pleats so that they are even - with post
touching panel above top hole, ease the pleats downward
until the stick hole resists further downward adjustment
(using reg. printed-on-two-sides cardstock weight)
to achieve heart's final length. Or, to the suggested
finished lengths shown in the following 3 diagrams:

Large plain heart

Medium plain heart

Medium (top) and Large scalloped hearts

13. To assist keeping the heart stable and drawn out
to desired finish length, add a dab of thick quick grab
glue such as Fabri-Tack used here at top of stick, and . . .

. . . also behind tip panel, then apply pressure
to these two places until glue holds.

14. Insert the stick bottom end through the top
of the stand box, down through the interior, then
"fish" around until the end finds and can be "seated"
into the platform collar hole.
NOTE: add glue to the stick tip before inserting through
top hole if a permanent attachment is desired.
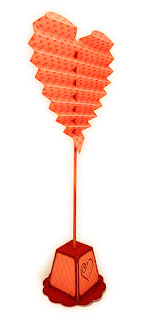
Without the glue, the hearts can be disassembled for storage.
Here is the large plain heart in its stand.
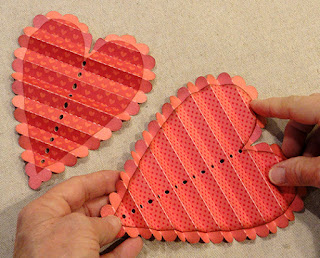
15. For the scalloped hearts versions as shown,
prepare the scalloped main heart and its coordinated
overlay inner heart as described for pleating in Step 9.
With the pleating spread in the approximate target length,
apply glue to the backside of the inner heart, then
position it over the front of scalloped heart, aligning
the top holes of each as a reference, then . . .

. . . fitting mountain and valley folds of each layer's pleating
so they fit neatly together - always aligning holes.
16. Repeat the stick prep and hole threading as described
in Steps11 & 12.
Repeated image: suggested adjusted lengths:
medium (top) and large scalloped hearts.

17. Refer to Steps 13-14 to complete the scalloped
hearts versions.
Here is the large scalloped project.

No comments:
Post a Comment