
the first letters T-M-A-S of this seasonal
display decoration.
(Part 1 includes first letters.) 

Slightly offset front accent panels can be cut and
added as front decoration from favorite Christmas
season paper prints. Larger end letter S also includes
iced gingerbread cookie decorative overlays.
Each “box” is composed of a LID which fits
over a BASE.
Letter S measures approx. 6.5” tall x 3.625” wide
x 1.5” deep finished size. Other letter boxes in this set
measure approx. 5.75” tall x 1.5” deep.

A designer project can be assembled using separate file 3D
and 2D decorations which take the place of
some letter boxes or add accents to others.
ASSEMBLY: 1. Identify and cut the shapes -
Letter Box C
A LID front panel
B LID boxing strips
C accent front panel overlay with star cutouts
D contrast underlay
E BASE back panel
F BASE boxing strips

Letter Box M
A LID front panel
B accent front panel overlay
C LID boxing strips
C decorative star cutouts overlay
D BASE back panel
E BASE boxing strips

Letter Box A
A LID front panel
B accent front panel overlay
C LID boxing strips
D LID interior opening boxing strip
E BASE back panel
F BASE boxing strips
G BASE interior opening boxing strip
LINK for 'A' letter box assembly:
https://needlesnknowledge.blogspot.com/2022/08/america-letter-box-ensemble-part-2.html

LETTER S (Large)
A LID front panel
B & D LID boxing strips with
C & E LID end add-on boxing strips
F BASE front panel
G & I BASE boxing strips with
H & J end add-on boxing strips
K icing lacy edge overlay
L gingerbread accent panel overlay
M icing contrast underlay

NOTE it is recommended to refer to Ltr Boxes Part 1
as review of method of building letter boxes with curves
and straight edges that are similar to the assembly
of the letters included in this tutorial. Letter C assembly
review will provide a good assembly reference.
LETTER BOX T
2. If creating the T box to hold the star wand for designer
project, prepare the post anchor layered squares by
stacking and gluing together the 4-5 anchor squares,
taking care to align the inner opening edges
as precisely as possible. Press the stack under a heavy
flat weight until completely dried.

3. Position and attach the contrast underlay
behind the letter T front panel.

4. Prepare and arrange the boxing strips
around the front panel to orient the bends, etc.

Also, use a tool such as the handle tip of this
hook tool to depress inward the four-corner post
receiving opening in the center of the LID's
top panel.

5. At the center bottom of the BASE lower boxing
strip, locate the dash lines square outline guide,
then position . . .

. . .and attach the star wand post anchor square from Step 2
so that the opening is exactly over the dashed square.
Press in place with heavy flat weight until dried.

6. Build the LID and BASE following procedures similar
to the 'H' box in Part 1 of the Christmas Letter Box project.
Once ready, insert the post end (possibly with quick grab
glue applied to bottom end) through LID 'opening',
BASE top opening, through center of 'T' then fish
around until the post end seats itself into the collar
recess at bottom. Hold until secure.

Here is the completed box with star.

LETTER BOX M
7. Follow the standard methods to prepare the LID
boxing strips for outer (top edges) curve edges,
inward (under arch) curve edges, and straights.
NOTE that laying out the strips around the front
panel will be helpful to re-direct the cross-folds
to match the letter edge angles.
8. Refer to the similar M project HERE to complete
the assembly for LID and BASE.

LETTER BOX A
9. Follow the usual preparation for A to set up
boxing strips around front panel, as well as
forming the triangular tube with interior opening
boxing strip (tab seam should be on backside.

10. Build the LID and BASE in usual manner.
Refer to 'R' box in Part 1 for a similar interior
shape - though without curves in the case of 'A'.
Then fit together, finish, etc.

LETTER BOX S - LARGE
11. Assemble the accent front panel by layering and attaching
the contrast behind the main "gingerbread" shape,
then . . .

. . . position and attach the lacy icing overlay just
within the gingerbread edge.

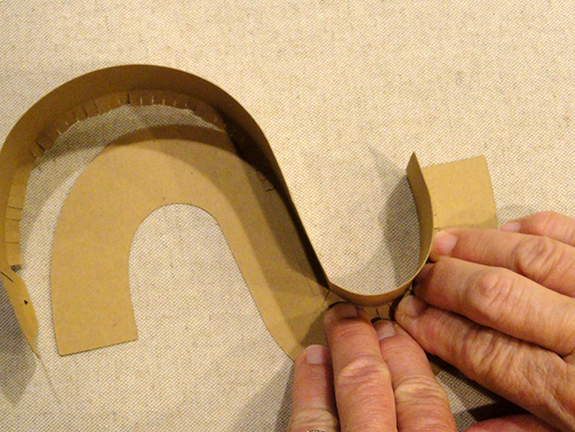
12. Become familiar with the boxing strips for
large 'S' which includes 2 identical long strips,
each with outside curve multiple tabs with wedge
cutouts between, a center straight, and an inside
curve portion . . . 

. . . that has tabs created by single cuts.
Separate end pieces will be joined during
the attachment sequence.
(NOTE that the small 'S' is identical, except
the end pieces are attached with cut.)

13. Prepare the first long boxing strip by adding
outer curl to the long lower portion. . .

. . . and inward
curl to the upper portion.

Compare the curl tightness to the panel
and add more if needed to echo the edge shape.

14. Locate small cut marks that will help
indicate where the straight portion transitions
to upper - or lower - curves.

14. Position and attach the end pieces to each
long strip prior to beginning to attach to panel.

Bend tabs inward.

15. Position #1 end at top inside curve corner
and attach only the very first tab. Then . . .

. . . locate the guide mark near center . . .

. . . and the beginning of straight segment . . .

. . . to position and attach straight edge/tab.

Immediately return and ease the tight inward
curve edge and tabs to match up.

Invert the construction on flat work surface and
apply fingertip pressure around the curve
until very secure.
15. Position and attach the lower end tab at end
of panel's curved edge, then ease tabs in to fit.

Again, invert the construction on flat work surface and
apply fingertip pressure around the curve
until secure.

16. Bend the end segment in to match up
with panel end edge, adjust and attach tab.

17. Prepare the second boxing strip as for the first,
including attaching end segment. Then position
and attach to tab of end segment and repeat
the addition of curves and straight segments,
until the point when . . .

. . . final end segment is swung into position
to attach, when it is easiest to apply glue and
attach final end tab seam at the same time.

18. Complete the BASE in same manner as LID.
Then fit BASE inside LID and attach together.

19. Position and attach the front accent panel to LID.

To manage any "twist" that may appear in 'S' letter box,
place a moderately-heavy flat object such as this book
on top of the letter box until all seams are dry.

20. To prepare the large 'S' box to be part of
the designer ensemble project with 3D elf hat
resting over top curve, omit the hat's BASE, then
fit arm of 'S' inside end, slide into play, angle
as desired, then attach touching edges with glue.

No comments:
Post a Comment