
Oval
window front accent layered and cross-stitched tag
features a vintage sewing machine decorated with posies.
features a vintage sewing machine decorated with posies.

Use temp tape to secure completed tag in place
when giving, to allow tag to be removed for hanging
or use as separate ornament
or decoration.

Coordinated envelope has tiny stitching holes in flap overlay
which provide framework for cross stitching
stylized heart with posy,
leaves and background.
Card measures
approx. 5x7 when top-fold closed.
Tag measures approx. 5.5” long x 3.87” wide.
Envelope measures approx. 7.25” long x 5.25”
wide.
Cross
stitching charts for each included
in respective files.
NOTE: The cross stitch car will be shown first
with the envelope flap assembly begins in Step 20.
ASSEMBLY: 1. Identify and cut the shapes:
A card base (top fold 5x7)
B front accent "frame" for tag
(NOTE that an alternative frame is included which is
adjusted a bit closer to left side edge.)
C cross stitch tag [shown rotated 180 degrees]
(cut 2 to layer for strength for stitching)
D buffer layer for stitching thickness
E back layer to finish backside

G envelope flap
H flap underlayer to cover stitching backside
 2. Assemble six colors of 6-strand embroidery floss

to complete cross stitching.
The sample used these DMC Colors:
medium blue 3810
light medium blue 598
gray 535
white 3866
red 309
green 988

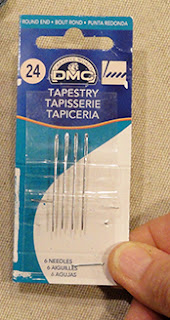
To complete the project, use size 22-24 tapestry
(blunt tip) stitching needles.
3. Prepare the two stitching hole-punched tags
by making sure that all "chads" or cut out "crumbs"
are removed. One way to do this is to bend
a standard paper clip end straight then use it
to poke through all holes not already vacant,
then brush or scrape away extra bits.

working quickly, attach together, taking care


that ALL outer cut edges plus stitch holes and
hang hole edges align as precisely as possible.

One way to check that the holes align is to use
the paper clip tool to poke through various holes
across the panel, particularly at edges and corners, etc.

Immediately place the glued-up unit on flat work surface
and press flat under a heavy flat object such as
this thick book volume, possibly with something else
heavy placed on top. Leave pressure on until
glue is dried completely and NOT still cool to touch.
Pressing flat like this will help minimize warping or
curling of the liquid-glue attached unit.

CROSS STITCHING
5. Refer to the instructions for a similar
cross stitch project HERE for floss and
needle preparation, in Steps 4 & 5.
6. For this project, begin at the bottom left where
the first cross stitch will be created.
Each square on the pattern chart represents 4 holes that
would be needed to create both the right and left slants.

Needle will be inserted UP at top left of the left square
that represents the sewing machine base "foot",
then insert diagonally down & right for first, left-most stitch.
On backside, pull the floss through UNTIL
about 3-2 inches of the loop end remains,
then insert the needle diagonally to complete
the first right slant stitch.

through the loop and pull the loop tight to remove all slack.
This is the "tying on" process.

the "foot" on this end of design, then . . .
 . . . return back toward left with left-slant stitches

to complete the bottom row two stitches.

 . . . complete the long row of right-slant stitches.

8. Move upward as indicated on chart to begin
next row 2 stitches farther right, and . . .

Return back along the row with left-slant stitches,
pausing to drop down to complete . . .

. . . the "foot" two stitches on the bottom row.
Then move needle insertion back up to the long row and
complete stitches back to beginning of row.

eventually be used up. Before length is
unmanageably short, pause when the needle is on
the backside of work as a slant stitch is completed.
Slip needle under 3-4 stitches on the backside, then . . .


. . . trim the tails close
to the surface of the work.
This is the "tying off" procedure.

to skip the "light medium blue" long row to begin
the second long "medium blue" row, including the 3 stitches
that flank the front end of the "gray" row . . .
 . . . and at the end of that row . . .
 11. Next, follow the chart to move upward and complete


the machine's backside "medium blue" rows/stitches.
 12. Switch to a needle-load of "light medium blue" floss

to work and complete the long row at bottom of machine,
then move upward to machine base, then to complete
all of the stitches of that color. Skip the "squares" where
other colors will stitch in the flowers and leaves.
13. Load needle with "medium blue" to complete the stitches
at machine head.
 14. Load needle with gray floss to complete stitches

that complete "needle", then jump down and across
to complete the long row near bottom of design.
When "jumping" - or carrying floss across backside of
work, take care that line of floss does not cross behind
open stitch holes where it might show through to front.
15. Load and complete stitches for remaining portions
of design, including posies, leaves and heart.


then glue in place, paying particular attention to
edges of the machine and heart cut out.
 17. Position and attach the tag back layer. Press

the assembly under a heavy flat weight until
thoroughly dry.
 18. Finish tag by threading a length of ribbon through

hang tab hole, cinching, wrapping and tying bow
above hang tab as shown.
19. Position completed tag within card front accent
window with even margin all around, and use
temp adhesive dots or equivalent to hold tag in place.

STITCHED ENVELOPE

20. Prepare the envelope hull shape by bending back
on all perforation lines.
 21. Prepare the hole punch portions of flap and hull

in same manner as for tag stitching holes, Step 3.
 22. Position and attach flap overlap on top of hull flap

with hole punches aligned as precisely as possible.
 Check for hole alignment using tool as described

for tab in Step 4.
 23. Follow stitching prep, tie-on, stitching and tie-off

to complete the stitches for the flap design.
 24. When the stitching is complete, position and

attach the camouflaging oval on backside of flap
to hide the stitch designs. Press with flat weight
until secure and thoroughly dry.
 25. To complete envelope, fold flaps inward,

bottom flap upward, apply adhesive to overlapping
margins, then secure flap seams.
 Here is the completed envelope.


Love it :-) Might have to go get some thread and jump right in......it's been ages since I cross stitched :-D
ReplyDelete