Showing posts with label 3d star. Show all posts

Sunday, December 1, 2019

Star 3D Box Ornament with Patchwork Accents

Multiple crease lines of the single piece hull 
create this shaped ornament.
Assembly includes folding in half, overlapping 
half diamond “flanges” and “puffing” out 
to form its dimensional shape. Fill with gift contents 
through unattached bottom angle edge, 
then close with a tab inserted into slot. 
Top point has circle cutout to insert 
a knotted ribbon hanging loop. 
Add mixed or matched geometric “patch” shapes 
on front and back as accents. 
Measures approx. 4.75” tall x 4.5” wide x 
1.5” deep when assembled, puffed and closed. 

ASSEMBLY: 
1. Identify and cut the shapes: 
A main star box hull
B patchwork accent shapes, 2 sets (pentagon - 1;
star points - 5)
2. Prepare the main hull shape by bending forward
 (valley folds) on the perforation lines marked in RED 
in this diagram, and back (mountain folds) on 
all other perforations.


One good way to do this is to place the shape
face side down on the work surface then fold
the edges where the full diamond side panels are,
(shown shaded in the diagram above) . . .
. . . also folding back on the center seam.
Next, bend on the short perf lines within 
the side diamonds.
Finally, bend on all the star point lines and . . .
. . . around the center pentagon.
Here is the completed hull with bending completed.
3. Locate and be familiar with the closure tab, and . . .
. . . slot opposite, and . . .
. . . where the top center hole cut out is.
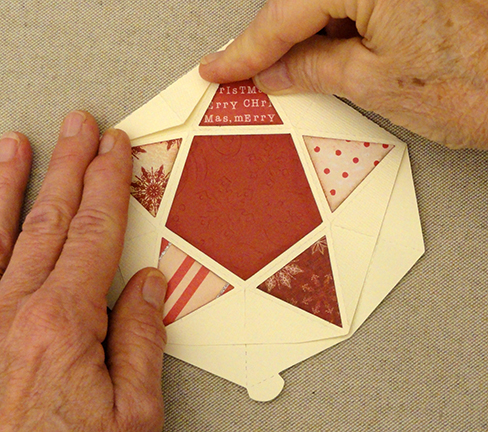
4. Position and attach the accent "patchwork"
shapes onto the face of the hull for both front
and back. 
5. Fold the hull in half on the center perforation,
then fold the side diamond center line . . .
. . . so that it wraps over the back edge,
and glue the half diamond "tab" in place.
Repeat for the other two half diamond tabs.
 6. Puff the star box open by inserting a finger
inside through the un-attached half diamond tab,
and "pop" the side diamond shape inward.
7. Repeat this for all of the sides, including . . .
. . . the side where the closure tab is located.
8. To close the box, bend the tab back
and insert it into the slot.
Open up the box to continue . . . 
. . . to finish the ornament with a ribbon loop.
9. Prepare a ribbon loop with ends knotted together.
10. Prepare a "threading loop" tool of doubled
floral style wire as shown.
11. Hook the wire threader around the ribbon loop  . .
. . . then insert the end of wire threader into the box
hull, across, and out the top circle opening.
Carefully pull the ribbon loop through the top
opening until . . .
. . . it is stopped by the knot at ends.
Glue in place if desired.
Here is the completed ornament with the ribbon hanger.
If additional embellishment is desired,
consider using this 2D Cedar Mini Sprig
that is shown in a different project tutorial with

Saturday, June 29, 2019

Stick 3D Star Decoration

Five dimensional, flat-bottom “stick” posts interconnect 
with end “tab” punch holes aligning to form 
a traditional pentagram star decoration 
to stand on a shelf or hang from nail or peg. 
Add your own decorative touches, including 
adhesive enamel dots at end tabs, 
twine wraps at intersections, purchased berry sprigs, 
ribbon and flowers. 
Measures approx. 10.8” wide x 10.37” tall. 

ASSEMBLY: 1. Identify and cut the shapes:
A stick "post" shapes (2)
B long half-length strut inserts for A (4)
C stick "post" shape (1)
D short strut insert for C (1)
E long half-length strut inserts for C (1)
F stick "post" shapes (2)
G short strut inserts for F (4)
2. Prepare the A sticks by bending back carefully on 
each of the long perforation lines and crease . . . 
. . . including the narrow margin lines toward
the center of the series of perforation lines.
3. TABS at ends need special care:
the BOTTOM tab indicated in the following image
 is not bent (no perforations), whereas . . . 
. . . the TOP tab is bent back at the inward perforation
and forward at the outward perforation.
4. Form the post shape into a tube to overlap
the side cut edge over the opposite long flange tab
to perforation line, and glue in place.
Take care that the tube does not twist during
this process.
NOTE: it may be helpful to use a wooden dowel
of approx. 5/16" diam. inserted inside tube as it is
formed to provide a "press against" surface
to help join the seam.
5. Prepare 2 long struts for each A stick "post"
by bending forward on the outer perforation lines, 
then alternate bending direction toward center
from each side, forming a 'W' configuration . . . 

. . . as shown in this diagram.


6. Compress the folds accordion fashion, and . . . 
. . . press and crease all along the length of strut.
7. Apply adhesive in the valleys between the narrow
folds, then repeat the pressing shown
in the preceding frame, applying pressure
until the glue is cured and the creases are secured.
(NOTE use this process for ALL strut lengths.)
8. Once dried, open up the strut so that it is
in this configuration, with two short "arms" at top,
and two longer "arms" toward side bottom.
9. Carefully insert the "long" half-strut into one end
of the post tube, with short "arm" extensions fitting
up into the top bends of the tube opening, with
the bottom two "arm" extensions fitting into
the bottom/base side angles.
10. Repeat the insertion of the other long strut
into the opposite end of tube in similar fashion.
11. With the struts pushed fully in from each end,
bend the mini side tabs in toward center at
a right angle . . . 
. . . apply glue to mini tabs, then . . . 
. . . apply glue to the underside of the upper tab, and . . . 
. . . bend the upper tab into position . . . 
. . . to attach to mini tabs underneath post opening,
adjusting so that walls and perforations line up
attractively, and align tab edges and punch holes.
Apply pressure to the tabs until secure.
Repeat for both post ends.
12. Repeat steps 2-4 to crease and prepare the post
stick shapes for C and F posts which each have . . .
. . . one or more "tunnels" to allow interlocking of sticks.
Form the post shapes as for A sticks,
taking care at "tunnel" areas to overlap
and join the wall straight edge with flange tab.
13. Prepare the various length struts for each
stick tube as described in steps 5-8.
14. Insert the appropriate length strut into
the tubes so that struts will fill the tube but not
interfere with the tunnel openings.
15. For the F sticks, insert the short center strut
from one tube end, then . . .
. . .use a dowel or pencil to
push the strut past the first tunnel to rest in
the center of the tube. Then insert the end strut.
 Bend mini tabs, upper end tab and glue in place
as previously described for A stick.
16. Prepare the sticks with tunnels by bending
the mini tabs inward with a blade style tool
such as this spatula.
Here are the five stick posts completed.
16. Lay out the specific posts in this
pentagram configuration to become accustomed
to the way they will fit together.
17. There is more than one correct way to assembly
the star. Begin inserting the sticks through the openings
of the sticks they may overlap in the preliminary layout . . . 
. . . such as inserting left end of B through C
as shown here, then . . . 
. . . repeating to insert A through the other tunnel
and also through the lower tunnel of the other C.
Continue inserting A through C and B until . . . 
. . . all sticks are in place.
18. It may be helpful to use a temporary tape
such as this masking tape to align and hold end tabs
together. Then remove tape on one end connection,
apply glue to join the flat tabs together, overlapping
ends and lining up punch holes as accurately as possible.
Here is the completed star structure.
19. If desired, use decorative twine, such as
Red/Cream color from TrendyTwine shown here,
to wrap 3-4 times around the short direction of
each intersection, then 3-4 times around long
direction (invisibly tie off or glue clipped ends on back).
This will help conceal the tunnel openings.
Add decorations and accents as desired.