Showing posts with label Easter card. Show all posts

Thursday, March 24, 2022

Folded Circles 3D Cross 5x7 Card

 
Low-relief dimension is added to this seasonal or religious card 
by means of a folded circle that imitates a lily bloom. 
Five blooms are arranged at center of 5x7 card 
to create a cross form, with decorative brads adding 
accent and harmony. 
At bottom, an arched “He Is Risen” welded word phrase 
celebrating the Easter message can be added 
(use a sharp blade when cutting), balanced by 
a crossed-stem pair of delicate palm fronds at top 
under upper bloom unit. 
Other arch phrases are available as separate files, 
sized to fit this card design layout. 

ASSEMBLY: 1. Identify and cut the shapes:
A card base   B card front panel with guide marks, holes
C circles for folding to create cross
D & E left & right accent overlays for folded circles
F palm fronds decoration
G word cut outs for He Is Risen!
H retained "weeded" rectangle positioning guide
2. Prepare the folded circles choosing from two
cut styles and procedures:
A) cut the edge marks only version, then . . .
. . . use a stylus with fine ball point and straight edge
to score straight4  fold lines between edge marks
at sides and center bottom.
-OR-
B) cut the circles with perforation lines.
3. For either version, fold the inward angled lines
forward as "valley" folds, and . . .
. . . the outer angled lines backward as "mountain" folds. 
Complete the folds, mirrored, on each half of 
all cut circles.
4. If using two-sided card stock, adding accent shapes
may NOT be necessary to achieve desired effect.
If not, or for additional decorative choices,
cut out and add the accent shapes between perf lines
on each side as shown here.
5. Finish circles prep by adding dabs of glue low
on the "inside" of folds as shown here, . . .
. . . and low under the "petals" half shapes that
are folded outward as viewed from the front of unit.
Press with a weight, or hold until secure.
NOTE: keeping some dimensionality for the folded
circle is desirable, so don't squash them to be too flat,
if possible.
7. Begin the final front panel assembly by locating
the top-most vertical guide cut mark, then . . .
. . . dry-fitting the first, top circle unit so that the center
top curved edge is centered at the top guide mark,
and the point is just above the brad cut circle.
This is where the circle unit will be attached.
But first the palm decorations will be attached.
8. Here is an illustration of how the palm fronds were
intended to be positioned, with arch directed downward,
and stems crossed. (The sample was completed as 
a different variation from this.)
The crossing intersection should be centered
and placed approx. .625" or .5" below panel's upper edge.
9. Position and attach fronds, then . . .
. . . re-position top center circle unit, and attach it in place.
10. Locate the side edge guide marks, then 
position the side circle units centered horizontally
at marks, with points just beyond punch hole,
and attach each circle unit in place.
11. Position and attach the center bottom unit in
 similar manner, below punch hole, centered vertically 
on panel front.
12. Once this last lower center circle is secured in place
turn the panel face down, use a pointed tool such as
this awl to carefully transfer the lower punch hole
through the circle unit on the front. Then . . .
. . . position and secure the final circle unit at 
panel bottom, centered at mark, with point just below 
the newly-punched hole in circle unit just above it
as can be seen in this image.
13. Insert decorative brads through both punch holes
and bend prongs back (or use studs affixed in place).
14. Fold the card base at vertical center perf line.
15. Position and attach front panel assembly
on base front, with narrow offset margin all around.
16. Position and attach the welded words for
"He Is Risen!" phrase, or other selection from
companion phrase designs.
One way to accomplish this is to use the retained
cut out panel, centered and parallel to card bottom edge
in desired place, then lightly marking strategic lower
edge portions, removing guide stencil, then . . .
. . . positioning and attaching each word.
Here is the completed card.

Saturday, March 13, 2021

Easter Flourish Card Peace Lilie

Celebrate the Easter season message with this elegant flourish 
5x7 top-fold card with dimensional left and right tipping lilies. 
Leaf and vine flourishes are cut out of front accent card panel 
with subtle sunrise at center top. 
Second front panel layer includes “PEACE” stencil cutout. 
“Easter” script word cut out is layered over stencil cutouts. 
Third front panel provides contrast to show through stencil letters. 
A rolled lily with leaf is placed on diagonal 
attached at each upper corner. 

ASSEMBLY: 1. Identify and cut the shapes:
A card base with horizontal center perforation
B front rounded corner "contrast" panel no. 3
C front accent panel no. 2 with stencil-cut PEACE
D flourish edge front panel no. 1
E "Easter" word cutout
For following lily dimensional bloom shapes,
F-I shapes will be cut as one left set, one right set
(right set shown)
F lily petal shape   G sepal base cone
H stamen accent   I leaf accent
2. Position and attach the panel layers in order,
with narrow offsets all around, except that flourish layer
should be positioned with side and top edges offset with
even margin (bottom edges fall slightly above same margin width.
Here, the flourish/panel no. 2 layered assemblies
are positioned and attached onto panel no. 3, and . . .
. . . finally the front panel three-layer assembly is
positioned and attached to the "front" panel of
the base shape, folded in half at perforation line.
3. Position and attach the "Easter" word cutout,
roughly centered, overlapping the stencil word slightly.
4. Prepare the lily petal by using a very narrow rod-shaped
tool such as this needlework hook handle/shaft to
A) add forward curl to the broad part of the petal, and . . .
. . . B) tightly curl, then roll the narrow end of petal,
curling inward until the bottom notch is reached.
C) unroll, then re-roll in a more upright, vertical position
spiral (shown by the position of the rolling rod, here)
to form the whorl of the blossoming lily.
5. Remove the rod, then continue to work the spiral roll
so that it is as tightly rolled as possible at the bottom tip . . .
. . . with whorl approaching the same tangent as petal tip.
To assist in maintaining this configuration,
add a discrete dab of quick-grab clear adhesive
at the base of the spiral.
6. Prepare the sepal "cone" shape by curling in a pivoting
manner, working the rod tool from bottom center tip
 in a fanning motion to begin the suggestion of cone shape.
NOTE the textured cardstock used for the sample flowers
separated into two "ply's" and only top ply was used
to complete the lily.
7. Add a dab of clear quick-grab adhesive to the tip of lily spiral, 
then position the cone with arched edge upward,
so that the lead edge will fall along blossom center back.
Continue to roll cone around the tip, and glue the cone in position 
as it is wrapped around to back, then . . .
. . . overlap at back.
Trim excess cone neatly along back, and smooth
edge into place as necessary.
8. Add a dab of quick-grab glue to the bottom tip of
stamen strip, then insert into the whorl spiral center
inside the blossom, push downward until top tip is
in desired position, then hold in place until secured.
9. Apply glue along the back "spine" of blossom assembly,
then position and attach along the lower inward edge
of leaf accent, as shown.
Here is the completed right blossom.
(Left blossom is created as mirror image.)
10. Position and attach lilies in place into card's
front panel, roughly in the positions shown.
Here is the completed card.

Monday, March 27, 2017

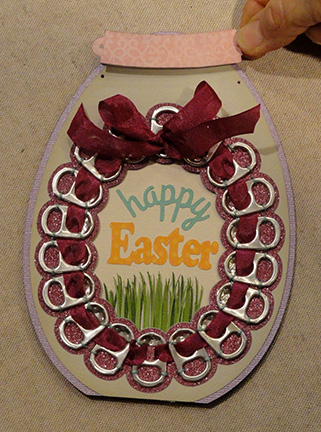
Easter Egg Pop Can Tabs Card

 Create a unique Easter "hollow" egg card with
pop can tab window edge and ribbon decoration
that brings to mind the scenic sugar eggs of past holidays.
Card measures approx. 5x7 when the hinged back is closed
in place. Aluminum tabs are laced in place with soft twine
perle cotton or 6-ply floss, using a blunt needle inserted
through the inner and outer series of needle holes.
Here the card is shown with a special,
coordinated insert that peeks through the window
to express "happy Easter" with layered grassy bottom accent.
(Find the assembly steps for the "Happy Easter Grass" plaque
beginning in step 26.)

ASSEMBLY:  1. Identify and cut the shapes:
A card "base" front   B card "base" back (jointed)
C egg front    D  "icing" accent shape
E top "banner" tag (for personalization)
NOT SHOWN: plain interior sentiment plaque
2. Position and attach the "icing" accent ring
on the front of the egg card front, taking care
to line up each of the many needle holes
for lacing the tabs in place.
NOTE: it may be helpful to use a narrow pointed
tool such as an awl or large needle to push
into the holes in strategic places to make sure
holes line up exactly before glue cures completely.
3. Prepare for the lacing steps by cutting
two 30" lengths of selected lacing materials
(no. 5 perle cotton shown here; soft baker's twine,
6-ply embroidery floss, or crochet cotton 
are other good choices). You will also need
a blunt tapestry needle or darning needle
that is the smallest size that will accept
your "thread" through its eye.
Check to make sure it will travel through
needle holes easily.
4. Collect and prepare 18 aluminum "pop can"
pull tabs, and make sure that the "break"
is uniform on all, and that any sharp edges are
bent flat, filed or removed.
5. Position the first tab at the center bottom position.
NOTE: the tabs can be held in position until
the first lacing stitches secure them in place.
OR, as is suggested by this image, a little
quick-grab "invisible" glue can be used to
"tack" them in place as the assembly progresses.
NOTE that each tab, when positioned correctly,
should be "between" the needle punch holes . . .
 
. . . that are configured "around" each tab pair position,
which can be more easily seen in this illustration.
NOTE how each of the irregular "scallops" of
the "icing" accent shape indicate where a tab
should be placed.
6. Thread one length onto the needle.
Position the tail end on the backside below 
the bottom holes sequence for the center bottom tab, 
and anchor in place with a small piece of cello tape.
7. Begin the first stitch by pushing the needle
through to the front on the right side inner holes row
on the INSIDE of the tab.
(ONLY the right stitch is completed now;
see step 13 for the final, left side stitch.)
8. Complete the first stitch by moving the needle
across the tab structure to the hole immediately
to the right of the first hole just exited
and inserting into the hole, pulling the thread
through completely to the back.
The "stitch" just completed should lace
the tab in place.
9. Position the next tab to the right, "centered"
over the holes assigned to it.
Insert the needle into the inner row hole
on the left INSIDE position . . .
. . . and pull the thread completely through
to the front.
10. Complete the left side lacing stitch by
inserting the needle into the "shared" hole
that is between the first and second tabs.
NOTE that this sharing of the needle holes
between the tabs will happen all around the
INNER row of lacing stitches.
11. Complete the right side lacing stitch
in similar fashion, inserting the needle into
the right inner hole, pull thread through,
then insert into the hole across the tab structure
and pull thread through to the back side.
Here is a closeup of the first stitches.
12. Continue to add a new tab, stitch in place
with left and then right stitches, sharing the hole
between the tabs when two adjacent tabs are
laced in place, etc., until all 18 tabs are in place.
NOTE that only the inner stitching is completed.
13. Complete the left side stitch of the FIRST
tab to complete the inner lacing row.
14. Clip excess thread leaving a short tail,
then anchor the tail in place with a small
piece of cello tape.
15. Cut a 36" length of silk-style ribbon 
(1/2" wide or so), and thread it down-up through
the center bottom slots. Pull through to center
the length evenly on each side.
16. Lace one side, then the other (left shown here,
with ribbon threaded through a large eye needle)
by taking ribbon OVER the left side tab structure,
then UNDER the adjacent tab structure and UP
through the inner center opening, then OVER/UNDER
in sequence all around the left side until the ribbon
comes UP through the center of the TOP MIDDLE tab.
17. Repeat the process of ribbon lacing for the
right half (in mirror image), going OVER the tab
structure of the bottom tab, then UNDER
the adjacent tab, then continuing OVER/UNDER
until all tabs are laced and the ribbon exits
at the center of the top middle tab.
(NOTE that the ribbon ends will eventually be
tied into a knot and bow; it can be done now
but the outer lacing row may cause it to
become un-tied.)
18. Prepare the second length of lacing thread
by threading needle, anchoring tail end
at top of the egg backside, above the outer ring of
needle holes near center.
19. Insert and push the needle through on one side
of the top center tab, cross the tab structure
to insert down through adjacent hole and
through to backside to complete first stitch.
Continue the same lacing process
as was used for the INNER lacing row,
except that the outer row does not share
holes between tabs EXCEPT . . .
. . . for the three tabs at the mid sides, shown here.
20. When lacing of the outer row is complete,
trim excess thread leaving a short tail,
anchor on the backside with cello tape as before.
21. Tie the ribbon bow, trim excess ends.
22. Position and attach the egg assembly
onto the card base FRONT, matching the inner
window scallop edges exactly.
Use appropriate adhesive for the added weight
from the tabs.
23. Position the sentiment plaque on the
inside of the card back base
using the cut guide marks.
(OR, assemble and position the coordinated
"Happy Easter Grass" plaque design
as described beginning in step 26).
24. Position the card front assembly over the
card back base (shown here without the interior plaque),
with outer edges aligned, and attach the upper portion ONLY
above the dashed line.
25. Add the personalization banner
with embellishments.
This completes the card.
HAPPY EASTER GRASS PLAQUE
This design is specially designed
to coordinate as the accent insert
for the hollow Easter egg card.
It can also be used as a postcard-style
card, with additional decoration such as
a loop of twine or ribbon, threaded through
a hand-punched hole or holes, etc.
26. Identify and cut the shapes:
plaque base with positioning guide marks
"happy" and "Easter" word cuts
grass layers (bottom to top) 1 thru 4
27. Layer the grass unit by positioning
shape no. 3 over shape no. 4
(2-4 include number ID cuts)
with bottom arc and upper "scallop" edges aligned.
Then layer no. 2, and finally no. 1 on top.
28. Position and attach "Easter" word cut
over the plaque base using the guide cut marks
(indicated by pointing finger) to align bottom edge
ends.
29. Position and attach the "happy" word cut
using the "h" bottom and "y" tail cut guide marks
to align the shape.
30. Position and attach the grass unit on the bottom
of the plaque with lower arc edges matched
and centered.
31. Position and attach the plaque onto the card
back base, then . . . 
. . . complete the card as described previously.