Showing posts with label dimensional paper crafting. Show all posts

Saturday, June 8, 2013

Garden Hat 3d Tutorial


Create this miniature lady's garden hat measuring approx. 11 inches
from paper card stock using an svg cut file from SnapDragon Snippets 
available for purchase from Silhouette America's online store.
Search: 3d garden hat
Two other 3d gardening designs are available: 
3d garden spade, 3d terra cotta pot.


These are the shapes that will be needed to complete the hat. 

Clockwise from upper right - 8 hat crown crescents; 8 crown overlay accents; 2 contrast bands; 3 top circles (one with hex cutout); underside tab concealer circle; brim, brim accent, brim edge.

Optional eyelet detail punched circles can be seen in pairs of pieces for crown, crown accents and bands.


Efficient use of paper can be achieved when arranging shapes on-screen for cutting by positioning crown crescents inside of brim edge ring, as shown here.


Begin with two CROWN crescent pieces (first piece should include the eyelet punch, if you are including that detail in your design). Fold on all horizontal perforations in mountain folds. Fold tabs inward.

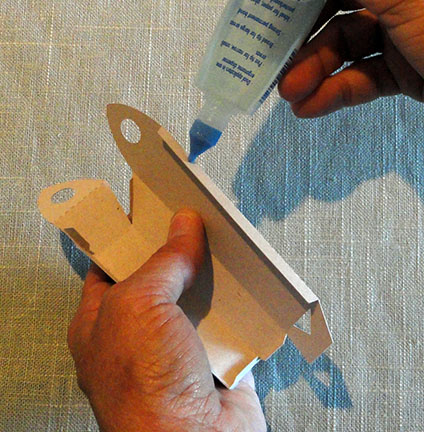
Apply adhesive to tabs (one at a time may work best, at least in the beginning). Start at bottom, overlap right straight edge of first crescent at corresponding tab perforation of second. Check to make sure horizontal perf lines of both crescents also line up. Hold until secure, then continue upward to secure the other "level" sections of the crescent pairs.


Continue in the same manner to join the third crescent and then the fourth, 


 Complete a crown HALF section with four crescents.

Note that the first crescent (far left of image) has the hole punch.

Complete a second identical crown half.


Join the crown halves. Apply adhesive the tabs on one seam. 


Insert fingers inside to apply pressure to seam area.


 Insert completed crown through BRIM opening (through from underside). 


Fold tabs back (valley folds). Apply adhesive to front sides of tabs.


Slide crown fully into place, then apply pressure at each of the 8 edges to help tabs attach securely into place. 


Working on a protected flat surface will help with the gluing process.


Slide BRIM ACCENT ring over crown and into place.


Apply adhesive to backside of accent brim, working around "rattan weave" design openings. 

Note: adhesive may be applied to brim prior to sliding accent ring over crown if preferred.


Add some curl to the brim at the point (or later), if desired. Locate the crown crescents that have the eyelet punches. These are the sides of the hat. Curl the front and back, using gentle but sustained pressure with hands. A cardboard tube can also be used as a form to roll and hold the brim edges over.


Next prepare CROWN ACCENT CRESENTS by folding on perforations.

Apply glue to backsides around cutouts.


Position and attach one crown accent to each face of crown. Take care to slide each down so that straight lower edge is snug against brim.

When all accent pieces are in place, attach the TOP BUTTON circles at crown top. Attach the hexagon cutout base circle, then the next largest circle, then the smallest (center each).


Apply adhesive, then position and attach the EDGE RING to the top of brim.


Apply adhesive then position the CONCEALER RING to the underside at crown opening.


Apply adhesive to one BAND section, then position and secure at lower edge of crown (align eyelet punches).


Apply second band strip, overlapping straight edge at first band perforation. At tab end, lift straight edge of first section slightly, insert tab under, then reattach.


Apply pressure to secure band in place.


Finally, insert eyelets through punched holes and use tools to crimp backside to secure in place. Because of the brim interference with this process, it may be necessary to position hat edge over a raised edge (such as wooden tool box used here, or a table, etc).


DONE!

Tutorial for 3d Paper Garden Spade

This life-size garden spade may look real, measuring approx. 11" tall.
But it is actually created from cardstock cut-out shapes 
using a Cameo digital cutting system with an svg cut file available for purchase
through SnapDragon Snippets at the Silhouette America online store
(Shape title: 3d garden spade).
Two other companion "gardening" 3d designs are also available:
3d terra cotta pot and 3d garden hat.


These shapes are used to create the 3d spade. Left to right they are: blades front (top) and back, shaft, handle with orange decorative grip above it, decorative band below it.


Begin with blade pieces. Fold FRONT BLADE at perforations: mountain fold center, valley fold two sides. Apply adhesive to spaces around perforation-defined triangle as shown. (Do not apply to area between side perforations.)

Position front over BACK BLADE. Align upper and side curved edges. The perforation folds will give the finished blade some cupping shape. (Don't try to make it flat!) The cut out triangle will allow the curving of the blade. Smooth away any potential folds that may begin to form near the pointed blade end. Continue to check and adjust and smooth edges so both layers align as closely as possible. A triangle shaped channel will form in the un-glued area around perforations.


Next prepare the SHAFT. Fold at the perforations in three mountain folds. Circle end is the top. This view is from the back. When viewed from the front, the far right face will act as a tab that will extend the full width of the shaft back to assist in the gluing.


Apply glue to the "tab" face full length.


Fold at perforations to position the "tab" face behind the back face (includes the circle end at the top). Apply pressure along the full length of the back to join back underside to tab face. AT THE SAME TIME push the two corner edges to force the tab cut edge fully back into the perforation corner. 

Continue working and holding until dried and secure.


Next, prepare the HANDLE. Fold vertical perforations as mountain folds. Fold front circle top perforations in mountain fold (inner) and valley fold as shown. Fold triangle lower end in mountain fold. Fold tabs inward.


Apply adhesive to full length of tab.


Fold into tube shape and position tab under opposite edge. Use a long tool like this knitting needle inserted inside the handle to help assist gluing process. Rigid needle offers fingers a way to apply pressure along the tab-to-edge seam.


Apply adhesive to tabs at triangle end. Fold end over, align end edges with perforation edges and adjust to help trapezoid end shape form correctly.


It may help to insert the flat eraser end of a new pencil into the handle to help apply pressure to triangle end tabs as glue dries. Move around to the three tabs as needed to apply pressure.


Insert shaft pointed end into top of handle tube and out through triangle hole at lower end. Push all the way through until top hole shapes of shaft and handle line up.


Adjust the shaft circle end, then apply adhesive to backside and glue in place.


Apply adhesive to backside of handle front circle end AND to angled edge tabs of sides. Fold into position and apply pressure until glue holds.


Shaft points end will insert into blade channel as shown.  Find the small perforations on each of the three faces of the shaft that will indicate the gluing area. Apply glue below these small marks, then insert into the channel, adjust to square shaft with blade top edges. Hold in place until secure.


Next, prepare and attach the decorative GRIP. Fold on all perforations in mountain folds.

Wrap the grip around the handle with cutouts aligned on top and side edges, seam and tab coming together at the back side edge. Center the grip top-to-bottom on the handle front face so that approx. 1/4" of the handle is visible above and below grip.


Apply adhesive to tab, then position and apply pressure along edges WHILE AT THE SAME TIME pushing side corners inward to snug the grip around handle. Hold until secure.


 Finally, prepare and attach the decorative BAND. Fold at the center perforation in a mountain fold. Next, fold at each of the three short perforations in mountain folds.

With fold edge downward, wrap band around shaft below handle. Begin to insert end tab into opposite end between band layers. Apply adhesive to tab, then complete the insertion and hold until secure.


Slide band down a bit, then apply adhesive just below handle. Re-position band and hold in place until secure.


DONE!