
Conjure up some make-believe play
as you create
this small child-size knight's helmet.
Features upper structure with nose piece that
cradles
the three (or more) plume crest at top
and nose plate extension at
bottom,
attached side 'neck plate' structures,
face grille that connects at
sides with brads.
Back strap overlaps with three punches on each side.
Measures approx. 7" tall (without feathers) x
8" deep x 5.25" wide.
ASSEMBLY: 1. Identify and cut the shapes:
A main helmet shape B eye hole accents
C & D side panels with accent shapes
E grille with accent shapes
F crest build up with accent & nose reinforcement
G feather crest collar H three feather shapes

 3. Fold the top tabs to the back and glue in place.
 4. Form the collar into a tube to overlap the
straight side edge at the opposite side tab
perforation line, and glue in place.

 . . . then on the inside bend the tabs outward
and glue in place.


 8. Form the main helmet shape/assembly into its
hat form by bringing the side edge and front edge
together, side edge to overlap the perforation of
the bent-back tab. Glue in place. Repeat for
opposite side.
Also overlap the back band and attach with brad(s).

 10. Bring the front center area side straight edges
to overlap the side "boxing" at the flange perforation,
and glue in place. Repeat for each segment of the edge,
and for both left and right sides.
 11. Attach the back segment center portion straight
edge along the back side flange, for both left
and right sides.

12. Prepare the crest accent shape by bending the
top two perforation lines back, bottom perf line forward.
Position and attach to the front of the crest, lining up
the punch holes of each.


13. Insert crest tabs into the main helmet shape,
beginning at the front . . .


 16. Bring the side straight edges to overlap
adjacent tab flange and glue side seams.


A main helmet shape B eye hole accents
C & D side panels with accent shapes
E grille with accent shapes
F crest build up with accent & nose reinforcement
G feather crest collar H three feather shapes

2. Prepare the crest collar by bending back
on vertical and horizontal perforation lines,
bending bottom tabs outward.
(NOTE that the top tabs in the final design
are shorter.)

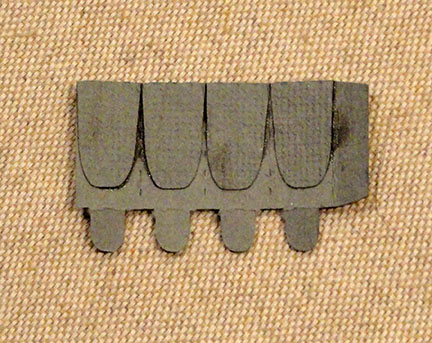
straight side edge at the opposite side tab
perforation line, and glue in place.

5. Prepare the collar shape by adjusting its overall shape
to be a diamond.
Insert the bottom tabs into slots on the top of
the main helmet shape . . .

and glue in place.

6. Prepare the side panels by layering on the
accent shapes, matching up cut edges
where they align, as shown.

7. Position (dry fit) the side panel onto the side of the
main shape, left and right panels on the appropriate
side of assembly. NOTE that the punch holes
of each should line up, and the dash cut near the
back edge should line up even with the main
helmet shape (indicated here by pointing right finger).

Take note or mark the area of the panel that
will attach to the main helmet shape (excluding
the very back of the accent shape which remains free.
Apply adhesive to the backside of panel where it
will attach, then re-position according to the dry fit,
and attach in place.

hat form by bringing the side edge and front edge
together, side edge to overlap the perforation of
the bent-back tab. Glue in place. Repeat for
opposite side.
Also overlap the back band and attach with brad(s).

9. Prepare the crest build up shape by bending
back on most perforation lines, except nose end
extension at bottom, and side tabs which fold forward.

to overlap the side "boxing" at the flange perforation,
and glue in place. Repeat for each segment of the edge,
and for both left and right sides.

edge along the back side flange, for both left
and right sides.

top two perforation lines back, bottom perf line forward.
Position and attach to the front of the crest, lining up
the punch holes of each.

Also prepare the nose reinforcement shape
by bending the top portion back.
Once in place, attach decoration brads
through punch holes.
Position and attach on the backside
of the crest at nose extension.

beginning at the front . . .

. . . then sliding the back diamond cutout over the
collar extension as the back tabs are inserted.

On the underside of the helmet main shape,
bend the tabs outward and glue in place.

14. Prepare the grill shape by bending back on all
perforation lines.
Position (offset) the lower two grille shapes
and the side accent shapes while the crest
is flat.

15. Bend the lower front to overlap the straight
edge at the adjacent tab/flange perforation line
and join this center front seam.

adjacent tab flange and glue side seams.

17. Bend the side extension of upper accent shapes
back, then position and attach to the main grille.

18. Position the grille onto the front of the main helmet
assembly, with the side punched extensions overlapping
the lower sides of helmet. Line up punch holes,
then attach in place using a regular size brad.

19. Prepare the feather shapes by bending and
"ruffling" the tine edges as desired.
Layer the feathers (tallest as center, suggested)
and line up the stem ends as much as possible.
Suggestion: to give the feathers more dimension,
consider using clear foam squares near the base
of the feather shape between the layers.
Glue the stems together, and trim to match the
center feather stem side and bottom edges, if necessary.
LEAVE the very ends of stems unattached, so
they can be bent back as attachment tabs.

20. Insert the stem end through the collar and
also through the main helmet slot.
On the inside of helmet, bend one of two stems
back in one direction, remaining stem(s)
back in opposite direction, and glue in place
to inside of helmet.

Here are two views of the completed helmet:
front and . . .

. . . side back.


