Highly detailed, built-up layers create a
stunning card
for Independence Day or festive Christmas giviing.
Back layer "hinges" away from front
at perforation line
to reveal message space. Place optional standard gift
card
recess panel with wrap-over tab bracket
which ribbon-ties closed to secure
card in place.
On front, layer drum main base with inner rim cutout base
(provides contrast for main body show-thru cutouts),
main body, front rim
strips, banding detail with
brackets and ball finials, arc flourishes and
stars.
Two-layer drum sticks are added diagonally across
front and tied in
place to card base punched tab
(as well as foam square attached).
Measures approx.
6x6 when finished.
ASSEMBLY: 1. Identify and cut the shapes:
A front card base
B (white) drum front silhouette (shows thru as skin)
C (dk blue) drum back rim/base shape
D (cream) drum hull with 'C' and
star flourishes in place
E hull accent cut-outs contrast liner
F front rim
G strapping shape with ball finials, bracket accents
H drum sticks base I drum stick front
J card back base
K opt. gift card recess panel build up (3)
L gift card panel strap strip
2. Prepare the drum hull shape by positioning
and attaching the contrast strip behind the shape
so that it is behind the the circle cut-outs ONLY.
3. Layer the "skin" (or head) bottom shape
with the rim shape and the hull assembly shape
with side and bottom edges of each aligned,
and attach each in place.
Use a flat weight to press the assembly during
the glue drying process if using liquid adhesive.
4. Position and attach the front rim shape over
the top edge of the hull shape.
Position and attach the bottom red trim strip
a scant 1/2" above the bottom edge.
5. Position and attach the strapping shape
over the top of the assembly, matching up
the corresponding ball finial shapes and side edges.
6. Position and attach the ball finial and bracket
accent shapes over the strapping shape.
7. Position and attach the 'C' flourishes surrounding
the square cutouts in each panel.
Position and attach star accent with arms
between the circle cutouts.
8. Position and attach the drum assembly
on the front of the card front base shape,
with edges offset approx. .1".
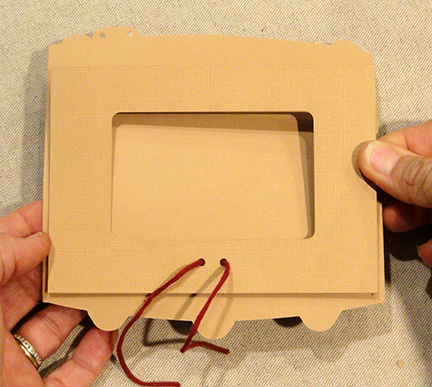
9. Prepare the optional gift card panel by
layering the three shapes and attaching together,
taking care to line up all cut edges as precisely
as possible.
10. Prepare the strap shape by bending back
the top end tab at perforation line.
Position, centered, over the card window panel,
with tab wrapped around top edge,
and glue tab in place.
NOTE it may be helpful to line up the ribbon
punch holes of strap and panel, then hold in place
as tab is wrapped to back and attached,
since there is a bit of play included in the strap
length to allow for paper thickness variation.
11. Insert a length of ribbon or twine through
both holes (tails toward the front side).
Position the panel (should have strap also in place)
over the back base panel inside face,
center (side to side and top to bottom)
and glue in place.
12. Position front card assembly over back assembly,
lining up edges, and attach the back top panel
(above perforation line) to backside of card FRONT.
13. Insert gift card into recess . . .
. . . and tie twine to secure in place.
(A piece of double-sided tape behind card will
additionally help keep it in place.)
14. Layer the drum stick single over the drum sticks
base shape and glue in place.
15. Prepare the attach the drum sticks unit onto
card front by strategically placing (trimmed to size)
foam mounting squares on the backside, then . . .
. . . position drum sticks unit over the card front,
lining up the punch hole near tips,
and angling the sticks attractively across drum.
16. Thread decorative twine through drum stick
hole and drum bases hole, and tie knot and bow.
Here is the completed card.


 3. Position and attach the stars panel on top of
 4. Use the guide marks cut into the flag base shape
 . . . position and attach the starry panel unit.
 5. Position and attach the stripes in position where

 6. Prepare the card base by ending forward along
 7. Position, centered, and attach the flag base
 8. Position and attach the studs into the circle
 Here is the completed flag card with studs.