Featuring dimensional ends with heart cutouts,
arched legs
connected with hexagon tubes
(reinforce with 5/16" dowel lengths),
this
quilt display stand makes a unique
and beautiful decor accent.

"Quilt
mini" companion designs (paper construction)
can be draped over the top
pole.

Or, stitch a fabric mini quilt to display.
Stand
measures approx. 7.5" t x 7.75" w x 2.75" d.
ASSEMBLY:
1. Identify and cut the shapes:
 A outside "front" panels
B inside "back" panels
C tall boxing strips D short boxing strips
E arch boxing strips
F & G covers for openings
H heart insert fronts & backs
I heart insert boxing strips
J pole strips (3) K front panel accents
NOT SHOWN: Z interior support strips (2)
2. Prepare the heart inset by bending back all the
strip tabs along both edges of two strips.
Also bend on the cross perf lines so that the strip
can form a heart silhouette as shown below.
3. Bend the bottom tab "forward" so that it can
tuck up behind the opposite strip end,
and glue in place.


 6. Position the second "back" side of the heart inset
by positioning the heart shape with backside
over the bent-back tabs,
adjust each tab to align with corresponding
perforation edge of strip, beginning
at the center top, then working around
as was done for the "front" heart.
 7. Prepare TWO stand side supports.
Prepare the boxing strips by bending the
edge tabs back. For the side strips, bend the
cross perforations back.
For the bottom 'arch' strip, bend the ends
and end tabs back,
and bend the remaining cross perf lines
between ends forward, as shown.
 Arrange strips in order (as shown above)
by referring to the tiny cut symbols near the ends
or in the end tabs, like the triangle shown here
that shows which ends will join as the strips
are attached around the 'face' shapes.

 9. Bend the next segment of the boxing strip
to align with the corresponding segment edge
of the face shape, adjust, and glue in place.
10. Continue working around the edge to
line up and join each segment of strip to
edge of face shape until sides and top
are completed.


 12. Position the segments of the strip around
the segments of the panel, adjust to align
as exactly as possible, and glue in place.
 13. Position and attach the heart inset behind
the inside face of the panel assembly . . .
 . . . turning the construction to the face side
to align the heart cutout edges of each
as precisely as possible.
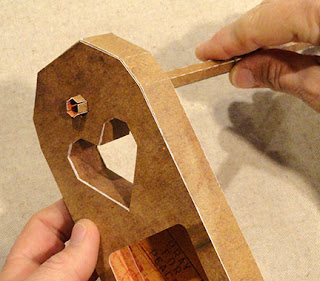
 NOTE that it may be helpful to use a narrow rod
tool such as the spatula tool shown here
to reach between projections to apply pressure
to the tabs and panel backside.


 . . . top hole cutout, and . . .
 . . . bottom "foot" holes to help apply pressure.
Shown here, a rod tool such as a knitting needle
is inserted into the foot hole and placed
behind the long side tab being glued in place
to provide a "press against" surface.

 17. Apply glue to the long tab, then form
the strip into a tube to overlap the straight long
edge over the tab to perforation line,
and gluing in place.
NOTE that it will be helpful to use a 5/16" diam.
dowel as a "press against" surface,
to help form the pole tube.




 22. Insert the support into the large finger
opening, apply glue to the tabs, then slide
ends under the panel edge and glue in place.


 . . . and top opening.


1. Identify and cut the shapes:

B inside "back" panels
C tall boxing strips D short boxing strips
E arch boxing strips
F & G covers for openings
H heart insert fronts & backs
I heart insert boxing strips
J pole strips (3) K front panel accents
NOT SHOWN: Z interior support strips (2)
2. Prepare the heart inset by bending back all the
strip tabs along both edges of two strips.
Also bend on the cross perf lines so that the strip
can form a heart silhouette as shown below.
3. Bend the bottom tab "forward" so that it can
tuck up behind the opposite strip end,
and glue in place.

4. Compete TWO heart inset units.
Position the back side of the first "front" heart shape
over the bent-back tabs of the tabs strip,
with the inner opening edges lined up at
strip perforation edges.

Match the point at
the center of the heart with the
center 'pivot' perforation, and also line up
the segment perforation edges at the corresponding
heart edges, and glue the top two tabs in place
on heart's back surface.

5. Line up the remaining edges and tab perf edges
along each side to center bottom, to line up
and attach each segment in place.

by positioning the heart shape with backside
over the bent-back tabs,
adjust each tab to align with corresponding
perforation edge of strip, beginning
at the center top, then working around
as was done for the "front" heart.

Prepare the boxing strips by bending the
edge tabs back. For the side strips, bend the
cross perforations back.
For the bottom 'arch' strip, bend the ends
and end tabs back,
and bend the remaining cross perf lines
between ends forward, as shown.

by referring to the tiny cut symbols near the ends
or in the end tabs, like the triangle shown here
that shows which ends will join as the strips
are attached around the 'face' shapes.

8. Position the first side of the 'front' face shape
to align the long side edge at the perforation
line of the corresponding segment of boxing strip,
and join.

to align with the corresponding segment edge
of the face shape, adjust, and glue in place.
10. Continue working around the edge to
line up and join each segment of strip to
edge of face shape until sides and top
are completed.

11. Attach ends of bottom arch strip by under-lapping
end tab beneath straight end edge of
symbol-matched end . . .

. . .for both ends.

the segments of the panel, adjust to align
as exactly as possible, and glue in place.

the inside face of the panel assembly . . .

to align the heart cutout edges of each
as precisely as possible.

tool such as the spatula tool shown here
to reach between projections to apply pressure
to the tabs and panel backside.

14. Bend all the tabs from the first panel assembly
toward the center.
15. Position the outer panel backside over the
tabs and second face of the heart inset,
adjust, and glue in place . . .

. . . using the large finger hole, plus . . .


Shown here, a rod tool such as a knitting needle
is inserted into the foot hole and placed
behind the long side tab being glued in place
to provide a "press against" surface.

16. Prepare the pole strips by bending back
on each of the long perforations.
(Leave the end tabs un-bent until later.)

the strip into a tube to overlap the straight long
edge over the tab to perforation line,
and gluing in place.
NOTE that it will be helpful to use a 5/16" diam.
dowel as a "press against" surface,
to help form the pole tube.

18. Compress the end tabs slightly . . .

. . . then insert the end through the first side
support unit (from the solid inside
through to the outer finger-hole side) . . .

. . . and through the hex opening.

19. Bend the end tabs outward, flat against
the outer support face, and glue in place.

20. Repeat the pole end inserting process
for the lower two poles.
NOTE that is the tabs catch behind the second
opening edge, insert a narrow tool
to help guide the "stuck" tab into position
to be inserted into and through the hex hole.

21. Prepare the Z strip interior supports by
bending side tab flanges back, bending on
cross perf lines one forward, one back
to form the 'Z' shape shown here.

opening, apply glue to the tabs, then slide
ends under the panel edge and glue in place.

23. If desired, cut three lengths of 5/16" diam.
dowel and insert one through the pole
opening at end, and slide all the way inside.

24. Apply adhesive to the backside of the
panel accents, then position over each end to
conceal the construction openings, and glue in place.
NOTE that . . .

. . . the lower 'foot' ends are aligned,
while other edges are offset slightly.

25. Position and attach the opening covers,
on 'feet' ends . . .


Here is the completed quilt display stand.