Showing posts with label stencil. Show all posts

Sunday, September 20, 2015

Four Halloween Triangle Flag Stenciled Pennants


Four new and unique designs available as cut files
to purchase, download, cut from stencil vinyl
to use as a stencil to paint custom pennant flags.
Position and attach to fabric of choice,
then apply spray paint evenly and thoroughly.
Remove stencil, use template to trace cutting lines.
Sandwich face side together, then sew, turn.
Fold over header, or trim and attach contrast ribbon
or grommets, etc.
Then hang for festive Halloween holiday fare.
Alternate with plain pennant flags
embellished as you choose.

PROJECT PROCESS:
1. Select your design, set it up on your prep-top-cut screen with some space around it for separating and later masking. (I will add wider margin to enlarge flags slightly, at the end of the stenciling process.)

I cut two flags on each of my 12x22 trimmed-to-size pieces of vinyl. (I had extra red regular vinyl on hand, so I used this instead of the clear stencil vinyl.) You may be able to get more onto a 12x12 if you wish. 

If you know how and wish to, consider ungrouping and removing the triangular perimeter cut line. Just be sure to keep the interior shapes together by selecting as a group and re-grouping, etc.

2. To create a stencil, remove the parts of the design that will be open to allow the paint through to create the design on the flag fabric.

Here you can see each of the four designs weeded, with the outer margin on the flag remaining, and an extra margin of vinyl left cut on.


3. Continue to follow the regular vinyl prep process.

First use transfer tape/paper applied to the face of the pennant weeded vinyl design.


Next, peel away the backing, taking care to leave all the tiny, tiny shapes (referring here to the script design) as part of the design on the transfer paper.


Position the vinyl (with transfer tape on top) on the flag fabric, then use a squeegee or paper scraper to apply thorough pressure to make the vinyl sticky backing attach to the fabric.

NOTE: vinyl does NOT grab fabric quite the same way that it would a wall, or a painted wooden plaque, etc.


Finally, carefully peel away the transfer tape/paper to leave ALL of the weeded vinyl stencil in place on the fabric.

Use all the patience it requires, particularly for the script design. Watch especially the interior shapes of the 'l's and the 'o's.


4. To make sure that all edges will mask against paint "overspray", go over vinyl shape edges with finger tip pressure. (I went over several times, just to be safe.)


Use masking tape to cover remaining flag outer cut lines, trimmed edges of the vinyl sections, and all other areas that should be preserved as paint-free. (Refer to the next photo to get an idea how thoroughly this sample set was masked prior to painting.)


5. Spray paint your stencil (or you can use a different application process using Silhouette America's fabric stencil paint, etc.)

Use a mist, not too close (this image is a set up; actual spraying was at least 10 inches from surface for even application). Get thorough coverage, but not puddled saturation. NOTE: my experience is that it is best to get complete coverage with a SINGLE coating, if possible. When the first coat of paint that is on the vinyl dries, it can pull away or curl, making a second coating create a paint shadow.

6. ALLOW PAINT TO THOROUGHLY DRY.

Carefully pull stencil away and discard.

Use weeding tool to remove all "floating" vinyl shapes that remain in place to completely reveal the wonderfully painted stencil designs!


7. To create "pillow case" (machine stitch edge finish) pennants, follow these remaining steps. Or choose your own method and process to complete your project.

Use the template in the cut file as a paper shape centered over the design with a 1/4" margin beyond edges of painted design to mark the cutting line for flags.


If desired, use a temp marking tool to mark the slots as the "fold line" for self-hem at the top of the flag.
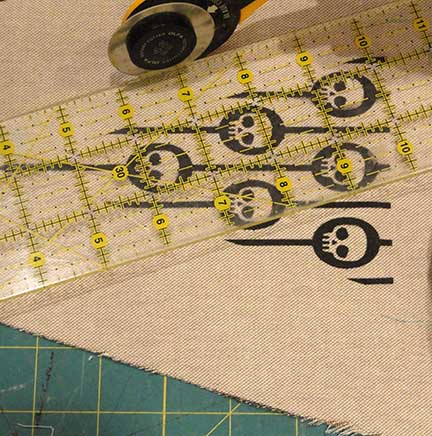


Trim the flags on the cut line. at the perimeter.


MODIFICATIONS:
For the project being shown here, I marked the template edges in the above image with temp marker all around instead of pencil as shown above. Then I used my rotary cutting equipment to cut the flag out 1/4" beyond the marked line. This makes the flag a little larger than the original designs are laid out to be.


8. Layer the stenciled flag front with a second blank flag shape, placed face to face.

Use a regular or slightly shorter stitch length to stitch sides on each side of point, leaving the straight top edge open. Lock stitching at top edges.


9. Turn the flag right side out (showing the harlequin design now), work the seam out fully, carefully press the edges flat.

NOTE: my paint choice (and others) may be transferred undesirably by the hot iron, so AVOID touching the painted portion directly with the iron.


10. If desired, stitch next to the seam fold edges.


11. To complete the flag top edge, trim raw edge and any unraveling to create a clean edge. Use FrayCheck applied to edge to keep it from unraveling later, or zigzag stitch the edge, serge, etc.

Fold on the marked line to create a channel for ribbon. String and display. Template suggests grommet or eyelet positioning, as a stringing alternative to the ribbon channel.


12. For this project, the fold line will be used as an "edge placement line" to position a folded and pressed length of grosgrain ribbon.

First, press ribbon in half. Next, position ribbon finished edge on traced temp line (hide the line). Finally, mark the top fold position onto the pennant. 


Rotary trim the excess above the marked ribbon fold position from previous image, trimming a little extra off below the line.


13. Stitch ribbon edges in place through all layers. (I used fabric adhesive to attach the underneath edge in place first, then topstitched from the front.) 


Ribbon raw ends were finished with an application of FrayCheck


14. Pennants were threaded onto a twill ribbon with a width that would fit through the channel. Three plain flags were alternated with the four designs for a 7-flag swag. (NOTE decorative grommets were applied to the front of the ribbon channel prior to stitching the front edge in place.


 15. Pleated rosettes and decorative card stock plaque shapes were also attached to the plain flags. See the separate assembly tutorial for these.

Here is the completed banner.


Sunday, July 20, 2014

Palm Leaf & Blossom Tropical Stencil Designs


Multiple Palm Leaf & Blossom designs
can be cut as stencils
then used to apply paint designs
to table cloths, placemats,
or as vinyl.


Coordinates for an island or pool party.
Designs soon available from SnapDragon Snippets
through Silhouette America or SVG Attic.

GUIDANCE & INSPIRATIONAL TUTORIAL
1. Decide which design you want to use, audition and select a layout (including scaling for enlarged sizes), then load the design in Silhouette Studio software to send the cut design to the Cameo cutting tool, load tool with stencil or other vinyl, then cut.


Design options in this set include triangle center motif, circular leaf wreath, block quatrafoil leaf desgns, and leaf and corner block border layouts.


The design sampled here is for the block and leaf frieze design that will be painted on a plain place mat

2. Use hook tool to remove the parts of the cut stencil vinyl that will be painted areas in the finished design.


Take care with the small "floating" oval shapes that are easily lost, shifted, transferred incorrectly, etc.


3. Cover the weeded stencil vinyl with a matched size transfer sheet.

(Transfer sheet is like very wide masking tape, sticky on one side, paper backed.)


4. Use a screen printing squeegee (or sturdy credit card) to rub across the back of the transfer sheet to help the vinyl stick to the transfer sheet and release from the vinyl's paper backing.


5. Position and secure the transfer assembly onto the project face in the final position. Use creases, temporary marker lines, pins and anything else you can think of on the project to help align and center the design.

Plack Pigma or other permanent pen can be used to make guidemarks on the stencil vinyl when it can plainly be seen to assist in this alignment and positioning process. For instance, a baseline extension can be marked to each side of the cut design, or center marks can be measured and marked, both vertical center and horizontal center.


6. Burnish across the positioned transfer assembly to help each part of the stencil adhere to the project's fabric face side.,

7. Carefully roll back to remove the transfer sheet, making sure that all "floating" bits and intricate edges detach from transfer sheet, and remain where they should on the project's face.

Take care, with the palm leaf designs, to get the floating tiny ovals to remain.


8. Use masking tape to enlarge the protected working paint area to each side of cut area. This projects the project surface from stray strokes, or errant finger marks, etc.

Use stencil brush and cream stencil paints (oil based) to fill the blank spaces in the stencil with your selected paint color. Work the paint fully into the design, and apply more paint strokes for a consistent color density.


9. Allow the paint to dry for several hours so that there is no possibility of smearing or transferring to hands, clothing or other surfaces. Release the edge tape, then pull away the stencil. Use fine tool like hook to remove small vinyl shapes within the interior of the designs.


Here is an image showing the finished place mat design that has been demonstrated.


10. The sample table topper demonstrated here is a 24" piece of coarse weave home decoration fabric (linen like). The center was located by folding in half in both directions, then the triangular blossom and three leaf design was centered, following pigma black ink pen markings placed on the stencil once it was newly cut.


11. The edges of my cut fabric could be narrowly (double turn-under) hemmed, or carefully cut following the weave, then fringed at the edges for 3/4" to 1". I used a machine short straight stitch to reinforce and define the area of the fringing.


Here is a shot of the finished placemat.


And here are both projects together.

Thursday, December 6, 2012

Reindeer & Wreath Pillow from Cut Stencil

Finished Reindeer pillow
in a Christmas decor ensemble

This simple yet graphic pillow seemed the perfect IDEA to 
coordinate with my other seasonal  "stuffies". 
A vinyl stenciling inspiration was offered recently on the Silhouette blog. 
After seeing that, I was hoping to recreate instead 
the rustic feed sack Pottery Barn look for myself. 
As I searched my Silhouette  library, suddenly it clicked
 that by combining a couple of designs, I could stencil something 
that would be "practically perfect".


Taped-up design, adhesive-sprayed and positioned
Designs I selected are "reindeer" by Snapdragon Snippets and "olive branch wreath" (can't find the designer to give attribution). Text was created with the text tool, then I stencil-ized the words by erasing parts. 


Next, I manipulated the designs on my Studio screen by enlarging, reversing the image, rearranging, etc. Since I am still working on the smaller mat Silhouette-1 machine, I could NOT assemble the complete layout on-screen. 


Also,  I could only cut part of the wreath design in the scale I wanted to fit around the reindeer. So instead of cutting a vinyl stencil, I cut card stock parts, played around with the "cutouts" until I got the arrangement I wanted, then laid the stencil "negative" areas back over the cutouts and taped them together well. I sprayed adhesive on the backside, then positioned and "rolled" it well to make sure all edges were sealed down. I also masked off the entire piece of fabric so that there would be no over-spray paint where it wasn't wanted.


Next I sprayed with acrylic brown paint. Because I want the "worn" look, I used light but even coverage.

(You may notice that I used a small cut circle, temp-glued in place for the reindeer eye.)


When the paint was dry, I peeled away the stencil. Being a card stock stencil, it was still in great shape and I used it to stencil more pillow fronts. This is something that a stencil cut from vinyl can't accomplish very well.


Here is the completed pillow front (though in this shot, I have not yet removed the eye "dot").


And finally, the finished pillow, with added red flange edge accent.