A tackle box shape is the card base
with a reel that spins on a brad fastener.
Inner circle layer (clear in
thumbnail sample)
has message "spare not the rod" mounted cutout,
with reel and
handle on the card front.
Hold and turn the slice-form dimensional handle to
reveal words ring.
Brad prong covers give a finished look to the card
back
where the pocket can hold a note or gift card.
(This post is under construction.
Please return soon to view
the completed tutorial.)

ASSEMBLY:
1. Identify and cut the shapes:
A main card base shape (bottom fold)
B card front build up shapes (4 to 5)
(to allow lower layers of spinning mechanism to clear upper card front layers)
C box front with "TACKLE" accent panel
D box upper front with accent
E buckle
F "spare not the rod" words reel circle positioning template
G words cutouts
H clear carrier circle
I spinner brad shaft build up (6)
J spinner handle base
K handle foundation
L left & right dimensional handle shapes
M net frame and net
N fish layers and eye layers
Not shown: brad prong covers, large (1) and small (6)
Not shown: brad prong covers, large (1) and small (6)

2. Prepare the card front build up layers by carefully aligning and gluing together 4 or 5 shapes in a stack, taking care that punch holes and edges line up as exactly as possible.

3. Prepare the card base front/back by folding the lower portion (back) under.
4. Position the build up stack over the front of the card base, taking care to line up the upper and side edges, and hole punches. Glue the stack in place.

The stack should provide a "built up" area where the spinner words circle can rotate without interference from the overlapping card layers.

5. Prepare the tackle box front panels. Layer the lower accent panel over the corresponding portion of the box base panel, taking care to line up the hole punches, with panel offset inside the base panel edges as shown.
Layer the upper accent panel over the upper box base shape, with shaped "cutout" at upper right corner edges of each lined up, and other edges offset as for the lower portions.

6. Prepare the dimensional handle by folding on center perforation as "valley" folds. Bring the two shapes together so that left and right halves that jut away from the plane of the side halves line up. Glue these two halves together. This is a "slice form" arrangement, and will provide the finger hold for the spinner handle.
7. Glue the bottom of the dimensional handle assembly onto the flat handle shape, aligning edges.

8. Glue the underside of the handle assembly to the whole handle shape.

9. Prepare the reel housing by centering and gluing the circle with punch holes ring over the whole circle.
10. Note the slot cut that will accent the brad prongs later in the construction in both the reel housing and the handle hub. Orient the handle hub so that the slot cuts of both will line up.
Glue handle hub in place . . .

. . . then while the glue is still a bit pliable, insert a blade tip into the slot to ensure that both layers line up as desired.

11. Prepare the words reel circle. Suggested method is to use a template of the words with circle shape, position the clear carrier circle over the top with center slot cuts lines up, then attach the words to the clear carrier in the positions indicated by the template.
(Use an appropriate adhesive to attach card stock words to clear acetate or vinyl circle.)

Here you can see the words attached to the clear carrier, with the template being separated away.
Discard the words template.

12. Prepare the shaft stack by gluing together the 6 "washer" shapes.

13. Attach the washer stack buildup on the top of the carrier circle, taking care to center the washer center opening over the slot cut.

14. Begin to assemble and attach the spinning mechanism. Push the accent brad prongs through the reel/handle housing.

Then place the reel housing assembly beneath, and insert the brad prongs through the slot cut of the carrier with words circle.
(PLEASE NOTE: the handle shown here is slightly covering the "the" word. It should actually be rotated 180 degrees so that it falls in front of the "spare" word. See the image in step 17.)
15. Slide the tackle box card front between the carrier and reel layers. This assembly is now prepared to attach to the built up card front.

16. Apply adhesive to the build up top surface . . .

. . . then, in the same action , insert the brad prongs through the punch hole in the card base front, while positioning the box base shape over the build up shape. Adjust to make sure the tackle box and build up edges are lined up as precisely as possible, then apply pressure over all to attach where glue was applied.
 Fold the brad prongs back on the backside of the card "upper" panel. NOTE: it may be helpful to not make the brad attachment as tight as possible to allow the mechanism to spin more easily.
17. Fold the bottom portion of the card back into its final position. Attach brads through side holes of front and back layers, and fold the prongs back on the backside.
18. Glue the buckle shape in place.

19. Position and glue brad prong covers over the brad prongs on the card's back side.

The stack should provide a "built up" area where the spinner words circle can rotate without interference from the overlapping card layers.
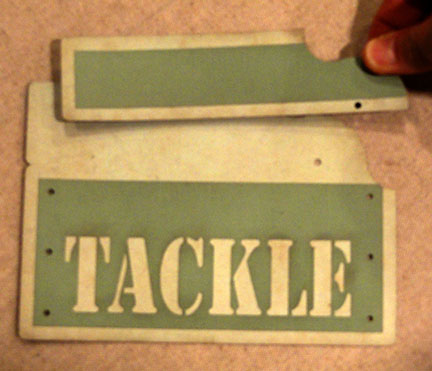
5. Prepare the tackle box front panels. Layer the lower accent panel over the corresponding portion of the box base panel, taking care to line up the hole punches, with panel offset inside the base panel edges as shown.
Layer the upper accent panel over the upper box base shape, with shaped "cutout" at upper right corner edges of each lined up, and other edges offset as for the lower portions.

6. Prepare the dimensional handle by folding on center perforation as "valley" folds. Bring the two shapes together so that left and right halves that jut away from the plane of the side halves line up. Glue these two halves together. This is a "slice form" arrangement, and will provide the finger hold for the spinner handle.
7. Glue the bottom of the dimensional handle assembly onto the flat handle shape, aligning edges.

8. Glue the underside of the handle assembly to the whole handle shape.

9. Prepare the reel housing by centering and gluing the circle with punch holes ring over the whole circle.
10. Note the slot cut that will accent the brad prongs later in the construction in both the reel housing and the handle hub. Orient the handle hub so that the slot cuts of both will line up.
Glue handle hub in place . . .

. . . then while the glue is still a bit pliable, insert a blade tip into the slot to ensure that both layers line up as desired.

11. Prepare the words reel circle. Suggested method is to use a template of the words with circle shape, position the clear carrier circle over the top with center slot cuts lines up, then attach the words to the clear carrier in the positions indicated by the template.
(Use an appropriate adhesive to attach card stock words to clear acetate or vinyl circle.)

Here you can see the words attached to the clear carrier, with the template being separated away.
Discard the words template.

12. Prepare the shaft stack by gluing together the 6 "washer" shapes.

13. Attach the washer stack buildup on the top of the carrier circle, taking care to center the washer center opening over the slot cut.

14. Begin to assemble and attach the spinning mechanism. Push the accent brad prongs through the reel/handle housing.

Then place the reel housing assembly beneath, and insert the brad prongs through the slot cut of the carrier with words circle.
(PLEASE NOTE: the handle shown here is slightly covering the "the" word. It should actually be rotated 180 degrees so that it falls in front of the "spare" word. See the image in step 17.)
15. Slide the tackle box card front between the carrier and reel layers. This assembly is now prepared to attach to the built up card front.

16. Apply adhesive to the build up top surface . . .

. . . then, in the same action , insert the brad prongs through the punch hole in the card base front, while positioning the box base shape over the build up shape. Adjust to make sure the tackle box and build up edges are lined up as precisely as possible, then apply pressure over all to attach where glue was applied.
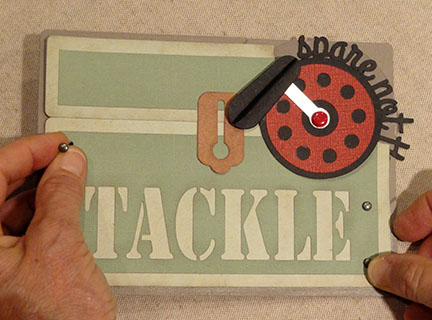 Fold the brad prongs back on the backside of the card "upper" panel. NOTE: it may be helpful to not make the brad attachment as tight as possible to allow the mechanism to spin more easily.
17. Fold the bottom portion of the card back into its final position. Attach brads through side holes of front and back layers, and fold the prongs back on the backside.
18. Glue the buckle shape in place.

19. Position and glue brad prong covers over the brad prongs on the card's back side.

20. Assemble the net handle and netting base shapes.
Layer and assemble the fish:
bottom to top: whole base shape; tail half with whole fins; tail half with fin "stripes"; back body half; eye base (black) and eye (white).
Attach to the net assembly. Position and glue in place over the front of the card as shown.

21. Test to make sure the spinner works by holding the dimensional handle and turning it counter-clockwise as shown in this series of three images.


22. (Image to follow) Cut a message shape rectangle (max size approx. 5.625" x 4.25") that you can insert into the back pocket.