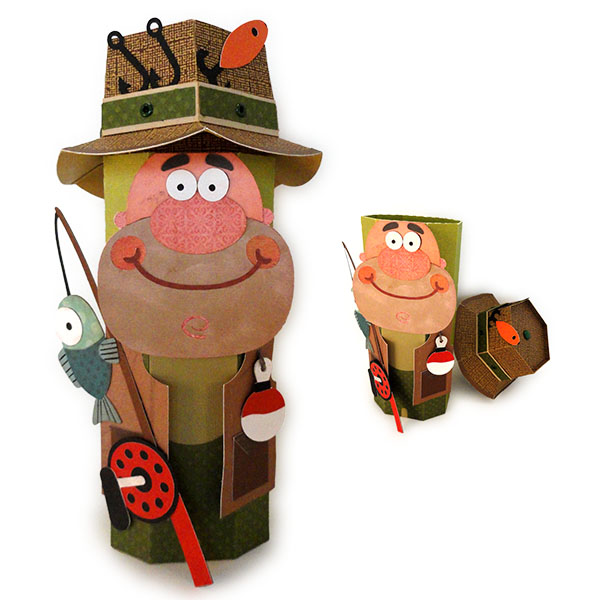
Unique gift box to fill and gift, or display.
Assemble the tubular "canister" box,
then decorate the box with
"tee shirt" base front panel,
waders, fishing vest fronts with bobber,
rod &
reel and whimsical fish on the line,
and jolly angler face ready to exaggerate the
size of his latest catch.
Dimensional bucket hat is assembled in six segments,
decorated with hat band and accent shapes,
eyelets and brad top button, hooks, fly and lure.
Another in a series of canister characters.
(Search this blog with "canister" to see others.)

ASSEMBLY:
1. Identify and cut the shapes:
A canister body
B canister bottom ring rim and insert
C canister top ring rim
D "tee shirt" front panel
E wader front panel
F vest fronts, pockets
G face base shape
H face details
I fish shapes
J rod and reel shapes
K bobber shapes
L hat panels (6)
M hat flange strip
N hat base hex
O hat bands (2)
P hat band accents
Q opt. top button circles (5-8)
R hat rim shapes (6)
S hat top
T hat accents: fly, lure, hooks

2. Build the canister box. Follow this link to view canister construction steps 2 through 6, then return for the remaining fisherman canister assembly steps.

3. Prepare the lower front panel (which shows through as the "tee shirt") by bending back on the vertical perforations. Position with bottom canister and panel edges even, perforations lined up, and glue in place.

4. Prepare the "waders" front panel in similar fashion, then position and attach with bottom edges even.

5. Prepare the vest left and right panels by gluing the vest pocket rectangles and triangle flaps in place.
Prepare the bobber decoration by layering the smaller shaped onto the base silhouette.

6. Attach the bobber to the left upper vest by creating a loop with twine and inserting the ends through the punch hole, then . . .

. . . glue ends in place on the back.

7. Position and attach each vest front on top of the wader panel, aligning the top outer corners of each, and keeping the vertical side edges parallel to the panel edge.

8. Prepare the head/face unit, beginning with the base silhouette (includes the ears that show when all other shapes are in place), then layering on the lower face, upper face, nose. Fit cheek circles into lower face cutouts. Layer eye (pupil) dark shape and top eye (white) shapes. Position and attach mouth, eyes, eye brows.
NOTE that the eyebrows must NOT extend above the top straight edge of the face unit.

9. Position - centered - face unit over the front of the canister assembly, with top straight edges even, and attach in place.

10. Prepare the fish unit by layering the body front and back shapes onto the base silhouette (optional fin and tail shapes may be included in the file). Layer pupil and eye top shapes, then position in the cutout area of upper body.
11. Prepare rod unit by attaching pole and grip to the base silhouette shape.
12. Position top portion of fish unit over the corresponding partial shape at the end of the line, and glue in place.

13. Assemble the reel unit by layering the circle punch top shape over the plain circle base shape, also layering the handle end shape over the handle and winder base shape.
Position and attach the handle unit to the reel assembly.
14. Position and attach the edge of the reel unit to the grip/rod unit.
(NOTE: when the fish is allowed to take it's natural position, a small portion of the dorsal fin will overlap the pole. Attach fin to pole with a small dab of glue.)
Position and attach the handle unit to the reel assembly.
14. Position and attach the edge of the reel unit to the grip/rod unit.
(NOTE: when the fish is allowed to take it's natural position, a small portion of the dorsal fin will overlap the pole. Attach fin to pole with a small dab of glue.)

15. If desired, add a series of ink lines to the exposed fins and tail.

16. Position and attach the rod/fish unit to the lower right portion of the canister assembly.
Take care that the bottom of the grip does NOT extend below the bottom edge of the canister, or the canister will not sit properly flat.

17. Assemble the hat. Prepare each of the six segments by folding upper perforation line back, lower perforation forward. Fold side tabs back.
18. Position the straight edge of one segment over the corresponding tab of the adjacent segment, with top and bottom edges or perforation lines lined up, and glue in place. It is recommended to begin at the top section, then bend and align the mid section, then the brim section.

19. Repeat the joining process to add a third segment to the first two assembly, then continue to add remaining segments until all six are attached.
Complete the hat crown/rim ring by joining the final edges and tabs.

20. Prepare the hat band by folding back on all perforation.
Join the two halves into a ring by overlapping the straight end edge of one strip over the tab perforation of the other strip, adjusting top/bottom edges, and attaching. Repeat for the other ends.

Apply the decorative eyelet accents through the two layers of hat band.
(OPT 2: if preferred, small brad fasteners can be inserted through band AND hat layers once the hat band is in position.)

22. Slide the hat band into place over the crown of the hat assembly.
Glue the lower edge of band only in place.

23. Position and attach a rim arc shape at the edge of each brim edge of hat assembly.

(NOTE: it may be helpful to NOT fold back the upper tabs, to assist with insertion into slots in step 22.)

25. Form the flange strip into a ring, overlapping the straight end edge over the tab perforation, and glue in place.
Fold the final bottom tab toward back and glue in place.

26. Prepare base hex shape by folding tabs back.
Rotate flange ring to orient the long tabs with the long slots on the base shape.
Insert tabs into slots . . .

. . . push fully in, fold toward center on the backside of the base shape, and glue in place.

27. Insert the base/flange assembly into the bottom opening of the bat assembly . . .

. . . push in so that the place of the base shape is exactly even with the crown perforation of the hat assembly (indicated by pointing finger) . . .

. . . then apply pressure to the tabs to attach in place. Since the top of the hat is still open, finger pressure can be applied from both inside and outside to complete these joinings.

28. Prepare the hat top panel by folding the edge tabs UP.
Insert a brad fastener "button", or . . .

. . . if preferred, stack and glue a series of 5 to 8 button circle shapes to create a paper button, then glue it in place over the hole punch.

29. Apply glue to tabs, then insert the top hat panel into the hat assembly opening . . .

. . . push in until top edges are even.

If the top gets pushed too far it, use a tool such as this spatula to work the tab edge back into position.

"Pinch" to apply pressure to edges of hat and top panel to secure.
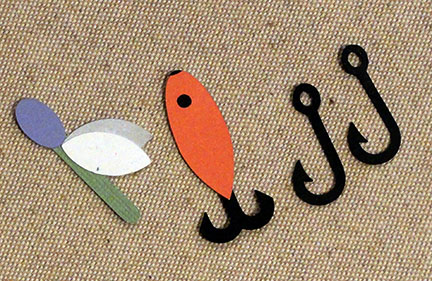
30. Prepare the fly and lure units by assembling shape(s) onto base shapes.
Arrange these accents on front panels of the hat, inserting bottom edges slightly under the free top edge of the hat band. Glue in place.

31. Place the hat onto the canister by inserting the flange inside the upper opening of the canister.


Here is the completed fisherman canister character.

And a few more images for reference:


lmfao, made this and loved every minute of it! I cut him all out in white and colored it my way. This makes a really cool ornament for your holiday tree- or on a shelf so all can see... it was a little time consuming, but well worth it! my family all fish and loved it too!
ReplyDelete