
Starry centerpiece for your patriotic
or Independence Day decor.
Create one of three sizes,
or make all three as a major focal point.
Build the open-back star "box",
fold the perforated strip into the "stick",
form the trap-door base box, then assemble.
Accent star face shapes are different for all three
of the sizes, with box panels the same for all.
Sizes: approx. (base 3.5" x 3.5") 5.25" wide,
short is 12.5", med. is 13.5", tall is 14.5.
NOTE: The three sizes of boxes, i.e. tall, medium and short, are assembled in identical fashion, except that the post lengths vary, and the star front accent shapes are different, as will be further described within the assembly guide.

ASSEMBLY:
1. Identify and cut the shapes:
A box main shape (top and front), accents
B box side shape, accent panels
C box bottom with trap door
D pole collar (support)
E inner box support strip
F pole support build up strip
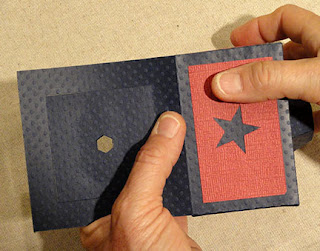
G box bottom hole concealer hex
H pole
I star box front with accent overlay
J star box back
K star boxing strips: short and long
K star boxing strips: short and long
Not shown: trap door attaching circles (3)


Shown here:
left - medium star front with overlay
right - short star front with overlay star,
rosette pleating strips (2), smaller star
Not shown: rosette center circle covers (2)

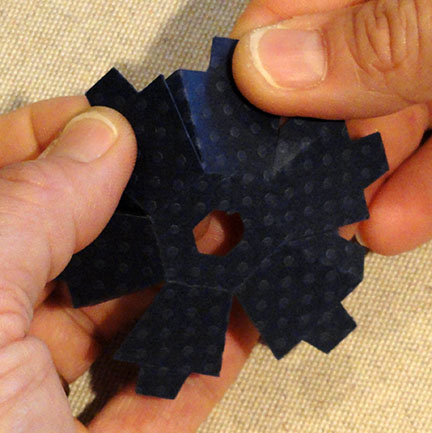
2. Prepare the star boxing strips by folding tabs back, perforation lines to correspond to the inward and outward angles of the star front.
(Perf pairs fold as mountain folds, end tabs of short strip, single folds on each side of hex pole hole and between perf pairs fold as valley folds.)

3. Working with the short (bottom) boxing strip, align the center bottom straight edge of the star front with the hex hole segment's tab perf line, adjust, and glue edge to tab with edge and perf line aligned.

left - medium star front with overlay
right - short star front with overlay star,
rosette pleating strips (2), smaller star
Not shown: rosette center circle covers (2)

2. Prepare the star boxing strips by folding tabs back, perforation lines to correspond to the inward and outward angles of the star front.
(Perf pairs fold as mountain folds, end tabs of short strip, single folds on each side of hex pole hole and between perf pairs fold as valley folds.)

3. Working with the short (bottom) boxing strip, align the center bottom straight edge of the star front with the hex hole segment's tab perf line, adjust, and glue edge to tab with edge and perf line aligned.

4. Bend the strip to bring the next segment of the strip in line with the edge of the star point, adjust as necessary, and glue edge to tab.
5. Continue to line up the star edges to boxing perf lines and glue in place to attach remaining segments of this end of the boxing strip . . .

. . . then complete the opposite end of the strip similarly.

It may prove helpful to place the assembly face down, once the initial grab of the seam is achieved, and apply pressure along the tab area to secure the gluing of each tab to edge seam.

6. Join the end of the top long boxing strip to the end tab of the attached boxing strip.

7. Bend each segment of the boxing strip into place along the star edge, align and join each in place one by one (or in pairs as seems to make sense).
As the final segment is being aligned . . .

. . . also line up the final free boxing strip end with the corresponding short strip tab and glue in place during the same operation.
Allow the boxing to star front seams to set fully before manipulating the assembly to attach the back.

8. Position overlay in place and glue to attach.
NOTE it may be helpful to turn the assembly face down on flat surface and apply pressure from the back/inside.

9. Prepare the star back by folding the pole support strip with hex hole at the perforations: end perf line as "valley" fold, and inner perf line as "mountain" fold.
10 . Position the star back over the backside boxing tabs, then . . .

. . . join tabs to corresponding straight edges of star back.
NOTE: allow the connected center strip with hex support hole to remain free and out of the way during the joining process.

11. Fold the support strip into perpendicular position, with tab end flush against backside of star front. Glue tab in place.

12. Prepare pole by folding (carefully) along each long perforation line to roughly form a tube.
 13. Overlap the long straight edge over the long tab to the perforation line and glue in place.
NOTE it may prove helpful to insert a corresponding size dowel or round pencil shaft into the pole tube to provide a "press against" surface while the seam is completed.

14. Insert the top end of the pole (you choose which is top) into the bottom hex hole of the star and up through the support strip hex hole until top pole tabs are fully exposed.

15. Bend the tabs outward and glue in place to the platform of the support strip.
NOTE it may prove helpful to insert a flat, thin press-against surface such as the spatula blade, under the platform on each side as the tabs are glued.

16. Prepare the main and side base box shapes by folding back (mountain folds) on all tab and sides or top perforations.
17. Position and attach the accent panels for sides and top while the shapes can be flattened.
18. Join the side section to the side tab of the front/top section by overlapping the appropriate straight side edge to the tab perf line, adjusting, and gluing in place.

19. Form the sides into a tube to bring the final straight side edge to overlap the corresponding side tab at perf line, and glue in place.

20. Prepare the pole support collar by folding on perforation lines as shown.

21. Form the collar shape by bending slightly to bring the straight edge of one extension into position to overlap adjacent tab and align at perf line.
Repeat for remaining 5 extension edges

22. Insert the end tabs of the collar through slots on box top . . .

. . . then insert completely, bend back, and glue in place on the underside of box lid.

23. Fold the top into position to align straight edges at tab perf lines, and glue in place.
(NOTE that this image is also showing the positioning of the final side seam that was described above in step 19.)

24. To help hold the pole in its vertical position and provide some stability with a glue-to receptacle, prepare the accordion build-up.
Fold the shape forward/backward in accordion fashion as shown . . .

. . . then apply glue between the folds to adhere the layers. NOTE that glue will need to be applied to a series of layers on one side and the other also.
(See the image in step 22 for the final form of the build-up shape.)

25. Position the build-up against the backside of the box bottom, in the trap door area so that the hexagon holes line up as exactly as possible . . .

. . . and glue in place.
26. Attach the box bottom straight edge parallel to the trap door perforation line at the front bottom tab.

27. Prepare the inner support by folding inward on each of the three perf lines.
28. Apply glue to the outer surfaces of the end tabs, then insert into the box and position with the "V" point at the center back (flush with the inner surface) and the arms extended as far down the sides as possible. Glue tabs in place.

29. Fold the "frame" of the box bottom into position to attach edges to the corresponding tab perf lines of the box sides.
NOTE it will prove helpful to use the trap door opening to reach in to adjust and apply pressure to complete each seam.
10 . Position the star back over the backside boxing tabs, then . . .

. . . join tabs to corresponding straight edges of star back.
NOTE: allow the connected center strip with hex support hole to remain free and out of the way during the joining process.

11. Fold the support strip into perpendicular position, with tab end flush against backside of star front. Glue tab in place.

12. Prepare pole by folding (carefully) along each long perforation line to roughly form a tube.

NOTE it may prove helpful to insert a corresponding size dowel or round pencil shaft into the pole tube to provide a "press against" surface while the seam is completed.

14. Insert the top end of the pole (you choose which is top) into the bottom hex hole of the star and up through the support strip hex hole until top pole tabs are fully exposed.

15. Bend the tabs outward and glue in place to the platform of the support strip.
NOTE it may prove helpful to insert a flat, thin press-against surface such as the spatula blade, under the platform on each side as the tabs are glued.

16. Prepare the main and side base box shapes by folding back (mountain folds) on all tab and sides or top perforations.
17. Position and attach the accent panels for sides and top while the shapes can be flattened.
18. Join the side section to the side tab of the front/top section by overlapping the appropriate straight side edge to the tab perf line, adjusting, and gluing in place.

19. Form the sides into a tube to bring the final straight side edge to overlap the corresponding side tab at perf line, and glue in place.

20. Prepare the pole support collar by folding on perforation lines as shown.
21. Form the collar shape by bending slightly to bring the straight edge of one extension into position to overlap adjacent tab and align at perf line.
Repeat for remaining 5 extension edges

22. Insert the end tabs of the collar through slots on box top . . .

. . . then insert completely, bend back, and glue in place on the underside of box lid.

23. Fold the top into position to align straight edges at tab perf lines, and glue in place.
(NOTE that this image is also showing the positioning of the final side seam that was described above in step 19.)

24. To help hold the pole in its vertical position and provide some stability with a glue-to receptacle, prepare the accordion build-up.
Fold the shape forward/backward in accordion fashion as shown . . .

. . . then apply glue between the folds to adhere the layers. NOTE that glue will need to be applied to a series of layers on one side and the other also.
(See the image in step 22 for the final form of the build-up shape.)

25. Position the build-up against the backside of the box bottom, in the trap door area so that the hexagon holes line up as exactly as possible . . .

. . . and glue in place.

26. Attach the box bottom straight edge parallel to the trap door perforation line at the front bottom tab.

27. Prepare the inner support by folding inward on each of the three perf lines.
28. Apply glue to the outer surfaces of the end tabs, then insert into the box and position with the "V" point at the center back (flush with the inner surface) and the arms extended as far down the sides as possible. Glue tabs in place.

29. Fold the "frame" of the box bottom into position to attach edges to the corresponding tab perf lines of the box sides.
NOTE it will prove helpful to use the trap door opening to reach in to adjust and apply pressure to complete each seam.

30. Apply glue to one-half of attaching circles and insert under the sides and back edges near centers and attach in place.

NOTE when the trap door is closed later, edges will join to the exposed half of each of these circle shapes.
FOR NOW, leave the trap door unattached.

31. Insert the bottom end of pole through the collar and box top holes, through the box interior, and through the hex hole in the trap door.
Fold the trap door into final position and glue in place to the attaching circles (and to the edge of the support strip, too, if desired.)

32. Fold pole end tabs outward and glue to the face of the trap door.
Glue the hex cover over the tabs and hole to conceal construction.


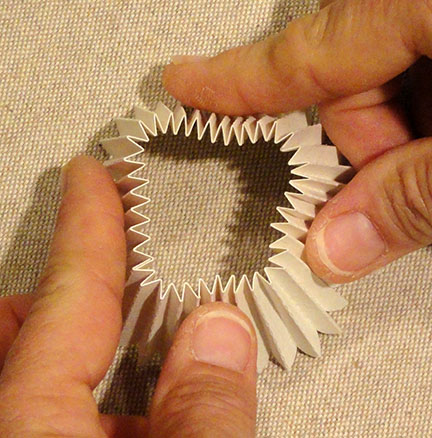
35. Convert the ring of the strips into a starburst circle form by using fingers of both hands to press the accordion folds near upper edge inward . . .

. . . gradually, until . . .

. . . they tighten to form the center hole.
Press inward concurrently from outer edges to tighten the folds as much as possible. Then without letting the shape un-adjust (spread fingers of one hand to take over applying pressure and keeping it from springing apart) . . .

. . . spread a bead of hot glue around the rim of the center opening. Quickly position the circle cover at the rosette center, then re-apply inward pressure from all sides as the hot glue dries and the shape is held in place.
Repeat the gluing of the circle cover on the other side of the rosette.
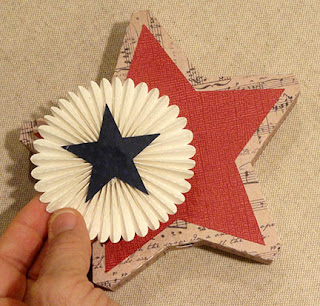
36. Attach the small accent star at the center front of the rosette, then attach to the front of the star overlay which should already be attached to the star box front.
(Tiny circle cutout on overlay may help position the rosette center.)


NOTE when the trap door is closed later, edges will join to the exposed half of each of these circle shapes.
FOR NOW, leave the trap door unattached.

31. Insert the bottom end of pole through the collar and box top holes, through the box interior, and through the hex hole in the trap door.
Fold the trap door into final position and glue in place to the attaching circles (and to the edge of the support strip, too, if desired.)

32. Fold pole end tabs outward and glue to the face of the trap door.
Glue the hex cover over the tabs and hole to conceal construction.

This completes the assembly of the tall star block on a stick.

Follow the same steps to complete the
medium star project, except substitute
medium star front overlay.

For short star on a stick project, prepare the star front decorations described here:
33. Fold each of the rosette strips in accordion fashion, with the "mountain" folds at the center of the edge scallop curves.

34. Join the ends of rosette strips into a ring by overlapping the scallop end straight edge over the corresponding end tab.

. . . gradually, until . . .

. . . they tighten to form the center hole.
Press inward concurrently from outer edges to tighten the folds as much as possible. Then without letting the shape un-adjust (spread fingers of one hand to take over applying pressure and keeping it from springing apart) . . .

. . . spread a bead of hot glue around the rim of the center opening. Quickly position the circle cover at the rosette center, then re-apply inward pressure from all sides as the hot glue dries and the shape is held in place.
Repeat the gluing of the circle cover on the other side of the rosette.

36. Attach the small accent star at the center front of the rosette, then attach to the front of the star overlay which should already be attached to the star box front.
(Tiny circle cutout on overlay may help position the rosette center.)

Here is a final view of our sample projects.
These are really cute!
ReplyDelete