
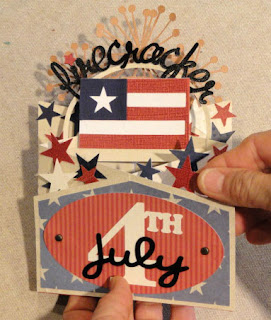
Create a show-stopping dimensional card
(that folds flat for giving and storing)
to give to someone special to wish them
"a firecracker" kind of Independence Day holiday,
or simply to display as part of July 4th fun.
Two sloping card base shapes are folded in "V" shape,
interlocked, then embellished with
front and back panels, firework explosion flourish,
"firecracker" with tiny star as the "i" jot,
layered flag that "floats" with end beams in side slots,
oval plaque with "july" and "4th",
plus as many star add-ons as you can fit.
Measures slightly larger than a7 size, so . . .
Measures slightly larger than a7 size, so . . .

. . . there is a companion box envelope
to protect its built-up thickness.
(Envelope measures approx. 5.375" wide x 8" tall x .5" deep.)

ASSEMBLY:
1. Identify and cut the shapes:
A & B main cascade base left and right
with red and blue star panels for each
of the four side sections
C back outer panel with stars trio and USA
accent shapes and offset base shapes
D fire burst accent shape (you may wish to
reversed and cut a second layer & join
E front outer panel with oval plaque,
"4th" and "july" cutouts
F "firecracker word cut, with arch & mini star
G red, white, blue flag layers with base bar
H collection of small and large stars

2. Prepare the A & B left and right base cascade shapes by folding (backside to backside) at the center perforation only. (NOTE that the quarter position perforation lines are mostly positioning lines and are not actually folded.)
3. Align and slide the two slots pairs together to join the card . . .

. . . into one unit as shown here.
A diamond opening forms at the center, with free ends at top or back (tall) and bottom or front.

4. To continue the assembly, collapse the base shape by flattening the front and back onto the same plane, bringing the slotted positions together to touch inside the "diamond" opening.
When the base is completely flattened, place on a flat surface and apply pressure to fully set the creases

5. Un-collapse the base shape so that the side panel faces are exposed as shown here. NOTE that the end panels exposed are actually part of the left base panel which is underneath, while the center two panels are part of the right base panel.
Position "red" lower accent rectangles, centered and with bottom edges aligned and glue in place. Position and glue a "blue" stars panel above each.
Complete both sets of panels.

6. Re-collapse the card assembly as described in step 4 above.
Position the front panel, centered and slightly offset within the edges of the area defined by the front sections of the two base panels, and glue in place.
NOTE that it is the front panel here and the back panel (step 7) that help the cascade card hold its form.

7. Position the back panel, centered and slightly offset within the edges of the back sections area, and glue in place, except leave a margin along the top edge free from adhesive until . . .

. . . the fireburst shape button margin can be tucked into position between the back panel and the backs of the base panel.
The margin of burst shape should slide down to be completely concealed behind panel with top edges aligned. Apply glue as necessary to adhere the burst shape and panel in place.

8. Assemble the accent elements as shown.

The margin of burst shape should slide down to be completely concealed behind panel with top edges aligned. Apply glue as necessary to adhere the burst shape and panel in place.

8. Assemble the accent elements as shown.

9. Attach the stars trio and USA elements on the back panel.

10. Position the "firecracker" arch bottom ends in front of the tallest exposed panels, taking care to center and balance the word positioning.
11. Position the July 4th plaque on the front panel.

12. Insert the flag base arms into the slots at the side bends. NOTE it may be helpful to slide one end into slot, push in as far as possible, then slightly flex the flag base to allow opposite arm end into the corresponding sot.
Take care not to bend the arm.
Flag needs to be free to slide to allow card to un-collapse for display, and then re-collapse for sending, etc.

13. Position various stars and glue along the cascade edges as desired.
Here is the assembled card,
at least in one arrangement.
How will yours look in its final form?

I absolutely LOVE the style of this card! Amazing design!
ReplyDeletei just made this beautiful card for my 94 year old neighbor - from one 4th of july to another - can't wait to see her reaction. i did find an error is the cutting file where the flag is inserted. the cutting file has the cut in the fold line rather that behind it. i just cut a slot with my knife 3/4" past that fold and it worked perfectly. now i just have to figure out how to set up the closure for the envelope. the card and envelope are just beautiful.
ReplyDeleteGlad you had fun. The slot, by the way, was moved to be in line with the fold, thinking it would work better.
Deleteit fits perfectly when you do it like this while the card is open, but when you fold card the flag falls out. the base arms are just a bit shorter than the width of the card folded...sigh. but i still absolutely love the card and envelope!!!!!! how do all those circles make up the closure for the card? i just put a star on the flap with a button tied with red/white twine and slipped it into the cut opening. worked for me.
Delete