If you're hoping to construct the NoeL 3d Letter Box Ensemble, this tutorial will help with the customized 'e'. For other tutorials on the boxes construction, visit 3under3andmore.
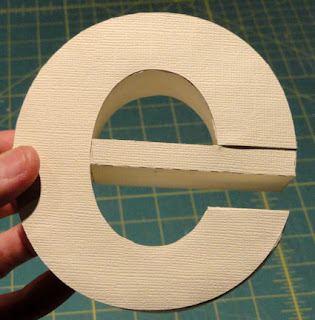
Here is the finished letter box.
It begins life as 'O'.
OVERVIEW of the construction steps:
1. Boxing sections are cut as they appear in the original file, then extra length trimmed away.
2. A LID and a BASE are each created, then base inserted behind lid and glued.
3. A custom bridge box (created by Jodi) is glued into place.

STEP 1. Cut the letter O Lid & Base face and boxing shapes as usual, enlarged to 125%. (The hand-written instructions indicate a different ratio of "135%").
Use the modified O shape (now it looks like 'C') from the attachment obtained by emailing Jodi at hearthsewnpatterns@yahoo.com
to mark the LID shape.
STEP 2. Rotary cut or scissor cut the new shape.
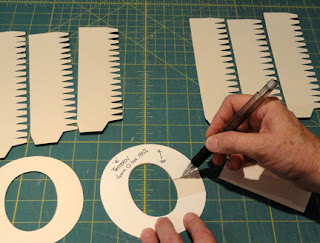
Also in this image you can see the shapes required for the O or new 'e'. There is a LID face shape (being trimmed), a BASE O shape (under the cutting template shape),
3 BASE boxing strips and 3 LID boxing shapes. The boxing strips have cut "notations" to show which 2 ends will join together for the outer curve. Inner curve requires only one strip alone.
Trim LID boxing strips to 1 1/2" wide and BASE boxing strips to 1 3/8" wide.
STEP 3. Use the newly cut LID shape, layered on top of the BASE 'O' shape to cut the new BASE shape. Trim the upper and lower cut edges 1/16" shorter so BASE will fit into LID.
STEP 4. Bend the flanges back into position as they will be used to glue to LID or BASE face backside surfaces.
Curl the boxing shapes into roughly the curves that will be needed. This imitates the curling of ribbon, only use the roundness of a forefinger as the strip is drawn slowly and gently, but with enough pressure to create the curve.
Outer boxing strips curl as shown.
Inner boxing strips curl opposite, with flanges extending upward.
STEP 5. Identify the inner curve boxing strip. Glue flanges to backside of inner edge of face shape, beginning at one short cut edge. Apply glue to only 2-3 notches at a time, shape and position fold edge at face edge and hold in place until dry. Continue around until entire inner edge is glued in place. Carefully trim away excess boxing, taking care that cut is PERPENDICULAR and squared up.
STEP 6. Follow the same process for the LID outer curve edge. Glue in place one boxing section. When it is secure, join the other box strip end by under-lapping the flange, then continue attaching. As with inner edge, trim excess boxing strip even with face shape cut edge, taking care to make perpendicular squared cut.
STEP 7. Fold and glue the lower "end" piece into place.
STEP 8. Repeat the boxing construction process for the BASE shapes.
When completed, insert the BASE into the LID shape. Glue to secure (use hot glue, if necessary).
STEP 9. Fold the provided custom "bridge" box into its rectangular, thin form. Only one side has a boxing tab. Glue both ends.
NOTE that there is a top layer boxing tab on the right end and an upper right extending tab. Fold the side tab into position and glue.
DO NOT bend the tabs over; they need to remain extended upward to fit into the 'e' opening.
STEP 10. Apply glue to the tab extensions.
STEP 11. Slide the tabs into place under the front and side edges respectively until it is as far as it can go. Bridge's horizontal top edge should be snug against straight cut edge of LID face. Hold securely until glue is dried.
Also note how the opposite short end of the bridge is now flush with the inside curve of the LID boxing.
STEP 12. Flex the bridge slightly to expose the inside edge. Apply hot glue carefully, then un-flex and reposition.
Make SURE that the LID face and BRIDGE face edges present a flat and continuous surface on the front, and that the bridge is parallel across the opening. Hold until glue cools.
Take care not to apply too much glue causing it to show to the front of the letter in an unsightly manner.
FINISHED!
And here it is, shown again, ready to decorate and fit into the ensemble!


No comments:
Post a Comment