
This classic “fries” box container
(made with a single
shape)
is a great way to package treats for special occasions.

Rim trim overlays
for front and back top edges
can set the color theme that is repeated
with
pleated rosette and circles trim.
Three-petal oxalis (shamrock) sprig
gives a
nod to St. Patrick’s Day.
Use other embellishment and color scheme
for holiday of
choice.
Measures approx. 5.374” tall x 3.25” deep x
3.75” wide when assembled.
ASSEMBLY: 1. Identify and cut the shapes:
A main hull shape B front accent rim strip
C back (inside or outside) accent rim strip
D front contrast band
E, F & G shamrock scallop medallion layers
H shamrock
I pleated rosette strips (2)
J rosette center securing circles (2)

 . . . carefully "pinching" along
the base curved perforation lines.


 . . . or on the outside face, shown here.


 Bend the hull shape into its cup form by bringing
the front side to overlap the back, with
the back lead edge being positioned at the dash cuts.


 . . . position and attach the band with holes
and bends aligned.

 Position and attach the shamrock
so that it is centered, covering the hole.

 Then bend the next perforation line back as
a "mountain" fold. Continue in alternating folds
in accordion fashion across the strip until
all perforation lines are folded and creased.
 It may be helpful to ensure consistent and
complete creasing to condense the accordion fold
into a tight stack and apply pressure all along
both edges.


 . . . the straight edges come together and can be
forced inward and down into a flat position.
 Push the pleats inward into the tightest formation
possible, then endeavor to hold in position while . . .
 . . . hot melt glue is applied around the center
opening, then quickly position (centered) one
of the securing circles over opening and glue
and hold in place until secure, while continuing . . .
 . . . to press the pleats inward all around, and
allowing the pleats to adjust to uniform
distance all around as glue solidifies.


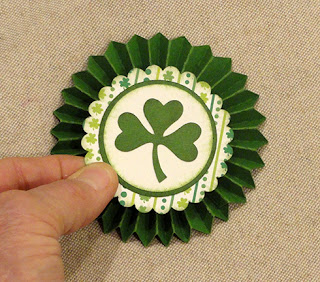 14. Position and attach the rosette unit
onto the front of the fries box, centering
over the guide punch circle.
(Hot melt or other quick-grab glue is suggested.)


A main hull shape B front accent rim strip
C back (inside or outside) accent rim strip
D front contrast band
E, F & G shamrock scallop medallion layers
H shamrock
I pleated rosette strips (2)
J rosette center securing circles (2)

2. Prepare the main hull shape by bending back
on middle flange tabs, along the pairs of front
and back vertical (partial) perforations, and . . .

the base curved perforation lines.

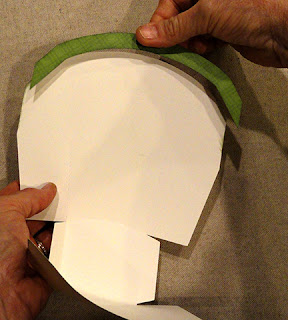
3. Position and attach the front rim accent strip,
matching the top edges.

4. Position and attach the back top rim contrast
accent strip, either on the inside face, shown
here (this is how the sample project is done) . . .


5. Prepare to align and join the side seams by
first bending in the bottom side flange tabs, then . . .

. . . identifying the alignment dash cuts on
the side area of the front panels.

the front side to overlap the back, with
the back lead edge being positioned at the dash cuts.

The bottom edges of the front and back should
align and square up at the bottom flange
perforation edge, and . . .

. . . the intersection at the rim areas should fall
at or very close to the angle on front side near edge.
Secure layers together, including the bottom
center flange tab. Repeat for second side seam.

6. Prepare the front accent band by bending
back on the vertical perforations slightly.
Identify the center alignment punch circles
on hull front panel and on accent panel, then . . .

and bends aligned.

7. Identify and prepare the medallion shapes,
then layer and attach the circles with
center hole punches aligned.

so that it is centered, covering the hole.

7. Prepare the two rosette pleat strips by first
bending the left end flange tab forward
as a "valley" fold.

a "mountain" fold. Continue in alternating folds
in accordion fashion across the strip until
all perforation lines are folded and creased.

complete creasing to condense the accordion fold
into a tight stack and apply pressure all along
both edges.

8. Line up the ends of the two strips so that
the plain straight edge of the left strip (as shown here)
overlaps the end tab of the right strip, bottom
edges lined up, and glue in place.

9. Form the strips unit into a ring to align
and join the second seam.

10. Prepare to assemble the rosette pleating by
arranging for quick-grab glue such as hot melt glue.
11. Place the pleating ring points downward on
work surface. With fingertips of both hands . . .

. . . begin to gather the top edges together,
condensing the pleats until . . .

forced inward and down into a flat position.

possible, then endeavor to hold in position while . . .

opening, then quickly position (centered) one
of the securing circles over opening and glue
and hold in place until secure, while continuing . . .

allowing the pleats to adjust to uniform
distance all around as glue solidifies.

12. Turn the rosette face side down and glue
the second circle in place centered over opening.

13. Position and attach the scallop medallion
onto the center front of the rosette.

onto the front of the fries box, centering
over the guide punch circle.
(Hot melt or other quick-grab glue is suggested.)

Here is the completed treat . . .

. . . ready to fill and gift as part of
a fun St. Patrick's Day holiday season.
Use different appropriate colors to prepare
a fries gift cup, and cut a different shape
to substitute at the center of the medallion.

No comments:
Post a Comment