Autumn Character gift tags (with optional base
that can also hold a "plastic" gift card inside) in this series include
Each features layered shapes onto tag base with top center
.2” diam. punch hole for ribbon loop.
Each measures approx. 2.6”
wide x 4.5” tall.
PUMPKIN TAG ASSEMBLY:
1. Identify and cut the shapes for the tag.
For this tutorial, the pumpkin is shown using
the plastic gift card-holding tag base.
1. Identify and cut the shapes for the tag.
For this tutorial, the pumpkin is shown using
the plastic gift card-holding tag base.
2. Position the contrast show-thru under panel
behind the main pumpkin shape, so that the eyes,
nose and mouth are fully covered . . .
. . . and glue to the backside of pumpkin panel.
3. Position and attach the center 'contour' pumpkin
upper and lower shapes, lining up edges that should
match, including the punch hole.
4. Position and attach the vine curl, then overlap
the leaf with punch hole openings aligned, pivot
to desired position, and glue in place.
5. Position and attach the pumpkin assembly
onto the tag base front, taking care to center
and also align the punch hole openings.
NOTE: if using the gift card holder base,
make sure that the tabs ARE NOT glued down
to pumpkin.
6. Place the gift card on the backside of the tag base
between the tabs.
Attach a ribbon loop through the holes
to complete the gift tag.
CROW TAG ASSEMBLY:
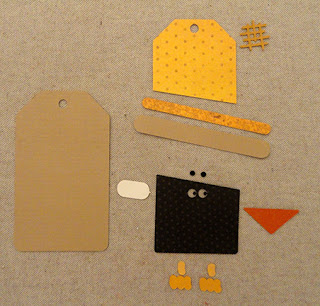
7. Identify and cut the shapes for the tag.
8. Position and attach the "eye whites" lozenge shape
behind the eye openings.
(NOTE: this image, below, shows the backside of
the crow head/body, with the white shape being attached.)
9. Position and attach the 'hat' upper tag shape onto
the tag base, taking care to align the punch hole openings,
with even offset margin around sides, then position
and attach the black head/body assembly below it with
diagonal edges abutted.
10. Center and attach the hat brim onto the brim base,
and the center 'toes' onto three-toes bases.
11. Position and attach the brim assembly with
lower edge aligned with the lower angle edge of 'hat'.
Position and attach the beak triangle below the eyes,
and each toes assembly along the bottom as shown.
12. Position and attach the separate eye circles over
the cut-in pupils of the head.
13. Attach a ribbon loop through the hole
to complete the gift tag.
SCARECROW TAG ASSEMBLY:
14. Identify and cut the shapes for the tag.
15. Reverse the head shape (face down), then position
and attach the contrast features shape over the cutouts.
16. Position and attach the 'hat' crown (black plaid)
over the tag base with hang hole openings aligned
and even offset margin around sides. Position and attach
the head assembly below it with diagonal edges abutted.
17. Position and attach the hat brim shape centered
onto the brim base shape.
18. Position and attach the brim assembly over the hat
shape lower angled edge. Position and attach the nose
triangle within the nose cut out shape. Position and attach
the hat patch where the side edges can align.
19. Attach a ribbon loop through the holes
to complete the gift tag.
Here is the completed tag.


No comments:
Post a Comment