This
simple sea critter is composed of body, claws and tail
that are built of stacked
shapes glued together into
thickened components. A .125” diam. wooden dowel
threaded
through body and claws provides the pivot
point,
with tail fan attached at a tail tip slot.
Top hanging twine is
integrated between layers,
with optional assembly to omit if preferred.
Measures approx. 2” tall x 5.25”
long x .75” deep
when assembled.
ASSEMBLY: 1. Identify and cut the shapes:
A body middle layers (sample uses the hanger loop mod) (6)
B notch shape for hanger loop option (6)
C right body layer with eye circle recess
D eye circles (fit into eye recess) (2)
E right body outer layers with eye punch (2)
F left body layer with eye circle recess
G left body outer layers with eye punch (2)
H claws main layers (11 for each of 2 sets)
I claws opposite outer layer (1 for each of 2 sets)
J tail shape (8, or quantity determined by test)
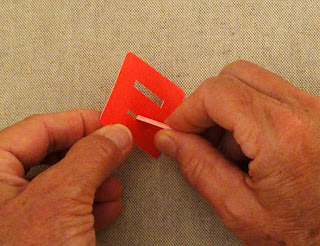
K testing window with slots for body and tail thickness
L testing strips (12)
2. To determine the accurate number of layers for
lobster body/claws and tail, stack the test strips
cut from card stock selected, then . . .
. . . fit into the narrower "tail" window.Repeat the process for the taller "body" window.
Use the resulting quantity to adjust the numbers
in the cutting list in step 1.
(Tail number is the more important of the two results.)
3. Layer the middle body shapes one by one into a stack,
taking GREAT care to line up all the edges as precisely
as possible, paying particular attention to the dowel
pivot opening.
Also stack and glue together the loop notch shapes.
NOTE is is essential for a liquid-glued up stack to
press the stack under a heavy flat weight such as
this fabric-covered re-purposed weight machine bar,
a wood plank, a heavy book or some other household
object that will not absorb any moisture from the drying glue
that might ruin the object. Leave the stack under the weight
for up to several hours, long enough for the glue to completely
dry. This will prevent warping and curling of the stack shape.
4. Position and attach the eye recess cut-out layer
onto the mid body stack, taking care HERE and
THROUGHOUT that all cut edges are precisely aligned.
5. Position and attach the eye punch in the recess.
6. Position and attach each of the 'front' or top layerswith the smaller eye cutout recess on top of the stack.
Press and allow glue to dry.
7. Reverse the stack so that the loop notch is up.
Cut a loop of perle cotton or soft twine approx. 10"
long, put ends together and tie a knot.
Position opposite center loop into the recess . . .
into the notch cutout, wedging the loop securely in place.
Here is the view from the top showing that the twine
is exiting from around the notch at top thickened edge
of body stack.
8. Repeat Steps 4-6 for the opposite lobster side . . .
. . . enclosing the notch and loop.
Press and allow glue to dry.
9. Layer the main claw shape into a stack of 11
with all edges and dowel hole precisely aligned
as described in Step 3 for body. Then . . .
. . . position and attach the reverse shape claw
on the backside.
Repeat for second claw.
Press and allow glue to dry.
10. Position and attach the tail shapes into a stack
with all edges precisely lined up.
Press and allow glue to dry.
12. Prepare the pivot dowel by hand cutting a 1" length from
the .125" diam. wooden dowel. Sand the cut end smooth.
12. Insert the dowel first end into one claw and push through
to extend approx. 1/8th" on the other side.
Push the dowel 'long end' through the lobster body
and leave a space approx. 1/8" from claw.
Push final claw onto remaining end with approx.
1/8" between and beyond.
Here you can see the assembly profile from the top.
NOTE: the dowel should fit tightly to hold the components
into position, but once they are pivoted more than a little,
the hole will loosen up. If desired, select the final positioning
of the claws in relation to the body, and glue in place on dowel.
13. Add a dab of glue to the tail slot on body end,
then insert the tail narrow edge edge between
slot 'arms', centered, until fully pushed in.
Make minor adjustment if needed, then allow to dry.
Here is the completed lobster ornament.


No comments:
Post a Comment