
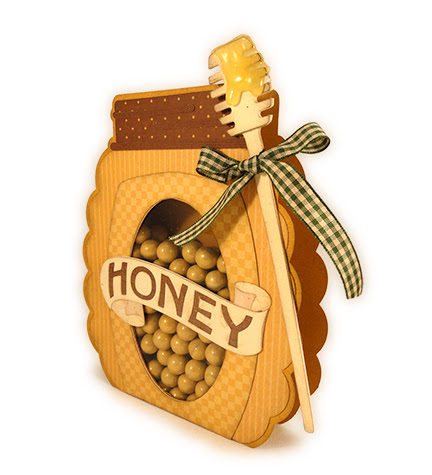
Front
and back panels camouflage the candy treat
container between. Front oval window cut through
multiple layers offers a glimpse of sweets inside.
Honey welded word banner
accent can be overlaid
across the front panel.

Box container is assembled, and
then attached within
guide marks aligned at bottom between jar front
and back
assemblies.
Jar container measures approx. 5” wide x 5.87” tall
x .85 deep when
fully assembled.
ASSEMBLY: 1. Identify and cut the shapes:
A front panel base
B front panel jar main shape
C front panel contour shape
D lid assembly: main silhouette, bottom rim,
left and right partial "threading" strips
E honey banner layers: letters "stencil" including separate 'o';
contrast layer to show thru layers;
dark curl shadow reveals; bottom mid-curl base layer
F front window clear liner
G back panel base H back panel jar main shape
I container box
J honey dipper build up layers stick/head (4)
K honey dipper head build up layers (4)

Prepare the container box by bending back on all
perforation lines for panels, lid, tabs and flanges.
 3. Prepare clear window panel by applying narrow

double stick tape such as this Kool Tak 1/8" wide
tape which has a removable (red) backer . . .


. . . then position sticky-side down on the backside of
the window panel, within the panel-defining perf lines,
and to cover the oval cut out.

the plain side edge to overlap the edge flange
to perforation line on opposite side. Adjust for
best top to bottom alignment, then complete the seam.

conveniently apply fingertip pressure all along edge.
 5. Pop the box back to dimensional configuration,

then bend the bottom side tabs inward, bend bottom
panel into position, tuck its flange into box bottom,
and attach in place in "closed" position.
 6. Position and attach the front accent shape onto

the front base shape, bottom edges aligned,
other edges offset with narrow margin.
 7. Prepare the lid accent shape by positioning

and attaching the bottom rim along bottom edge,
"screw-on" thread strips one on each side where
the side edge shaping indicates and small guide cuts
near center help to align perpendicular to rim and top.
 8. Position and attach the lid accent and front contour

accent shapes onto front panel assembly.
 9. Position and attach the back accent panel to

the back base shape.
 10. Prepare to assemble the "honey" banner accent

by identifying and becoming familiar with the layers
as shown, top to bottom:
A) word "stencil" layer, including the separate 'O' interior
B) contrast second layer
C) curl shadow third layer
D) base layer
 11. Position and attach the contrast layer to

the backside of the front layer. Also position
and attach the O interior shape inside O exterior window.
12. Position and attach the "honey" assembly onto
the curl shadow layer.
 13. Position and attach the assembly from step 12

onto the base shape.
Position and attach the banner across the front window
of the front panel assembly (refer to opening thumbnail
or see step 17).
 14. Prepare the honey dipper accent by layering

the four stick shapes and attaching into a stack,
taking care to align all cut edges as precisely as
possible. Repeat for the four head shapes.
15. Position the head stack onto the stick
stack with edges aligned precisely and attach.
Press flat under a heavy flat weight until
completely dried.

16. Place the jar back panel assembly face down on
work surface and locate the side alignment dash lines.

Position the backside of the container box (with
adhesive applied) onto the panel backside, matching
the box side edges to guide marks,
and bottom edges even, and attach in place.

17. Repeat the process to position and align box front
edges to guide marks on backside of front panel
assembly, bottom edges even, and attach in place.

18. To close the box container when filled,
bend top side tabs inward, top downward, tucking
flap into container at back.

19. To tie the dipper accent into place, punch or pierce
a small (1/8") hole through the front panel assembly layers
in the approx. position shown here, then thread
narrow ribbon through . . .

. . . then tie the dipper in place. Add dab of glue
or sticky dot to help it stay in desired position.

This is so cute <3 Gotta make them all <3
ReplyDelete