
Multiple folds create a vertical corrugated surface
for the egg in this Easter arrangement, attached by tiny
for the egg in this Easter arrangement, attached by tiny
positioning tabs and end crescents on the whole egg “front”.
Other whole egg shapes are layered and attached behind
the pleated front assembly for thickness and strength.
Egg is decorated with small heart and cross band.
Base tag and accent front hold other elements:
“E A S T E R” print & cut tiles, love welded word,
dimensional rolled flower, long & short leafy sprigs.
Completed tag can be attached to
a hostess gift bouquet (or other gifts),
or simply as a seasonal decoration.
Tag measures approx. 3.28” wide x 6.25” tall
when assembled.
ASSEMBLY: 1. Identify and cut the shapes:
A tag base front panel accent B tag base
C pleated (corrugated) egg shape
D base for egg shape with slots
E base egg build up shape for thickness (4-6)
F cross band G accent heart H accent 'love" word cut
I sprigs with leaves and berries accents tall & med.
J "E A S T E R" letter tiles to print & cut
K spiral blossom with circle base

for thickened egg, taking care to align all outer edges
as precisely as possible. Press under a flat heavy weight
for several hours or overnight to ensure flatness and
prevent warping or curling.
3. Beginning at the center perforation line for the pleated
egg shape, making a 'mountain' fold at center.

Working toward each side edge, fold remaining perforation
lines in alternating 'valley' then 'mountain' folds.
NOTE that the side-most folds will be 'valley' folds.
Also note that the small tabs at intermediate fold lines
('valley" should be allowed to pop free from the folded edge.)

the shape so that all the folds get "stacked", then . . .


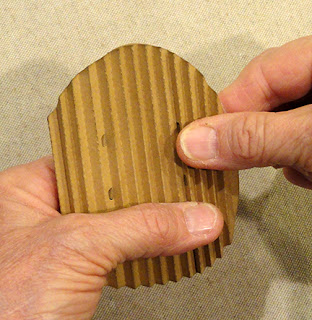
 4. Position the pleated egg shape backside down

. . . apply strong pressure all along the stack to ensure
that all the fold lines are thoroughly creased.

This is help the fanning of pleats to happen in
a consistent pattern.

onto egg base, apply glue to tabs, then insert
into the slots on corresponding side (right side shown).
 On the underside of assembly, bend the tabs outward

and press in place to attach to base egg.
 5. When tabs from previous step are secure in place,

lift the outer portion of pleated egg and apply glue
to the edge, and also in a zig zag across
the rest of exposed base panel. Then . . .
 . . . reposition the outer portion of pleated egg to

align the final segment flat against the base's surface
and secure in place. At the same time . . .
 . . . allow or assist the pleat sequence between tabs

and edge to even out to consistent configuration,
then apply pressure to secure the inward ridges in place.
 Insert the tabs into slots and glue in place,

6. Repeat the process for the opposite side of pleated
egg and tabs, first lifting the center portion and applying
a zigzag of glue from top to bottom.

while at the same time assisting/allowing pleats to
adjust to regular, evenly-spaced arrangement
across middle.
 7. Repeat step 5 for the left side of pleated egg

and edge.
 NOTE that the pleating across the whole egg should

be assisted to be even and regularly-spaced
as can be seen in the following edge-view image.
 Also, at edges, while glue is still workable, push/ease

the pleating inward to align as closely as possible
with the base oval edges, then hold in place
until glue dries.

the front of the layered for thickness egg base,
with outer edges aligned.


9. Position the cross band accent across egg assembly,
with straight edges placed at perpendicular to pleats,
and adjust up or down until shaped side edges of band
and egg match up, and attach in place.

10. Position the accent heart, centered over egg
at the position where the tiny tab "irregularities"
will be hidden just below the top curved edges
of heart, and glue in place.

11. Position the egg assembly onto the joined
tag base layers, centered, and with margin below
bottom edge that matches the side margin space,
and attach in place.

12. Follow "Print & Cut" procedures to print
and cut out the letter tiles that spell EASTER.
Position above egg and below punch ribbon hole,
and justified toward the right edge of front
tag layer, and attach in place.
Also position the welded word centered
on top of the cross band, overlapping the heart.

13. If desired to add jute string around egg edge,
apply glue at edge, then . . .

. . . wrap string snugly at egg edge, with the beginning
"splice" positioned at center left edge.
Trim string ends so that they abut.

14. To create the spiral blossom accent, follow this LINK
to a previous tutorial for a different project,
referring to steps 15-19. Then return to this post.

15. Arrange the sprigs at the left edge of the egg,
with spiral blossom on top concealing
the overlapping stems.
Embellish as desired. Sample project includes:
fine jute string bow loops cluster at left edge
(under sprigs), purchased and trimmed silk blossom,
berry short sprigs (white), wide slat-end ribbon
threaded through top center hole and tied with
narrow contrast ribbon in knot and bow.


WONDERFUL!!!
ReplyDeleteLOVE your AMAZING corrugated egg, look forward to trying it :)