
Wood block style 3D box composed of
angular lid and
base that fit closely together. Bump-out skull with
recessed
eye sockets and nose fits onto front panel
with tabs and slots.

Layered-for-thickness
eyeballs with pupils
(or substitute large stud jewels) add a spark of life.
Great
as a base-standing decoration with
lid and base walls glued together,
or use as
a gift box with lid and base that can be
opened and closed.

Block box measures
approx. 6” tall x 5.72” wide
x 1.5” deep (plus .3 deep bump-out) when closed.
(Requires 12x12 cutting capacity and card stock.)
(This tutorial is under construction.
Please return soon to view
the completed assembly guide.)
ASSEMBLY: 1. Identify and cut the shapes:
A LID front panel
B LID upper boxing strip C LID lower boxing strip
D BASE front panel
(Not shows is the BASE panel overlay
that is attached on outside bottom of BASE)
E BASE upper boxing strip
F BASE lower boxing strip
G BASE cross brace boxing strip
H LID front panel overlay with slots
I eyes contrast J bump out assembly front panel
K bump out upper & lower narrow boxing strips
L bump out eyes and nose openings narrow boxing
M bump out front panel overlay
N large eye ball layers (8) and pupil layers (4)
O smaller eye ball layers (8) and pupil layers (4)

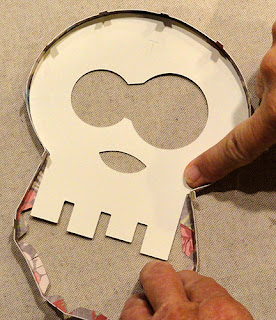
Compare the front panels so that they are used
in the correct positions. At left in this image, the LID
front panel overlay includes slots. At center, the LID
assembly front panel includes the 'L' symbol.
At right, the BASE bottom panel that includes 'B',
and not shown, the outer bottom panel which is blank.

Also NOTE that the boxing strips for LID and BASE include
tiny symbols near ends that indicate how ends
join. Single symbols indicate LID strips; double
symbols indicate BASE strips.

2. Complete the "pre assembly" steps so that glue-ups
can be drying as other assembly is completed:
A) layer & attach the large and small eye ball circles into
separate stacks of 8, taking care that outer edges
and hole punch edges are aligned as precisely as
possible;

B) layer & attach the pupil circles into
separate stacks of 4, taking care that outer edges
are aligned as precisely as possible.

until thoroughly dried, for several hours or over night.
This will help prevent warping or curling of multiple
shapes glued with liquid adhesive.

on front of the LID front panel overlay (with slots).
Press under a heavy flat weight until dried.
 BASE & LID ASSEMBLY

3. Prepare the BASE upper boxing strip by bending
back on cross perforations for segments and end tabs,
and back for bottom tabs.

on cross perforations and tabs in similar manner . . .
 . . . then join the strips at ends as shown by

matching double symbols.
 5. With boxing form tabs/bottom down , apply glue

to the tabs interior surface all around. Insert the BASE
panel (with 'B') face down into the boxing, adjust
so that center top, side angles and bottom corners
conform to panel shape.
 Apply fingertip pressure all around until ALL tabs

are attached securely in place.
 6. Prepare the cross-brace strip by bending back

side and bottom flanges. Position at the middle angle
of BASE compartment so that side tab perforations
align at angle perforations, then . . .


taking care that edges align as closely as possible
to box edges. Apply pressure to ensure attachment.
8. Repeat steps 3-5 to complete the LID in
similar fashion.

9. Bump out form is composed of front panel,
curved boxing strip for upper curved edge,
and multiple cross perforations lower strip.
 Prepare the upper strip by adding back curl using

a rod-like tool such as this round shaft pencil.
 Bend the small tabs ALL back.
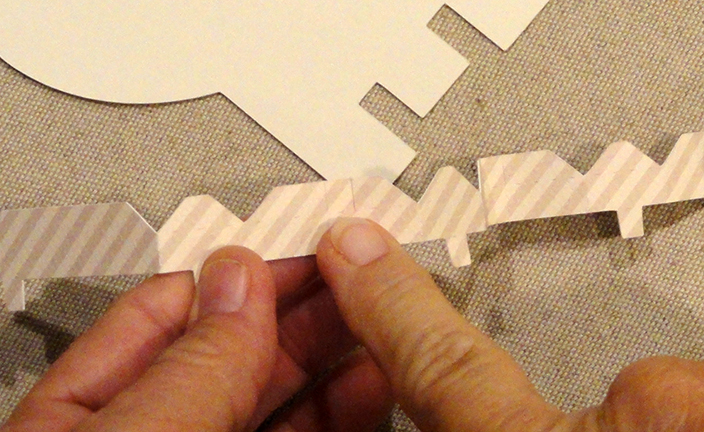
 10. Bend the lower strip to match the crenelation


shape of panel.
 NOTE that the angled tab cuts will bend back and

the straight line tab cuts will bend forward.
Do NOT bend the lower edge tabs at this time.
 11. Bend end tabs forward. Join upper and lower
strips at ends.
 12. With strip tabs bent inward, and positioned

downward, apply glue to tabs backside
all around.
 Fit the assembly front panel inside ring and

orient so that mid-side angles align with
strips joint.
 Fit the strip at side angles, then apply fingertip

pressure to layers at beginning of upper (rounded)
portion until they are secure in place,
then . . .

. . . apply fingertip pressure all around to firmly
attach in place, allowing the strip to adjust if needed
to the rounded shape so it is even and well fitted.

13. Apply glue to tabs backsides along lower strip,
then bend to fit between the 'teeth' crenelations.

Apply pressure to snug the bends to hug
the panel edge.

Use a spatula tool or equivalent to further assist
getting the boxing to fit the panel edges.

This is the bump out assembly as completed
to this stage.

14. Prepare the eyes opening bump out boxing by
bending back slightly at the cross perforation lines
for the narrow straight portions near end tab
and at mid point.

Also add tight forward curl
using round-barreled pencil or similar tool.

15. Form the strip into a "ring" and join seam.

Bend edge tabs back, and make sure that ALL
cut tab-defining edges and disconnected.

16. NOTE that the straight edge tabs should be
ON TOP of the curved edge tabs as the strip
is attached behind the eye opening edge.

With bump out assembly face down apply glue
to upper straight edge ONLY. Fit the upper straight edge at
corresponding opening edge, align tab edge as precisely
as possible to panel edge, and

. . . apply fingertip pressure
until firmly attached. Repeat this preliminary step
for the lower straight edge, at corresponding panel edge.
17. Apply glue around backside at (between panel
and strip tabs) at opening edge of large OR small
opening for the approx. width of tabs. Then work to shape
strip so that perf bends align at panel opening
edges as precisely as possible.
18. Repeat step 17 for the remaining portion
of opening and unattached strip tabs.
Apply pressure all around to secure strip at opening edge.

19. Prepare the nose bump out strip in similar manner
to add curl, position with corresponding upper and lower
oval edges at panel opening edges, make adjustments,
and attach tabs in place, etc.

20. Position and attach bump out overlay panel.

21. Position bump out over the LID front panel
overlay and align tabs with slots, then insert tabs.

At backside, bend tabs inward and glue in place.
(Quick grab adhesive such as Fabri-Tack is suggested.)

22. Position large and smaller size eye ball stacks
in place within eyes recess, aligning punch holes
of discs with those on panel/contrast panel.

Position pupils stacks, centered over punch holes.
Apply pressure to securely attach in place.

If desired, position and attach large size black
low-relief studs on top of pupils to provide highlights.

23. Position the bump out/overlay assembly over
LID front panel and attach securely in place.
(Quick grab glue recommended.)

24. To close the box, insert the BASE within
the LID, then . . .

. . . slide fully together.

If you plan to use the box as a BOX, do not apply
glue between layers. However, if this will be
a decoration only, it may help to snug the two layers
together by applying quick grab glue between
at side angles and other strategic placed all around
as deemed necessary. Apply hand pressure for
accurate and full attachment.


No comments:
Post a Comment