
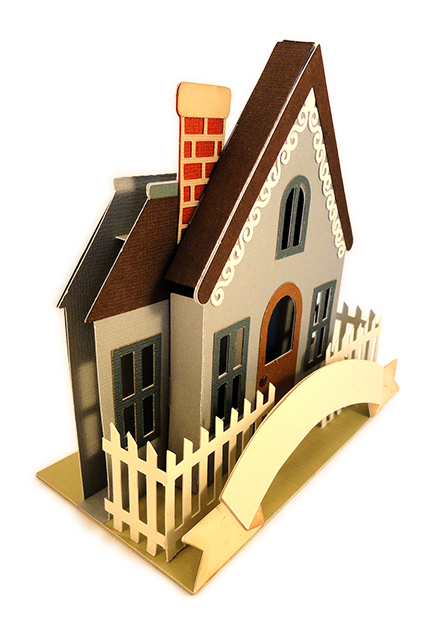
Detailed
house has gable front, main house and back
which “pop” out to add depth to this
traditional house,
with picket fence section and arched banner providing
additional dimension.

Connector tabs and slots help with assembly and
alignment.
Back panel fold opens upward to reveal one of two sizes
of optional
pockets for half-fold paper bill or
standard gift card housewarming gift.

Card pops
open to be approx. 5.6” tall x 6” wide,
folds flat for giving to be 7.75” tall.
Coordinated “print & cut” banner fronts to convey
“Happy New Home” ,
“Welcome Home” or “Memories Await”
plus an over-size envelope are available as
separate files
(“Banner Arched House Warming Pair” and
“Banner Lrg Arched Pair
for New House”).
Find the assembly guide for the large twine tie envelope
by following this LINK.
ASSEMBLY: 1. Identify and cut the shapes:
A main house wall with window frames
B card back with opening panel for gift card pocket
C gift card (or alternative cash bill) pocket
D contrast roof with top ridge rail
E roof connector duplicate
F front house gable wall
G contrast roof panel overlays
H front roof trim contrast overlay
I "gingerbread" trim overlay
J chimney assembly: base, bricks overlay, capstone
K house front gable overlay with window frames
L door and knob circle overlay
M picket fence left & right sections
N base top layer with attached banner base
O base build up layers (3-4), bottom layer
P banner layers: base, fold back & top
(shown with a "print & cut" optional front)
Q opt. instructions card for recipient
NOT SHOWN: half circle "stop" tabs (2 pair 3-4 ea.)

2. Complete these prep steps prior to assembling
the house itself:
A) layer and glue together the "stop" tabs into
2 stacks of 3 or 4 each, taking care to align all
cut edges carefully; press under flat weight 'til dry.

 press under a heavy flat weight such as this muslin-covered

B) layer the base back and build-up layers and
glue together into a stack, taking care to align
all cut edges as carefully as possible;

re-purposed weight bar until completely dry,
several hours or overnight, to help minimize warping
or curling of the glued-up shape.


 F) position and attach roof trim assembly onto

C) prepare the main house front by bending back
the flange on bottom, bending out/forward the cut-in
connector tab near top gable point; bend end tab
of connector forward.

D) position and attach the contrast roof overlay on
main front, window frame overlays and door onto
respective main front or front gable overlay panels;
press under flat weight until dry.

E) position and attach the roof front trim shape over
the top of the "gingerbread" trim shape, with top
and rounded end edges aligned precisely; press flat.

house front gable overlay; position and attach
the doorknob in place; press flat until dry.
 G) prepare the back closing panel by bending

back along top ridge halfway perforation line,
then bend the second perforation line on
back opening panel up/forward.
H) prep selected gift card or bill pocket by bending
slightly forward at side, bottom flanges;
position centered on inward half (below slots),
then apply glue to the flanges and attach in place.
 I) apply glue to the narrow margin between

the 2 perforation lines, then press together to
attach the narrow margin to back panel only
along the narrow margin, to help back panel
lay more flat for the final card appearance.
 J) prepare the front gable panel by bending back

on roof flanges, top tab, side walls;
bend forward at bottom connector tabs.


outline shape over the contrast "bricks" whole layer,
then the capstone over the upper portion.
 M) position and attach the chimney unit

over the main house panel, aligning corresponding
edges, also making sure that the slot openings
remain free and clear; press all under flat weight.
 N) prepare the connector main house panel by

bending the embedded tabs forward/up, with
the end tabs also bent up.
 O) position the connector panel behind the main house

panel assembly so that roof, chimney and slant side
walls, etc., align precisely; make sure that connector
tabs remain free and unattached.
NOTE that the main house panel is shown here
inverted to be face down.

HOUSE AND CARD ASSEMBLY

3. Position the gable house panel in front of
the main house panel, with the top connector tab
extended forward to insert through gable slot.
Once inserted, check that end tab perforation is
aligned at slot edge, then bend down and attach.
 4. Position the front gable overlay assembly

over front gable panel (attached with tab),
align so that edges align with edges or
corresponding perforations and glue in place.
Press until thoroughly attached and dry.

5. Prepare the base top layer by bending
the banner base portion back.

Assemble the banner by layering and attaching
middle (simulates folding) and top layer to
base layer with all centered, edges matching.

Position the assembled banner over the top front
of corresponding attached portion of base top layer.
Press under flat weight until dry.

6. Handling carefully, position the house walls
assembly over the base top layer so that
the lower tabs of front wall can be inserted into
corresponding front slots.
NOTE that the picket fence slots are in front
of the front wall slots.

bend slots downward* toward bottom of house,
and glue in place.
*NOTE this is opposite what is shown in photo

position on top of base so that back edge aligns
with front edge of base slots, side edges even.


tabs panel upward, then tuck bottom tabs into
slots just behind main house panel flange.
 Once inserted, bend tabs down (toward back)

and glue in place.
 9. At top of card, insert tabs on upper back of

main house panel into corresponding slots
near top of back panel. Once inserted, bend end tabs
up and glue in place.

the assembly flat, taking care that connector tab
perforations do not tear.


11. Prepare the picket fence sections by
bending at the vertical "corner" perf cuts,
also bending bottom tabs forward and back end
tiny tabs back.

12. Insert the front tabs into the remaining slots
on base top layer.

On the backside, bend tabs downward* and glue
in place. Repeat for the second fence section.
*NOTE this is opposite what is shown in photo.

NOTE: When the card is in open and the house in
upright position, the back fence segment will be bent
into position with end tabs tucked behind
the main house panel.

PREPARING CARD FOR DISPLAY & SENDING
13. While the card is not quite complete, for final attachment
of base, the card needs to be in its final form.
To open and display the card, place the base flat
on table top. Bend the tabbed roof of front panel
back into position - perpendicular to main panel -
then the opposite roof panel back to overlap
previous roof tab.

Slip the short tabs of roof into associated slots,
first one side, then . . .

. . . the other. Also bend the side walls back in
similar fashion, and tuck tabs into corresponding slots.

14. At back of card, close the panel that opens to reveal
the gift pocket so it is touching and flat, then position
the two "stop" tabs snug against the bottom of panel
at the one-third positions, and attach firmly to top
of the base top panel. Hold in place until firmly attached.

15. Apply glue to the top of the base build-up stack,
then position underside of base top layer over stack . . .

. . . and glue in place. Try to apply fingertip pressure
between house layers, at front of house around
fence segments, and at back.

Here is the prepared card in "open" form.

16. Lift the back panel, tuck the gift card or cash bill
into pocket. Close the back panel.

17. To flatten the card to give or send, bend roof walls
and side walls to flat position. Fold side fence segments
to lie in front of attached fence segments.
Bend banner arch upward (normal position).

If using the coordinated twine and discs envelope,
carefully ease it into the envelope opening,
bottom first, then . . .

. . . close flap and wrap twine in figure 8 to secure.

Here is the completed card.
No comments:
Post a Comment