A front/side hull shape B back/side hull shape
C front accent with heart bump out shapes (2)
D back accent shape
E & F side accent shapes
G wing front & back, build up layers (7-8)
H arm tubes I cuff shapes (2)
J hand accent overlays (2 sets)
K buttons (real pair used for sample)
L wave accent front and build up layers (8)
M tiny heart dangler (5 each for 3 hearts)
N optional circle opening contrast backing
O face main 3D shape P face shape Q nose, eyes
R head front (with bottom tab) with neck overlay
S head mid build up layers (7)
T head back (with bottom tab) with neck overlay
U head back build up layers (8-9)
V bow shapes with build up (3 each)
NOT SHOWN: optional hull top reinforcement
build up (9)
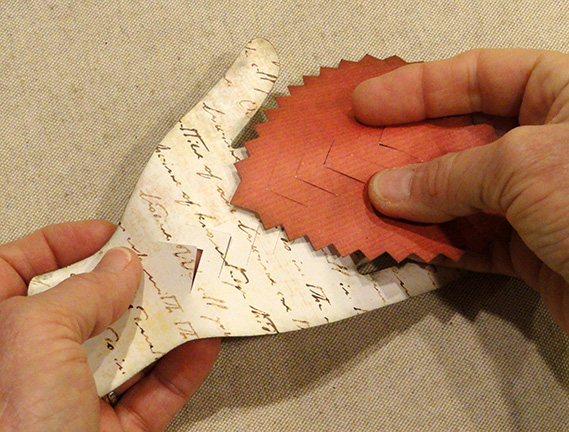
2. Stack, layer and glue together the wing cutouts
into one thickened shape (approx. 1/8").
NOTE: the sample project includes contrast
front and back layers with brown core
layers in between.
For ALL components that are stacked and glued up,
it will be helpful and ensure a better final project
if a flat weight is placed over the drying stack
to keep it flat and avoid warping and curling
until the liquid adhesive has completely dried.
In this picture, a muslin-covered re-purposed
weight machine bar weight is used to press
the wings shape while drying.
2. Consider skipping the assembly progression
in steps order to read and execute the steps
that show other layering and gluing up required
so that those pieces can be drying during other
construction steps. See step17 & 18 for Hair,
step 35 for Wavy Stripe,
step 33 for mini Heart Charms, step 31 for Bows.
3. Prepare the front and back body (hull) shapes
by bending back on all perforation lines for body
panels, bottom tabs, side and top tabs.
NOTE that in the final cut file, the front body includes
the slots for the heart bump out and arm attachment
punch holes. The back body includes the wing
attachment punch holes and arm attachment
punch holes.
4. Prepare the Heart bump out shapes
by bending back on all perforation lines
except bend edge tabs forward.
For add-on top boxing strip, bend center
vertical perforation line face-to-face,
tabs forward.
5. Join the tiny heart side seams by bending
so that straight edge overlaps the wedge tab
to the perforation line(s).
6. Attach the add-on boxing top strip segment
at one end by overlapping the straight edge
over opposite tab perf line, and gluing in place.
Bend the remainder of the strip into position with
top tabs being overlapped by corresponding
straight edges and glue in place, including the final
edge and end tabs which should be positioned
and attached in one combination process.
(Skip to complete Step 8.)
7. Insert the heart tabs through the hull front (NOTE
that the design was modified after these images
were taken so that adding the heart happens
after step 8, next), bend the tabs outward
on the hull backside, and glue in place.
8. Position and attach accent shapes to hull
front and back shapes - including sides and top.
(Return to complete Step 7.)
9. Position front body side straight edge over
the corresponding side long tab, adjust top
and bottom and glue seam.
10. Form the hull into a triangular tube to bring
together the remaining free side edges, then
overlap, position and attach the second side seam
as for the first seam in Step 9.
NOTE it may be helpful to insert a long "press-against"
tool such as a dowel or rod behind the seam
while working to get seam attached smoothly
and completely.
11. Bend the bottom flanges up inside the hull
and glue each in place to the backside.
12. Prepare the head, face and nose shapes
by bending back on all perforations lines,
except bend forward at edge tabs.
13. Shape the head by bending to align
straight edges at upper side to overlap corresponding
tabs at perforation lines to complete two-segment
seam as shown here. Then . . .
. . . bend to complete the upper side seam
in similar manner. Then . . .
. . . bend the bottom side segment to join seam,
and . . .
. . . complete the first part of the two-segment seam that
is roughly right angled, and then . . .
. . . the second part.
Complete the seams at the other side of the head
in the same manner.
14. Insert the edge tabs of head into the FRONT
hair shape that contains slots, then . . .
. . . bend the tabs outward, trimming any
that overlap beyond the hair's edge . . .
. . . and glue in place.
15. Insert the nose tabs into face overlay . . .
. . . bend outward on the backside and
glue in place.
16. Position face unit, centered, on front
of head and glue in place.
Also position and glue the neck overlay shape
over the matching portion of the FRONT hair neck.
17. Stack and glue together the middle hair shapes,
taking care here and in any other layering steps
to line up all cut edges as precisely as possible,
and use flat weight while shapes are drying.
 18. Stack and glue up the back hair shapes.
19. Position and attach the BACK middle hair
layer which includes the bottom tab onto
the back of the middle hair stack created in
step 17 above.
Also position and attach the BACK neck accent
shape below the back hair build up edge.
18. Stack and glue up the back hair shapes.
19. Position and attach the BACK middle hair
layer which includes the bottom tab onto
the back of the middle hair stack created in
step 17 above.
Also position and attach the BACK neck accent
shape below the back hair build up edge.
20. Position and attach the back hair stack
behind the BACK middle hair layer attached
in step 19 above.
21. Position the front hair with head/face shapes
onto the FRONT of the hair assembly.
(NOTE that the face overlay should be
in place in this photo.)
22. Prepare the arm shape by bending back on
all perforations, except bend the top end tab
forward.
23. Form the arm shapes into a tube
to bring the straight edge to overlap
the opposite tab, and join seam.
Take care while joining that the ends
of tab and edge remain properly aligned,
because it is possible to skew this tube.
Check for "squareness" by placing
under face on flat surface during
joining before glue is set.
24. At top end, bend side tabs inward,
bend front two-part end tab to connect at
side tabs, with rounded end tab lining up
with rounded underside end tab extension.
25. At bottom end, bend end and side tabs of two
angled edges inward, bend "hand" contour
extensions to align with tab perforations,
and glue in place.
26. Position and attach the center flesh-tone
accent (bent at perf) and side flesh-tone accents
onto the arm tube where they should match
panel edges.
27. Prepare cuff shapes by bending long perf lines
back, short front edge tabs upward.
28. Apply glue to front tabs, along side edges,
then . . .
. . . position tab ends even at hand upper
straight edges on top and sides, also
position straight side edges of cuff along
arm tube straight side edges, and glue in place.
29. Position each arm on hull side with top
punch holes lined up with body punch holes,
and glue under surface in place, for stationary
arms. For arms that pivot, don't glue in place,
but position buttons at punch holes, then . . .
. . . attach buttons and arms to body with two
strands of perle cotton or twine, using a long
needle as shown.
Tie off twine ends with double knots.
30. Position and attach wings unit using two
regular size head decorative brads (with
glue assist). Bend brad prongs back inside body.
31. Stack and attach the layers of the two bow
shapes, carefully aligning cut edges, and
using flat weight to press while drying.
32. Layer the two bow units with hole punches
aligned, then position and attach with mini
decorative brad (with glue assist) through
front top center hole.
33. Stack and glue up three mini heart charms
using 5 layers for each.
34. Attach twine or button thread to each.
35. Stack and layer the wavy stripe shapes into
TWO stacks (front and back). If using a different
front accent layer like the model, it will go onto
the front of the front stack.
36. Position each heart charm centered
behind wavy stripe windows, then . . .
. . . glue twine in place at top behind front stack,
trim excess twine slightly below top of stripe,
then position front stack half over back half and
glue layers together. Press with flat weights.
37. If desired, position contrast window back
circle shapes onto back of stack and hold in place
with small strips of cello tape.
Here is the prepared wavy stripe unit.
38. Position the wavy stripe unit onto body front
parallel to bottom hem edge, with ends
slightly extending beyond body sides as shown.
Glue in place.
39. Insert neck end tabs through body top panel
slot, bend tabs outward and glue in place
under top panel.
40. Stack and glue up the neck reinforcement
panel.
41. Position, centered, under top panel,
covering the neck attachment tabs.
42. Apply quick-grab glue such as Fabri-Tack
to thick edges of build-up rectangle.
Bend body side tabs flat inside.
"Close" top panel into final position,
tucking back tab into opening, and glue in place,
holding neck in proper position until glue is set.
Here is the completed folk angel figure.