Showing posts with label heart. Show all posts

Tuesday, February 7, 2017

Heart Echo Strips Ornament

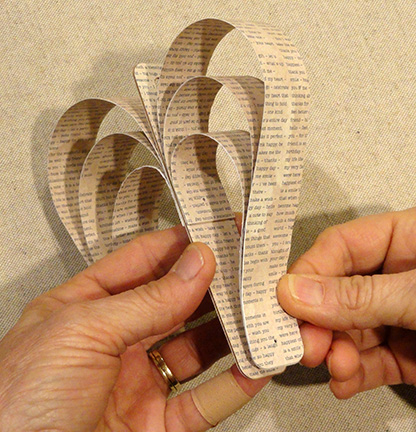
Three strips arch on each side 
to create an "echo" heart, 
attach to reinforced hanger center strip. 
Tie a ribbon bow and loop a hanging string 
to provide fun and unique decoration for 
Valentine's Day or Christmas. 
Measures approx. 4.75" wide x 5" tall x 1" deep. 

ASSEMBLY: 1. Identify and cut the shapes:
NOTE this project will work with card stock
that has a single or double printed side(s) 
(providing the backside is acceptable) or
using printed paper weight (65 lb or less)
where a front and back for each strip is cut,
which is what this sample project has used.

Large strips: front & back for each left, right
Middle strips: two pair as for large
Short: two pair as for large
Center front & back face strips
Center reinforcement strips (2-3) (cut from
card stock or heavy card stock)
2. If using lighter paper, (liquid) glue the front
and back shapes together, for each
of the strip length pairs, taking care
that edges and punch holes line up
as accurately as possible.
3. Identify the bottom end of each
strip length as the rounded corner end.
4. Before the glue dries completely (if layering),
or as this step in the assembly, add
some curl to the top half of each strip by
running strip over a rod tool (such as this pen shaft)
while applying finger or thumb pressure.
Here is the completed curled strip.
5. Prepare the center "stem" strips by
layering the reinforcing layers together . . . 
. . . then attaching the face strips on
each side.
While the gluing cures place a flat weight
on top to help flatten and avoid warping
or curling.
6. Prepare a heart layout with the three
strip lengths on each side, center stem strip
in the middle.
7. Assembly each of 2 heart arch halves by gluing
the bottom ends of the sequence together,
matching up the bottom guide mark punch holes.
NOTE: apply glue at end and upward only
to barely above the punch hole on each strip.
Here is one arch half with bottom ends glued.
8. Bring the top ends together, aligning
the edges and punch holes, and glue
together as for bottom ends.
Complete this step for both arches.
9. Identify the center punch guide mark
on the center stem.
Also identify the dash guide marks on the
long strips that show the glue-to level.
Apply glue to the inside/underside surface
of the long strip of the first arch assembly
front end to the guide marks ONLY . . . 
. . . then position that end against the stem,
aligning punch circles, and making sure
side edges match up.
Repeat for the second arch on opposite side
of stem, then apply finger pressure until secure.
10. Curve each arch bottom end down into
position, then attach each in place, lining up
side edges and punch holes.
Apply finger pressure until both arch bottom ends
are secure. OR, use clips to hold in place.
11. Apply decorative nail heads over the
guide mark circles at bottom and at center,
as desired.
12. Tie a length of ribbon (18" approx.)
through the stem's top hole.
To hang, create a loop of twine with tied ends,
and loop through the end hole . . .
. . . then thread knot end through loop.
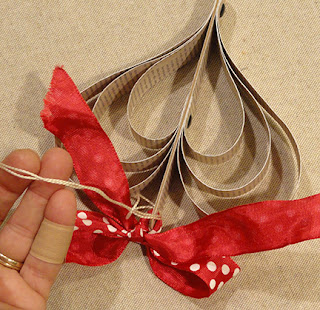
Here is the completed Heart Echo ornament.


Tuesday, February 4, 2014

Patchwork Fabric Valentine Card

This unique patchwork valentine card
is the project that students are currently working to create
in an "Introduction to the Silhouette System" class
being taught in a Salt Lake City area quilt store.
The design combines two downloadable cut designs
from SnapDragon Snippets:
february docket quilt block
4 vintage scallop with hearts card front basic shapes.

Here is a closeup of the card.
Patchwork heart was enlarged to approx. 3 inches.
Card front shape and card size is 5x5 inches.
It has been distressed at edges,
with punch holes added for a ribbon.
Fabric patches were cut using the Silhouette Cameo
and fabric that was prepared with paper-backed fusible web,
then pieces assembled and fused onto the base shape.


Wednesday, December 4, 2013

Fabric Gifts Using Cut Shapes: Group 1

Cutting fabric shapes is very easy and fun
with the Cameo and the Silhouette system.
Here are five quick projects (stocking makes a "guest" appearance) 
using shapes from the cut file titled
Christmas Basic Shapes
from SnapDragon Snippets.
The appliques are cut from fabric that has been prepared
by fusing a required size square or rectangle to
paper-backed fusible web (Silhouette has a product
they call "fabric interfacing") such as Heat N Bond light.


APPLIQUE PREP STEPS:
A. Select your applique shape, size it appropriately, then check the "selection" design measurements on your Cameo or Silhouette screen. Add approx. 1/2" on each side (that's 1" increase to the width and length measurements), then cut this size piece of fusible web (paper backed such as Heat N Bond light for sewing in, or Ultra Hold if you will NOT be over-edging because the project will not be washed). Fuse on fabric backside according to product directions, then trim fabric to match paper size. Cut following Silhouette's recommendations. (See tutorial here.)

PROJECT #1: SPARKLING JUICE TALL SACK

1. Cut two 15"x7" rectangles (includes 1/4" seam allowances and wide opening hem). 
Fold in half lengthwise with face sides together and stitch one SIDE seam. Over-edge or serge raw edges (here and throughout as desired). 

Center applique of choice approx. 3.5"-4" up from bottom edge on one of the panels, fuse and over stitch raw edges. Attach buttons for berries.

Open flat and press seam. At top edge, fold back a wide header hem of 3.25".


2. On front side of hem area, use temporary marker to make a stitching line at 3" from fold.

Open header hem flat, then re-fold with face sides together as in step 1 and sew second side seam. Also stitch across BOTTOM. Press seams flat as well as possible.


3. Prepare the bottom shaping seam: Re-fold the bag so that one side and bottom seam line up on top of each other at the center. From the end point that forms with this folding, mark a perpendicular stitching line 1.5". 


Stitch across on the marked line, locking stitching at each end.

Repeat folding, marking and stitching for the opposite side. Turn the bag face side out.


4. Fold header hem to the inside of the bag and re-press as needed. Stitch all around on the previously-marked line.

5. If desired, attach the center of a decorative double tassel cord at the hem stitching at the bag's center back by stitching across 3-4 times. Or attach or simply tie ribbon in the same place. 


PROJECT #2: DISH TOWEL

1. Prepare and attach fabric applique to your purchased dishtowel. Some styles will work best with applique centered from side to side. This towel with wonderful side edge stripes seemed best with applique near the left edge. Overedge the raw edges of applique, pulling stitching threads to the backside and tying off to secure. Clip threads. Attach buttons.


PROJECT #3: COASTER


Prepare, fuse and overstitch the holly leaf applique edges. This project uses a pre-finished linen coaster with faggot open stitching detail. You could also simply cut squares 3.5" - 5", layer face sides together, stitch around leaving turning opening, turn, press, and edge stitch.


PROJECT #4: FRAYED PLACEMAT


1. Purchase coarse weave fabric. approx. 18" yardage is required for this double-layered version per placemat. Cut two rectangles from the fabric. To do this and keep the grainline and edge yards parallel with the cut edges, start at one end of the cut edge of yardage and pull a yarn. Continue pulling to create a trim line across the edge. If the yarn breaks, trim along the yarn path until the broken end can be retrieved and the pulling continue all the way across.

Prepare a base square from contrast coarse weave fabric, large enough to give a margin beyond applique shape with approx. 3/8" fringe. Complete applique on base square, position and topstitch to top placemat rectangle in desired position. Attach buttons. Layer both placemats, topstitch securely all around (shorten stitch length) approx. 3/4" - 1" (fringe depth). They remove edge yarns from both layers to produce fringe.

PROJECT #5: SACHET HANGER BAG

1. Trace a tag shape on top layer of double layer of selected fabric. (For your own shape, trace 4" wide x 5" tall rectangle, then trace diagonal of a 1" square on each upper corner.) 
2. Trim layers 1/4" beyond marked lines.
3. Press 1/4" hem back along bottom edges. Unfold flat.
4. Complete applique on front of top layer. Attach buttons and other details.
5. Re-layer and stitch 1/4" around on all but hem edges; back-stitch to lock at opening.
6. Turn right side out, press flat.
7. Complete a 1/2" button hole at center top approx. 1/2"-3/4" from top  as a hang hole.
8. Fill with loose lavender or favorite potpourri. Pin and stitch across layers. Thread sachet hole over purchased padded hanger hook. 

Hope these ideas help with your gifting!