Showing posts with label quilt card. Show all posts

Sunday, March 10, 2019

Twisted Blossom Quilt Block Card

This traditional quilt patchwork block looks a little like 
a four-leaf clover, but can be “pieced” together 
in a color scheme of your choice. 
Composed on a background square with four quarter “petals” 
that have overlays joined to base patch shapes, 
plus center square overlay. 
Mix and match favorite paper and card stock prints 
for fun pattern play. 
Contrast offset card base layers create a narrow borders. 
Measures approx. 6x6 square when folded.

ASSEMBLY: 1. Identify and cut the shapes:
A card front base   B offset card front middle layer
C main card base
D "contrast" background triangles
E center triangles squares base background
F center patchwork triangles
G color #1 patchwork petal base shape with
 left & right curved overlay patches (2 sets)
H color #2 patchwork petal base shape with  
left & right curved overlay patches (2 sets)
2. Prepare the petal units by positioning the left
and right curved edge patches onto corresponding
areas of the petal base.
Prepare 2 of color #1 and 2 of color #2.
3, Locate the center guide marks on the card front.
Position the first petal unit at one corner location
so that the interior cutout shape of base lines up
with the same shape window in the petal unit,
with the center point aligned at center guide mark
cross hairs, and glue in place.
4. Position the second petal unit (from color #2)
in the next corner, align and glue in place.
5. Repeat to position the final two petal units
in alternating color arrangement.
6. Prepare the center triangle patchwork by
first locating the guide marks at the center of
each side edge.
Position the four triangle patches with the square
corners at the center, and the narrow edges at
the guide marks at side edges, and glue each in place.
7. Position the center patchwork unit over
the middle petal unit points so that the points of
the square match up with the window inner corners,
and glue in place.
8. Center the front panel assembly onto the contrast
card front with even margin all around.
9. Fit each background triangle into the recessed
window of the front assembly layers,
and glue in place. 
NOTE: you may wish to position the triangles into
the windows of the main background shape
before or any time prior to step 9, and use
small pieces of cello tape on backside
to hold them in place until step 9 when they
can be glued into place.
10. Prepare the main card base by bending back
on the center perforation line.
11. Center the card assembly onto the front of
the main card base with even margin all around,
and attach in place.

Wednesday, February 27, 2019

Patchwork Cathedral Windows 5x7 Card

A paper rendition of a traditional patchwork design, 
this card that fits into a 5x7 envelope features 
fold-over circles that wrap around 
twelve different print squares. 
Position the folded shapes edge to edge 
on the sawtooth top panel guideline grid. 
Attach twenty 3/16 " tiny buttons with thick thread 
or perle cotton at intersection hole punches, 
then attach to folded card front base. 

ASSEMBLY: 1. Identify and cut the shapes:
A card base (shown folded with TOP fold)
B sawtooth front card panel with
guide marks and stitching punch holes
C fold-over circle patches (12)
D "patchwork" squares (12 varied prints)
2. This project is follows the assembly steps
of a similar project "Cathedral Windows Quilt Card"
very closely. Please click on the title above to follow
steps 2-5 for that project to prepare the fold-over
patches and assemble as shown here on 
the sawtooth card front panel.
3. Follow steps 6-11 to complete the "stitching"
of the 20 buttons at the intersections, and
attach the card front to the base.
NOTE that these "patches" are arranged
for a top-fold 5x7 card. They can alternately
be arranged as a side-fold card.


Monday, November 27, 2017

Star Stepping Stones Quilt Card

Traditional quilt block features 
a layered center star with "diamond" points 
extending away, "stepping stone" squares 
cascading on the diagonals. 
Card front layer includes cutouts to accept 
the small squares and provide registration 
for center star. Measures approx. 6x6 when closed. 

ASSEMBLY: 1. Identify and cut the shapes:
A card front panel   B card back panel
C stepping stones cutout overlay
D front accent panel (shows as narrow border)
E center star (positioning guide - cut to match C)
F center square and 4 stone squares
G stepping stones  - four sets of 3
H left "diamond" star points
I right "diamond" star points
2. Position stepping stones cutout overlay
onto front of accent panel, with stepping stone
cutouts, offset with narrow border all around,
and attach panel.
3. Position and attach the center star
with corner angle cuts aligned with
corresponding square cut edges.
NOTICE that the star matches the overlay
"background" and thus disappears, acting
as a positioning guide for the "diamond" 
star points at the valley between its points.
4. Position and attach the center (largest) square
at the middle of the star.
5. Position the stepping stone squares into
the cutout positions, including at the top
open corners.
The sample uses three gradated greens,
darkest toward the center, lightest at corners.
6. Position the "diamond" star point pairs -
one left, one right - above the "disappearing" star
shape, taking care that the center edges
match up (this may involve adjusting positions
of diamond lower edges along the star shape).
7. Attach the card front to the card back
at the top edge an tab flange.

Here is the completed card.

Thursday, January 19, 2017

Cathedral Windows Quilt Card

Circles fold over patchwork squares to create 
a secondary pattern between and around 
the replica quilt, titled "Cathedral Windows". 
Sixteen buttons (3/16" to 1/4" size) are laced into place
at the corners and intersections to tighten. 
Sawtooth edge of center panel adds more interest. 
Measures approx. 5" x 5" when top folded. 

ASSEMBLY: 1. Identify and cut the shapes:
A main card base (top fold)
B accent base with positioning guide 
and needle lacing holes
C fold over circles (9)
D patchwork squares (9)
buttons: 16 count of 3/16" to 1/4"
2. Fold each of the flanges on each circle
forward . . .
. . . and fingernail crease them, then open backup flat.
3. Position one patchwork square, face outward,
back to back with the creased circle, centered,
and glue in place.
Make sure that the square's edges are all
a fraction in from the creases.
4. Refold the circle's flanges inward.
5. Arrange the patchwork units in the layout preferred,
then position and glue each one securely to
the overlay sawtooth square, with edges
precisely at the dash line grid.
As each unit is positioned, make sure it is
abutted as snugly next to its neighbors so that
no space shows between.
(The edges that match are intended to
simulate a sewn seam!)
Here is the patchwork sawtooth unit completed.
6. To complete the button attachment,
cut a 34" length of soft twine or perle cotton,
and secure one end with cello tape near
the top corner (or wherever you select).
7. Thread the twine onto the finest needle
through which twine will pass. Insert the needle
through the corner hole and pass twine
completely through to the front.
8.Thread the twine through first button, back to front,
then slide down into position flush with panel front,
then pass needle through second button hole . . . 
. . . and down through the same hole as before.
Pull twine all the way through to back, and
snug the button tightly against the paper corner.
9. Move across the top to insert needle into
the next available hole, and repeat the process.
Work across, then down to the next row and
across, etc., until all 16 buttons have been attached.
10. (NOTE that I changed twine colors after I
could see what the black looked like in the buttons.)
The needle and twine should end up at 
the backside of the card. Trim off excess
leaving approx. 1" tail . . . 
. . . pull tail tightly and then secure end
with a small piece of cello tape.
Here is the completed sawtooth panel.
11. Position and attach the sawtooth panel
onto the front of the card, centered.
Here is the completed card.
Change the coloration, add a tag, and this
little quilt card could double as a "new baby" card,
a Christmas card, a get well card, a birthday card,
or to coordinated with any holiday or occasion.


Wednesday, April 13, 2016

Garden Basket Gift Card Holder Assembly

Quilt patch styled basket with contrast 'stripe' 
presents hexagon flowers plus daisies 
and stylized bluebell fronds. 
Built up layers in the basket (lower half) base 
conceal a compartment for a standard gift card. 
Bouquet also has built up layers to create 
a channel into which the card slider top fits. 
Measures approx. 6.5" x 6.5" when closed. 

ASSEMBLY: 1. Identify and cut the shapes:
A upper front panel    B upper channel panels (5)
C upper back panel    D flower panel silhouette base
E flower base 'dome'   
F hex flowers (3) with center & 3 (ea.) hex overlays
G daisies base with 3 petal overlays, center
H right daisy with 3 petal overlays, center
I bluebell fronds, 3 ea. dot 'bells'
J basket main     K basket 'stripe'
L lower panel front
M lower card frame build up (3)
N lower card build up back
O lower panel back
2. Attach the 'stripe' to the front of the
main basket shape.
3. Position and attach the dome to the flower
silhouette base.
Also position the three hexagon flower shapes
over their side and center positions,
aligning outer/upper edges with the silhouette
edge shapes that correspond.
4. Position and attach the flower centers
in each flower.
Position and attach three hexagon overlays
onto each flower in alternating positions.
(This gives definition to ALL six hexagons 
of the flowers without needing SIX hexagons cut
separately.)
5. Prepare the daisy whole and right separate
blossoms by identifying where the separate
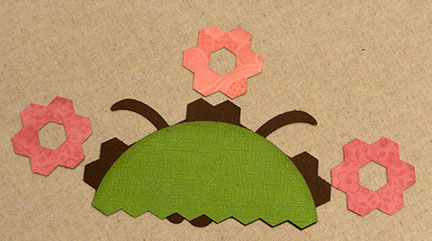
petal overlays will be positioned on top
of the bases (shown here near the base
shapes to which they will be attached).
Position and attach the green 'bluebell' frond
shapes on the whole daisy base.
6. Position and attach the petal overlays 
onto the daisies.
Position and attach the centers.
7. Position the separate right daisy flower
over the whole base silhouette,
align corresponding edges,
and attach.
8. Position the daisy unit over the green dome
and other flowers, etc., of the upper (flowers)
base, lining up the frond edges that correspond,
and attach in place.
NOTE that the 'bluebell' circle punches
are shown here in their relative positions,
but they will NOT be attached until
later in the assembly process.
9. Prepare the upper build up by attaching the
5 channel shapes one by one into a stack,
taking care to line up ALL edges as precisely
as possible (here and throughout).
NOTE: it may be helpful to use a flat weight 
to assist the attachment of each layer
and to keep the layers from curling undesirably.
10. Position and attach the upper back panel . . .
. . . and then the upper front panel to the appropriate
back or front surfaces of the channel panels build up,
continuing to line up the edges that correspond
as precisely as possible.
11. Position the flowers unit over the upper front
with the zigzag bottom edges that correspond
lined up, and the sides and top edges offset slightly,
and glue in place.
12. Prepare the lower build up by aligning and
attaching the three card frame shapes.
13. Position and attach (surfaces that correspond)
frame build up and lower build up back panel
(contains push-out hole).
14. Position and attach the lower build up front
panel . . .
. . . and then the lower build up back panel.
15. Position and attach the basket decor unit,
lining up the zigzag edges that correspond,
and offset inside slightly at sides and bottom.
16. To insert the gift card, slide it into
the frame opening by slipping it under the
lower front edges.
17. Close the card by inserting the frame
extension up into the channel, between
the front and back panel layers. . . 
. . . then push the upper and lower together
to fit the zigzag edges flush.